Ever since I received my PSOC 4 Pioneer kit from Cypress I have wanted to play with this little mixed-signal Programmable System-on-Chip (PSOC) developer board. I love developer boards, providing that they are priced in a way to entice me to not only open my wallet but also make time in a busy schedule. I think my kit was free after winning a swag bag from Adafruit that they themselves obtained at the Open Hardware Summit and gave away on their weekly streamcast. Ultimately it was the invitation to beta test datasheet.net which also was included in that pile of swag that led to my getting involved with Hackaday.
What is Programmable System On Chip?
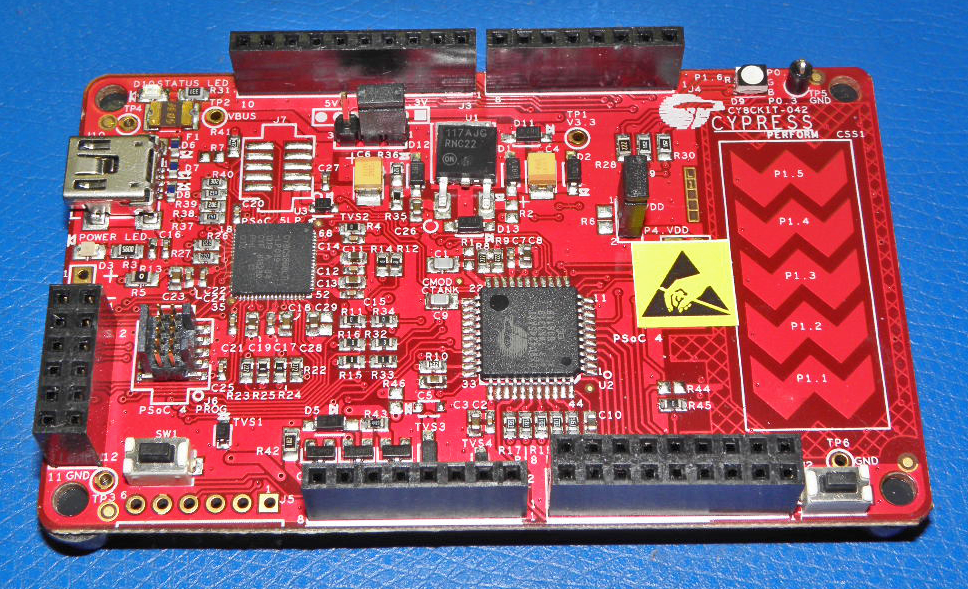
So what is a PSOC 4? A quick summary is that it’s based on an ARM Cortex reduced instruction set processor (RISC) and is somewhat capable of supporting shields based on the Arduino footprint, and it also uses a bright red PCB that I have come to associate with a Sparkfun PCB. What doesn’t show is the fact that this programmable system on chip has programmable analog function blocks in addition to programmable digital logic blocks. There is also some supporting input/output circuitry such as a multicolored LED and a capacitive touch sensor directly on the PCB.
This is an intriguing amount of programmability, so much so that Newark/Element 14 highlighted a “100 projects in 100 days” event on it.
Enter the IDE
Over the years I have had to create or install many Integrated Development Environments (IDE) that linked hardware to software. Knowing that you had to, and how to, implement an IDE was part of being an engineer. Nowadays with the Arduino type environment the user has an IDE pretty much as soon as they click on the executable which I find to be one of the best aspects of the genre. It was so quick in fact that I was able to get my teenaged son into writing his first program even before he remembered to do massive eye-rolls and make sounds of utter disdain. He did give up however, just shy of learning how to have the Arduino make sounds of disdain on his behalf.
Love Your Developer Board
So here is why I love cheap developer boards, you have standard hardware that in theory is already working, and demonstration projects are readily available to feed the IDE. Loading untested software code into a project that probably has hardware issues can present a bit of a challenge. Starting with either hardware or software that is already known to be working is a big plus as you don’t necessarily have to troubleshoot the difference between a jump out of bounds of the memory map or a blown address line, or both.
Setting up the IDE consists of downloading and installing PSoC Creator 3.0 from the Cypress website and clicking execute; I usually click “run as administrator” just because I can and it makes me feel superlative as if I have a role to play.
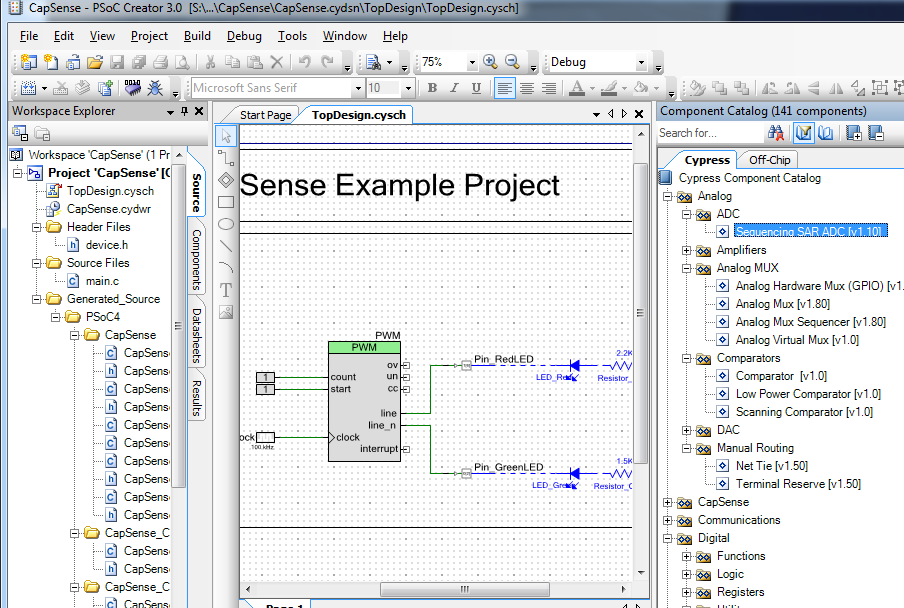
As mentioned above, Newark hosted a 100 Projects event and I have decided to try circuit #2 as a way of exercising all of the steps from selection and compiling to download and use. Simply put this example changes the color of the multicolor LED based on where the user touches the capacitive sensor.
Build and Run
Compiling and running the example was accomplished by a rapid-fire succession of mouse clicks, with the only pause being for the “clean and build” step. A quick click on “Debug” and the “Program” completes the process and a quick test showed the color of the LED changing based on where the capsense (capacitive sense) slider gets touched. At this point both analog and digital components have been included and configured based on a one sheet schematic.
So why do this? What is the significance of having analog compiled along with digital when the user can just utilize an add-on solder-less breadboard? The answerer is that you absolutely could implement the same designs using external analog components, especially since not all circuits can be realized with the PSOC architecture. However if you are into having more than one screwdriver in the box you will appreciate this version of having multiple answers to a problem. You might like the fact that you can re-implement a design by just pulling it from disc and not have to rebuild the solder-less breadboard (or keep the circuit built for two months in case you might need it, which you do 3.45 months later)
You may also appreciate the cleanliness of a design where most of the support circuitry is tucked up in the chip itself, not to mention real life issues with noise and reliability.
Or you might like it because it is kind of cool to compile analog.
In my case I think it’s kind of cool.


Nice post! A couple of things worth noting:
– The PSoC 4 MCUs are on special for the next few months for $1 each!
– The PSoC 5 is substantially more powerful, particularly when it comes to analog, than the PSoC 4.
– PSoC creator is Windows only :(
Another thing to add:
– The PSoC 1, while much less capable, is available in breadboard-friendly DIP package.
Currently working (albeit slowly) on an addressable RS232/RS485 ‘router’ of sorts for an underwater camera system. The biggest PSoC1s can handle 4 simultaneous UARTs so it simplifies things quite a bit.
Love the touch sensor with the ESD warning sticker right next to it :D
I always think that that Icon is the same one on my lawn mower saying you get your fingers chopped off if putting them in too far.
Check out jon moeller’s Freesoc. it was Kickstarted.
It’s a pretty cool device, I’m using it for my coffee brewing robot arm. It was frustrating to transition to from arduino, but it’s a really nice package once you figure out it out!
Programmable analog sounds impressive, but it appears you only get 2 opamps, an ADC, and an analog mux.
Yes the various PSOCs have various blocks available to them, in this case I used the board that was in stock, I think I would look at the PSOC5 for something new.
freesoc
Awesome video Bill. Looks like a fun piece of kit.
Also, the barebone dev kit for the PSoC4 is only $4.
It uses a USB-to-UART chip for programming the PSoC4 instead of the PSoC5 that’s on the pioneer kit. The USB chip can also do I2C and SPI, so I see it as a $4 I2C bridge with a PSoC4 thrown in for free!
nice
Do you have a link?
$4 board: http://www.cypress.com/?rID=92146
CY8CKIT-049 seems only can programming the PSoC4 on the prototyping kit.
If I want to buy a new PSoC4 chip, I can’t program the new chip’s bootloader using CY8CKIT-049, only by Pioneer Kit and MiniProg3 is the possible way to do so.
Am I correct?
@Flenser: Kris posted the link, just click his name.
P.S. Sorry for my english if its not good enough. :-(
Sorry. I don’t post here very much. I put the link in the wrong place.
Yeah, the prototype kit has the USB-to-UART chip for programming, so you can only bootload the PSoC4 with that chip. But the SWD pins on the PSoC4 are brought out to the header pins, I believe. So if you don’t want to bootload it, you can flash the whole chip with a Miniprog3. (I assume you can use the PSoC5 on the Pioneer kit, as well, but I can’t remember if the SWD pins are brought out to a header, so I can’t say for sure.)
Bill,
I run the Software division at Cypress and am responsible for Creator.
Id love to chat with you about your experience.
If you are willing drop me a note.
It looks like a system on a board to me.
Nice article. Until now I didn’t know about Cypress, and now I do.
It’s not that I would immediately obtain one and start to try to program it, but it’s good to know what’s out there. Thanks for sharing.
We used to rock Cypress memory back when I was doing very wide DSP based machine vision. Sometimes you just need a well behaved 8ns RAM. We always knew that if we failed to get everything just right we could use dual-port RAM, to solve the problem but at a cost of the other engineers throwing things at you as they walked by.
I will check out FreeSOC. Thanks for the lead!
How much did Cypress for this article? Scam, if you ask me.
If you think this is product placement, no, we do not post paid content.
The IDE looks great. Downloading it now. I will get some of the cheep $4 boards.
cheap boards by cheap cypress, tehy used to do free samples, now they even charge for shipping + they are sending me to my local distributor that does direct $ => Euro x2 conversion before thinking about selling anything to me.
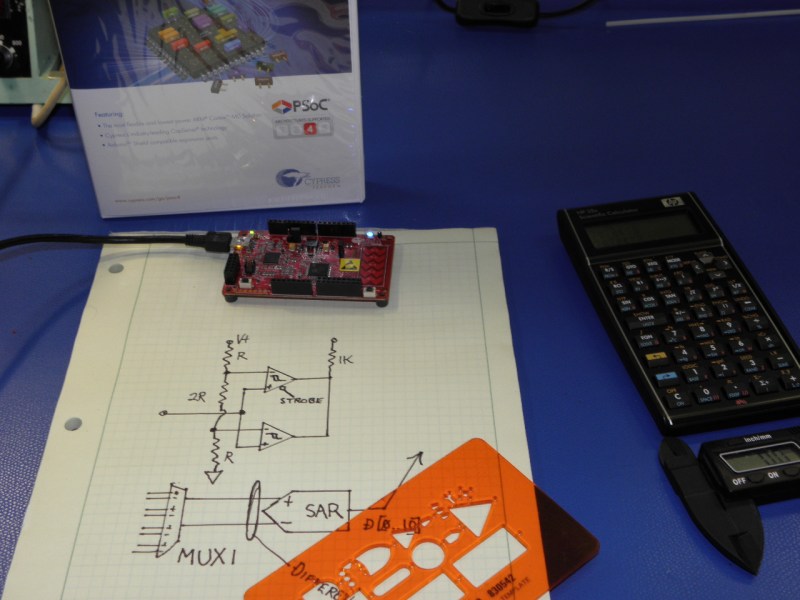
I just want to know where I can find that orange block diagram template in the first picture.
Yeah, and with the HP calculator on the side and a hint of a Weller soldering station in the back it’s a nice geek-cred setup ;-)
Not in orange…
http://www.ebay.com/itm/390791836762
Start shopping here http://www.amazon.com/s/ref=a9_sc_1?rh=i%3Aaps%2Ck%3Adata+flow+chart+drafting+stencils&keywords=data+flow+chart+drafting+stencils&ie=UTF8&qid=1402968189 I’m sure none of them are as thick as the stencil in photo appears to be. That camera angle make the paper is a 1/4″ thick going by the ring binder holes
Now that I’ve read your Programmable Logic II article, I’m wondering about the ability to program the PSoC 4 in verilog – from reading the datasheets it seems it is possible, but I can’t figure out if the UDBs are able to be programmed through verilog or if they require using the PSoc creator.
You can reprogram the UDBs in the PSoC series using an HDL – VHDL rather than verilog if I recall correctly, though I haven’t tried it yet.
Hey I am new to PSOC 4. I am using PSOC Creator 3 SP2. Can you please tell me how to print “Hello World” on LCD. I am not understanding how to connect E,R/W,RS to PSOC 4 Pioneer Kit.
Posting a request for someone to do your homework on an outdated thread is no way to go through life, son…