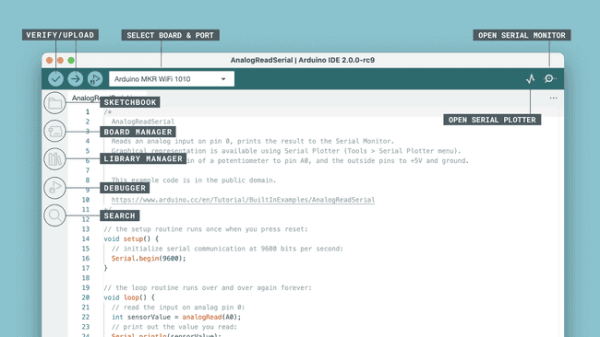
Arduino have released the latest version of their Integrated Development Environment (IDE), Version 2.0 and it is a big step up from the previous release, boasting plenty of new features to help you to develop your code more easily.
As the de-facto way for beginners to get into programming hardware, more experienced users have sometimes complained about what they see as the over-simplistic IDE — even lacking relatively basic features such as autocomplete. The new version provides this, and much more besides. Continue reading “Arduino IDE 2.0 Is Here”→
Pascal is not one of the biggest programming languages these days; it’s fallen into the background as the world moved on to newfangled things like C#, Python and Java. However, the language has its fans, one of whom put together a new compiler which targets retro platforms – and it goes by the name Turbo Rascal.
The list of supported platforms is extensive, with Turbo Rascal able to compile highly-optimized binaries for the C64, Amiga 500, BBC Micro, IBM PC, Atari ST, Game Boy, Amstrad, NES, ZX Spectrum, and more. There’s a usable IDE and even an included graphics editor for getting projects put together quickly. Also known by its full name of Turbo Rascal Syntax Error, or TRSE, it’s the work of one [Nicolaas Groeneboom].
The compiler runs on 64-bit Windows, Linux, and OS X, and there are extensive tutorial videos available on YouTube, too. Thus, there’s no excuse not to start developing a new retro game immediately. Check out the demo video below, and remember – as long as we keep using it, Pascal isn’t dead!
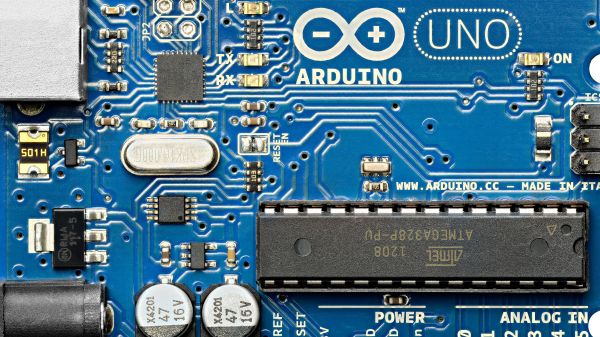
We’ve all become familiar with the Arduino ecosystem by now, to the point where it’s almost trivially easy to whip up a quick project that implements almost every aspect of its functionality strictly in code. It’s incredibly useful, but we tend to lose sight of the fact that our Arduino sketches represent a virtual world where the IDE and a vast selection of libraries abstract away a lot of the complexity of what’s going on inside the AVR microcontroller.
While it’s certainly handy to have an environment that lets you stand up a system in a matter of minutes, it’s hardly the end of the story. There’s a lot to be gained by tapping into the power of assembly programming on the AVR, and learning how to read the datasheet and really run the thing. That was the focus of Uri Shaked’s recent well-received HackadayU course on AVR internals, and it’ll form the basis of this Hack Chat. Then again, since Uri is also leading a Raspberry Pi Pico and RP2040 course on HackadayU in a couple of weeks, we may end up talking about that too. Or we may end up chatting about something else entirely! It’s really hard to where this Hack Chat will go, given Uri’s breadth of interests and expertise, but we’re pretty sure of one thing: it won’t be boring. Make sure you log in and join the chat — where it goes is largely up to you.
Click that speech bubble to the right, and you’ll be taken directly to the Hack Chat group on Hackaday.io. You don’t have to wait until Wednesday; join whenever you want and you can see what the community is talking about. Continue reading “AVR Reverse Engineering Hack Chat”→
One of the nicest amenities of interpreted programming languages is that you can test out the code that you’re developing in a shell, one line at a time, and see the results instantly. No matter how quickly your write-compile-flash cycle has gotten on the microcontroller of your choice, it’s still less fun than writing blink_led() and having it do so right then and there. Why don’t we have that experience yet?
If you’ve used any modern scripting language on your big computer, it comes with a shell, a read-eval-print loop (REPL) in which you can interactively try out your code just about as fast as you can type it. It’s great for interactive or exploratory programming, and it’s great for newbies who can test and learn things step by step. A good REPL lets you test out your ideas line by line, essentially running a little test of your code every time you hit enter.
This is your development environment
The obvious tradeoff for ease of development is speed. Compiled languages are almost always faster, and this is especially relevant in the constrained world of microcontrollers. Or maybe it used to be. I learned to program in an interpreted language — BASIC — on computers that were not much more powerful than a $5 microcontroller these days, and there’s a BASIC for most every micro out there. I write in Forth, which is faster and less resource intensive than BASIC, and has a very comprehensive REPL, but is admittedly an acquired taste. MicroPython has been ported over to a number of micros, and is probably a lot more familiar.
But still, developing MicroPython for your microcontroller isn’t developing on your microcontroller, and if you follow any of the guides out there, you’ll end up editing a file on your computer, uploading it to the microcontroller, and running it from within the REPL. This creates a flow that’s just about as awkward as the write-compile-flash cycle of C.
What’s missing? A good editor (or IDE?) running on the microcontroller that would let you do both your exploratory coding and record its history into a more permanent form. Imagine, for instance, a web-based MicroPython IDE served off of an ESP32, which provided both a shell for experiments and a way to copy the line you just typed into the shell into the file you’re working on. We’re very close to this being a viable idea, and it would reduce the introductory hurdles for newbies to almost nothing, while letting experienced programmers play.
Or has someone done this already? Why isn’t an interpreted introduction to microcontrollers the standard?
This article is part of the Hackaday.com newsletter, delivered every seven days for each of the last 200+ weeks. It also includes our favorite articles from the last seven days that you can see on the web version of the newsletter.
Want this type of article to hit your inbox every Friday morning? You should sign up!
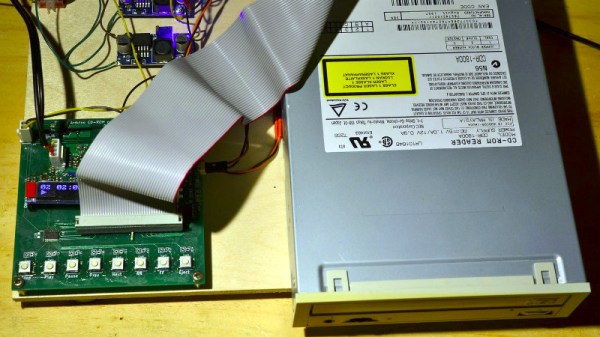
In an age of streaming media it’s easy to forget the audio CD, but they still remain as a physical format from the days when the “Play” button was not yet the “Pay” button. A CD player may no longer be the prized possession it once was, but it’s still possible to dabble in the world of 120 mm polycarbonate discs if you have a fancy for it. It’s something [Daniel1111] has done with his Arduino CD player, which uses the little microcontroller board to control a CD-ROM drive via its IDE bus.
The project draws heavily from the work of previous experimenters, notably ATAPIDUINO, but it extends them by taking its audio from the drive’s S/PDIF output. A port expander drives the IDE interface, while a Cirrus Logic WM8805 S/PDIF transceiver handles the digital audio and converts it to an I2S stream. That in turn is fed to a Texas Instruments PCM5102 DAC, which provides a line-level audio output. All the code and schematic can be found in a GitHub repository.
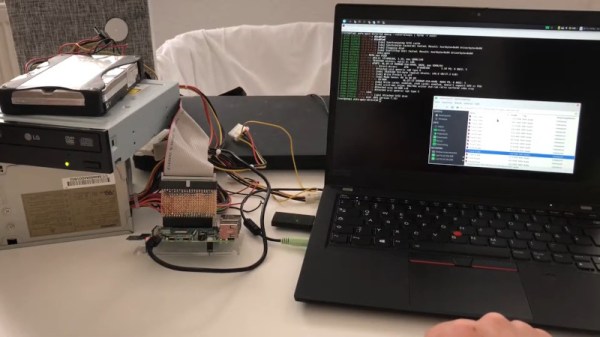
By and large, the Raspberry Pi is a computer that eschews legacy interfaces. Primarily relying on SD cards for storage and USB ports for further expansion, magnetic hard drives are a rare sight. However, [Manawyrm] decided that some 40-pin goodness was in order, and set to making a PATA IDE adapter for the platform.
To achieve the task of interfacing now-vintage IDE devices with the Raspberry Pi, [Manawyrm] elected to use the single board computer’s GPIO pins to get the job done. 23 pins are required, with 16 used for the data bus, with the rest dedicated to address lines, strobes, and other features.
The adapter is no speed demon, netting 800 KiB/s on reads and 500 KiB/s on writes with a Raspberry Pi 4. The main bottleneck comes from relying on libgpiod, which [Manawyrm] readily admits is designed for general IO tasks, not data transfers. Despite this, it’s still fast enough to play an audio CD from an IDE CD-ROM drive without skipping. A kernel build is required, however, as Raspberry Pis are unsurprisingly not configured to use ATA disks by default.
Obviously, more serious applications would substitute a dedicated USB hard disk adapter or give the Raspberry Pi a PCI-express (PCIe) card for sata drives instead, but that doesn’t discount the fun inherent in the build. While it may be slow, it shows that talking to PATA hard disks is actually quite straightforward when you understand the basics. Of course, if you want to do the opposite, and have your Raspberry Pi emulate a PATA disk, that’s possible too. Video after the break.
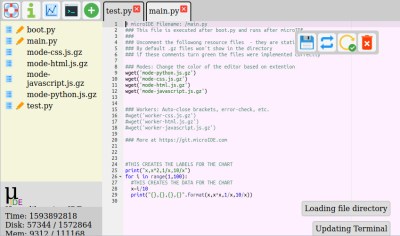
What if your microcontroller IDE was running on the microcontroller itself and not hosted on the computer you use to do the programming? The greatest legacy of Arduino in all its forms has arguably been a software one, in that it replaced annoying proprietary development environments with one that installed easily on a range of operating systems, was easy to use, and above all, worked. The next level of portability is to get rid of any specialize computer-side software. [Ronny Neufeld] wrote MicroIDE for ESP32 as an IDE accessible through a web browser, which interestingly is hosted on the target device itself.
Using the IDE is easy enough, install a binary, connect to the ESP with a web browser, start writing MicroPython code. There is a choice of connecting directly to the chip as a hotspot, or connecting via another WiFi network. The interface is looking pretty slick but he’s at pains to remind us that it’s a work in progress. Sadly there is no source code yet as it’s a binary distribution that is free for non-commercial use, we’d hope that an open-source release might one day happen. It’s not for everyone, but the convenience of accessing the same interface from almost any modern device should help attract a healthy community.
This appears to be the first web-based on-chip ESP IDE we’ve shown you. But it’s not the first on-chip coding example, as this BASIC interpreter shows.


 Using the IDE is easy enough, install a binary, connect to the ESP with a web browser, start writing MicroPython code. There is a choice of connecting directly to the chip as a hotspot, or connecting via another WiFi network. The interface is looking pretty slick but he’s at pains to remind us that it’s a work in progress. Sadly there is no source code yet as it’s a binary distribution that is free for non-commercial use, we’d hope that an open-source release might one day happen. It’s not for everyone, but the convenience of accessing the same interface from almost any modern device should help attract a healthy community.


