[Anton] recently acquired a broken Nintendo 3DS. When the power button was pressed, the device would start booting up only to shut back down after flashing a blue light and making a popping sound. It turns out this problem is pretty common with the 3DS.
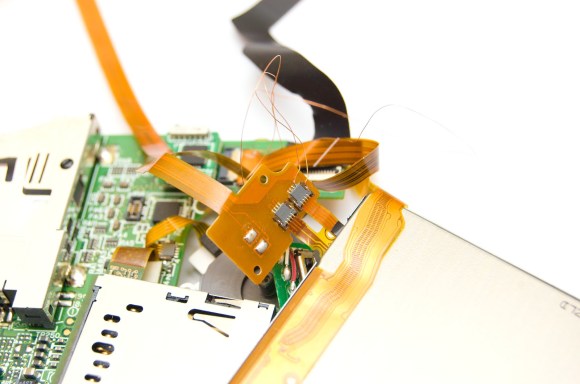
[Anton] could have tossed this device into the landfill, but where’s the fun in that? Instead, he cracked the device open like any self-respecting hacker would. It didn’t take him long to discover two broken flex ribbon cables. [Anton] could have then searched for replacement cables, but his inner hacker told him he could repair this himself. He carefully scraped the insulation off of the broken traces and then soldered on some hair thin wires to bridge the gap.
All that was left to do was to glue the wires securely in place and feed them back through the hinges. This project is a great example of how a little determination and know-how can keep a useful device from the landfill. If you attempt this repair yourself, you may find this 3DS teardown to be a helpful reference. What devices have you been able to save from an untimely demise?


Apparently HaD gave this guy’s server the Hug of Death.
http://webcache.googleusercontent.com/search?q=cache:qaOINgJJvtQJ:blog.avrnoob.com/2014/05/lets-quickly-fix-nintendo-3ds-shuts-off.html+&cd=1&hl=en&ct=clnk&gl=us
Beautiful!!!!!
Recently did something similar. Same problem but more than a few damaged traces. Bought spare parts and presto! I must say, passing the ribbons wires through the hinge is a real pain (especially if the metal tube of the hinge is stuck in the plastic).
What’s impressive here is the soldering job. Also I can’t imagine the pain it would have been to get that back into the case.
I’m trying to figure out how tiny the wires are, and if the red and white wires in the background are just standard wires, it’s the kind of intricate soldering I couldn’t even dream of doing. I have trouble soldering ordinary wires sometimes…
That metal thing directly underneath is an SD card slot.
wow. Ok. That’s smaller than I thought then. At first I thought that was an SD card holder, but then decided it must be the cartridge holder.
My guess is about 40AWG. I’ve got a spool of that in my office, and it is indeed thinner than a hair, and quite tricky to solder.
It’s actually quite easy. Just melt a bit of solder on the copper trace (while keeping the solder iron melting the solder), and just poke in the wire through the solder. Be sure to not take too long holding the solder iron there as you might melt the ribbon cable’s plastic. You don’t even need to strip the tip of the wire since the solder will burn it away for you.
Are the ribbon cables not available for purchase?
They aren’t standard. Nintendo would be making their own ribbon cables (the length/routing is unique to the gameboy’s layout). So basically you have to buy from Nintendo if they even offer it or hope someone starts manufacturing a copy.
They are available for $4.5 or so from DX and alike.
A few years ago I bought a DS Light that was split in half for a few (too many) bucks. Ribbon cable (I’m sure there’s another name for them) was torn off at the connector to the lower PCB. I figured I’d melt the cable if I tried to solder to it.
Searching online I couldn’t find anyone selling the cable separate to the top screen module. Decided the cost of that wasn’t worth it and the DS has been sitting in a draw ever since.
The lower screen flashes once when you turn it on as well.
anyone who rescues plastic from the landfill deserves my respedct. awesome pulse job.
darn ipad keyboard. I meant respect.
Wasn’t there a project on here a while ago where someone made their own homemade ribbon cable? I thought I saw that on here but I searched and never could find it.
Props to him. I tried to replace the case on a DSi with broken hinges, using a kit with good directions, and still managed to completely destroy the thing :(
I did something similar a year or two ago with my wife’s laptop. The ground lead in the signal cable to the monitor had frayed to the point where it made only intermittent contact. I fixed it with a length of wire pulled out of an IDE cable. Of course, now it’s going bad again, and this time I sprung for the $10 for a replacement cable.
These replacement cables are available on eBay for about $8 delivered, but I would probably have also fixed it myself due to the fact that the last two flex assemblies that I bought I had to repair when I got them new anyhow. A new power switch/volume control flex cable for an IPad 2 came with the volume down switch permanently depressed, but the switch still not making electrical contact. I unsoldered one of the old switches from the original broken flex cable and soldered it onto the “new” one. A wifi flex antenna that I ordered from a different vendor, that was for the same iPad came without the center conductor of the coax soldered at all. I had to use my stereo-scope and needle point tip in my Metcal to repair these. I guess you get what you pay for; I could have ordered original Apple parts, I guess… :)
Saved my Tivo from the dump by opening it up and re-soldering a burned out the internal power plug connectors links to the motherboard. Nothing special but restored the device which was constantly rebooting before the fix. :-)
Nice fix.
So far I’ve replaced the screen on my Kindle Fire twice. The second time, I also found a bad USB Micro jack, and had to replace that as well. First time doing any kind of SMT in a long time. Got a new Weller 1/64″ tip for the job… yay for purchasing new tools : )
I saved an IBM Model M from landfill when school threw out old computer stuff. It was only missing few keys and cable.
I have an LCD monitor that suffered from the Capacitor Plague of ’02. I replaced all the caps on it’s power supply and it’s still working today on a daily basis! It’s a good feeling, no matter how trivial the repair was.
“All that was left to do was to glue the wires securely in place and feed them back through the hinges”
Feeding that goddam cable through the hinges is a job ten times bigger than mending the ribbon.
My day old Olympus digital voice recorder fell out of my shirt pocket into water but wasn’t noticed until the next day. The battery voltage had caused the power pins of the flash memory to completely dissolve. Needless to say, the unit was dead.
So I carefully ground away the epoxy package to expose the lead frame for the power pins. Some ~38 gauge bare copper strands were soldered from the lead frame to the adjacent circuit board traces. It came right up and still works well.
Wire smaller than 32 gauge isn’t very common at Radio Shack or such but is often found as the strands of multistranded flexible wiring. So, the total cost of the fix was zero.
Have fixed broken laptop LCDs before using pressure, seems that sometimes when they have vertical lines simply wedging a piece of foam rubber up against the case and tightening the screws up is enough to fix it for a while.
Also relevant, descratching screens using a UV ink marker is my own method, saved a £900 LCD from landfill :-)
Do you literally mean you used a UV marker pen on a monitor that had scratches and that removed them? Or am I lost in a land of technobabble?
Did a similar “microsurgery” recently and saved an EOS 1100D from becoming e-waste =-) -> https://blog.noq2.net/water-damaged-eos-1100d-err-01.html
greetings noq2