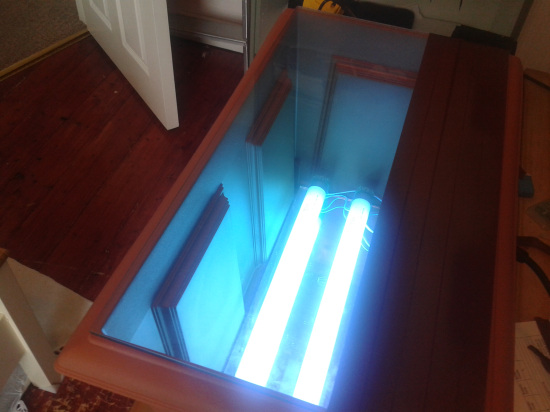
[Shane] needed a UV exposure box to help speed up the process of making PCB’s at home. Not wanting to spend a few hundred on one, he decided to design and build his own, using a planter box!
Why a planter box? To be honest, it was simply the first opaque container [Shane] found, so he decided to base the design around it. Inside the planter box are two 15W fluorescent daytime bulbs which output a similar amount of UV to normal sunlight. A mirror is placed below them to help reflect all the useful light out of the box. A pane of glass was cut to fit on top of the planter box, giving you a nice surface to place curing PCB’s on.
All in all, it’s a pretty simple and inexpensive method to make your own UV exposure box. We’ve also seen it done before using UV LEDs and IKEA picture frames — just make sure you don’t start tanning your hands while you’re working!


The easiest way to make an exposure box has always struck me as to use one of those UV nail curing lamps they sell on ebay for next to nothing.
Definitely. I’ve got one and it works really well.
Yes, easiest and cheapest. Only one side at a time, though (but so is this build).
It is overkill to use a pure UV source, and unles you have perfect transparencies you don’t want to anyway because light seepage through the transparency will expose what you don’t want.
All you need is a CFL bulb, about a 75-100W equivalent output will work fine. I use a desk lamp and position the board about 10 inches away from the lamp. I place a piece of glass over the top to hold the transparency flat . Expose the board to the lamp for 12 minutes and your done. No UV light dangers, nothing complicated , and it works every single time .
What is the exposure time for positive presensitized boards?
I made mine with 100UV leds from eBay (arround 5$), some resistors, perfboard, and a box I found at the 1€ store with the glass in the lid. About 1.5min exposure is perfect for presensitized positive boards.
I’m planing to add PIC based timer, but I’m lazy and the box is working ok as is
The other option is a “germicidal” fluorescent tube…clear with no phosphor. All UV, all the time. Just don’t look at it.
And the mirror on the bottom is a good idea, but unless you can look down and see FOUR tubes (two real and two reflections from the mirror), you’re not getting any benefit. It needs to be a bunch of mirrors, to reflect the image of the tube sideways, then up between the two tubes. Four strips at 45 degrees, I think would do it.
he’s right about the germ ones, they kill retinas real fast when looked directly at.
normal glass blocks most UV / UVB, i think they use quartz?
“germicidical”, “bug-attractor” and “blacklight” are 3 seperate and very different bulbs
Toner transfer with FeCl3 is cheaper.
Sometimes it’s not about cheaper.
I just did some boards with .1 mm traces, toner method never could have done that.
Once you get the hang of it you can do a double sided board from start to finish in under 1 hour. That includes applying the film, developing , removing, etching.
Mirrors don’t reflect much.
Very zen. I’d like to put this on a tshirt.