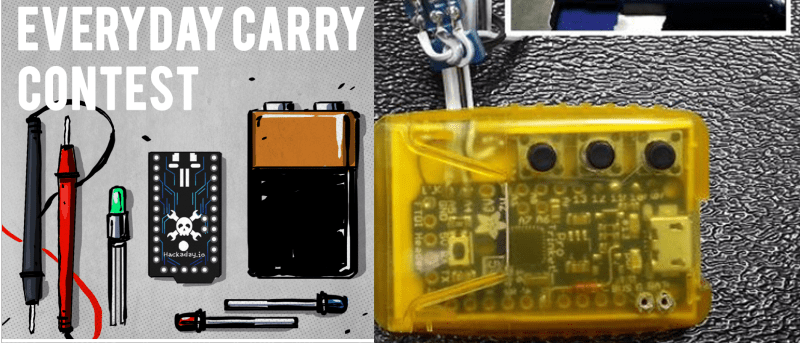
[Lou]’s entry for the Trinket EDC Contest is a great addition to the ubiquitous digital calipers found on workbenches and eBay resellers the world over. It translates the value displayed on the calipers to a USB HID interface for logging all those tricky measurements at the push of a button.
Most of the digital calipers you’ll find at Harbor Freight or on eBay are pretty much the same. There are two pads on the caliper’s PCB that give any microcontroller the ability to read what is being measured. It’s done with a 24-bit encoding scheme, where each bit is a nearly-BCD measurement in units of 1/1000 of an inch or 1/100 of a millimeter. After decoding the value, [Lou]’s trinket sends a few numbers to a computer over a USB HID interface.
Simply sending a measurement to a computer over USB wasn’t enough for [Lou]. He added three buttons to the project for typing multiple characters. The first button just sends Enter to the computer, the second sends a comma, and the third sends “/2 (Enter)”, exactly what you need to input the radius of something when measuring the diameter.
This was a project for the Trinket EDC Contest that ended a few hours ago. Nobody knows who the winner is, but there are some pretty cool prizes up for grabs including the new Rigol scope, a Fluke 179, and a soldering station.


Great use of the trinket. I’ve seen projects where the calipers are hacked to make scales for a mini lathe.
has anyone figured out how to keep these things from eating batteries other than pulling them after using?
I guess the answer is: buy a mitotoyo solar, like my father did..
That’s what I do. Perhaps a small slide switch and a new 3D printed housing?
nothing better than pulling out the calipers and realizing that you left the battery in…
I live 20 miles from the nearest hardware store.
why not 3d print a AAA battery compartment(with the switch) ?
so far I’ve opened up a couple of 12V alkaline batteries to get the button cells from those.
The Chinese ones never power off, they simply turn the LCD off. Makes bugger all difference to power consumption (10uA vs 12uA or something like that).
You can buy SR44 (silver oxide) rather than the usual LR44 (alkaline ones). The advantage is the voltage drops slower on the SR44 ones so they take longer to go ‘flat’. I’ve no idea what the difference is in real life though, I’ve just gotten used to putting in a new battery every six months or so.
from google search for “LR44 datasheet” or “Sr44 datasheet”
Energizer LR44: Nominal Voltage: 1.5 Volts. Typical Capacity: 153 mAh* (to 0.9 volts).
Energizer SR44: Nominal Voltage: 1.55 Volts. Typical Capacity: 200 mAh* (to 0.9 volts).
They usually gives discharge curves too. Saw some other SR44 has 153mAh.
The batteries for any Mitutoyo would probably last years, I’ve owned two and they don’t kill batteries. I didn’t even know they offered solar models. I’ve also done well with Fowler calipers, they have an auto off feature. The super cheap calipers are a bit of a crap shoot on their battery life.
my father has had a mitotoyo solar caliper for about 20 years now. very nice tool.
My $18 Neiko calipers are still on their first button cell, the one that came IN the device, and I’ve had it for well over a year. Maybe I got lucky, or maybe there are some cheap Chinese calipers that don’t eat button cells like kids eat candies.
Not as accurate as the Mitutoyo, but I keep these around in case I forget to change batteries:
http://item.taobao.com/item.htm?id=35409852174
Probably have some distributors in the West.
Christ! why didn’t I bother to look. Ebay is infested with ‘solar digital calipers’ minus the pedo bear taobao watermarks.
all in the $10 range with free shipping.
yay, thanks Timilo
Yeah I know the feeling, I find that so annoying that I ended picking up a mechanical one with a dial when I happen to see it on sale.
My mechanical one with a dial never needed a battery in the last 15 years. :)
If you are running from USB all the time, then it is a matter of using a couple of silicon diodes as a shunt regulator and a series resistor to provide ~1.4V to the calipers. There is a 1.5V connection along with the signals. Remember to take out the battery.
You can make a battery holder out of copper clad boards. I have made AA and AAA holders. See my battery holder integrated with the rest of electronics on a PCB. The U shaped retainer doesn’t seem to be critical for regular usage. Not everything needs to be 3D printed.
https://tekkieneet.wordpress.com/2013/07/30/batteries-not-included/
I totally agree that not everything should be 3D printed but given that it’s replacing a small plastic case I thought this would be a good candidate.
You want something covering up the circuitry as the workshop can be a messy place, potting compound or Sugru might work well here too.
Cable tie a aaa battery holder to the back of the vernier, run 2 wires to the expansion plug. Don’t need a switch, the current is too low. Use a dry cell, not a rechargeable as you need nearly 1.5V.
Don’t feel bad about leaving the vernier on, the off switch only turns off the display, not the sensor. This means turning it off only drops the power maybe 20%. This is why you can move the vernier with it off, then turn it on, and its meaningfull.
I intend to do one of the often done digital caliper to microcontroller connections, to interface via USB, for a DRO. How do people shut off the auto-sleep thing? Or it keeps sending on the port as long as there is power (even when the LCD is sleepy)?