Digital To Analog To Digital To Analog To Digital Conversion

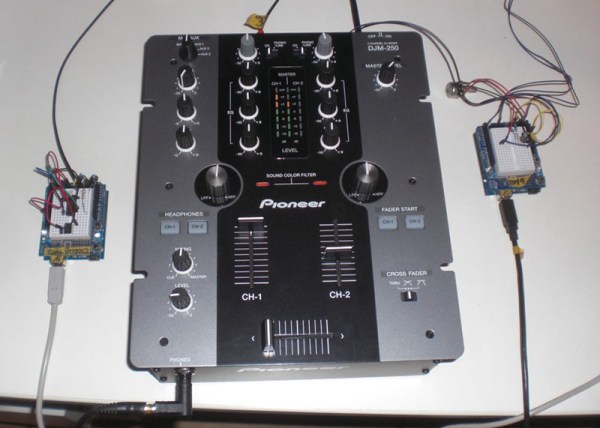
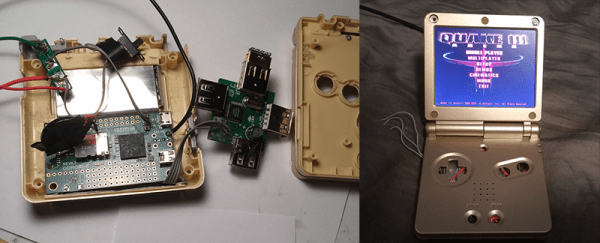
[Andy] had the idea of turning a mixing desk into a MIDI controller. At first glance, this idea seems extremely practical – mixers are a great way to get a lot of dials and faders in a cheap, compact, and robust enclosure. Exactly how you turn a mixer into a MIDI device is what’s important. This build might not be the most efficient, but it does have the best name ever: digital to analog to digital to analog to digital conversion.

The process starts by generating a sine wave on an Arduino with some direct digital synthesis. A 480 Hz square wave is generated on an ATTiny85. Both of these signals are then fed into a 74LS08 AND gate. According to the schematic [Andy] posted, these signals are going into two different gates, with the other input of the gate pulled high. The output of the gate is then sent through a pair of resistors and combined to the ‘audio out’ signal. [Andy] says this is ‘spine-crawling’ for people who do this professionally. If anyone knows what this part of the circuit actually does, please leave a note in the comments.

The signal from the AND gates is then fed into the mixer and sent out to the analog input of another Arduino. This Arduino converts the audio coming out of the mixer to frequencies using a Fast Hartley Transform. With a binary representation of what’s happening inside the mixer, [Andy] has something that can be converted into MIDI.

[Andy] put up a demo of this circuit working. He’s connected the MIDI out to Abelton and can modify MIDI parameters using an audio mixer. Video of that below if you’re still trying to wrap your head around this one.

Continue reading “Digital To Analog To Digital To Analog To Digital Conversion”

The Smallest Portable Pi

What do you get when you take an extremely small Raspberry Pi clone and stuff it inside a Game Boy Advance SP? We don’t know what to call it, but it’s probably one of the best portable gaming machines ever made, able to run emulators ranging from the Apple II to playing Quake III natively on a tiny flip-top display.

This isn’t the first time we’ve seen [frostedfires]’ work on a tiny system stuffed into a Game Boy. The initial post on this build over on the bacman forums just covered the basics – getting an Odroid W up and running, and putting Quake III on the tiny display. Now that the build is complete, we can get a look at what it takes to turn a Raspberry Pi clone into one of the smallest portable projects we’ve ever seen.

Using a Raspi clone as the only component in a tiny portable emulation station isn’t possible, so [frostefires] added a few other bits of electronics to make everything work. There’s a joystick from a PSP in there to work as the mouse, a few extra buttons in addition to the stock Game Boy ones, A USB hub, WiFi adapter, speaker and amplifier, a battery and the related charging electronics, and a Teensy 3.1 to handle all the input.

It’s a very impressive build that can run emulators ranging from the Apple II to later generation Nintendo consoles and handhelds (including the Game Boy Advance), but since the HDMI connector is availble on the outside of the case, [frostedfires] can also use this as a tiny, portable media center. Check out the video below to see this Game Boy in action, playing Mario Kart and 1080p video.

Continue reading “The Smallest Portable Pi”

Boeing 777 From Manilla Folders, A 6+ Year Effort

The closer you look the more you will be in awe of this shockingly intricate 777 replica. The fully-articulating landing gear alone has over 2,000 parts and 200 hours of assembly, not even including the penny-sized tires with individually-cut lug nuts. All carved from manilla office folders by hand.

HAD - 777 WingA high school art architecture class in 2008 inspired this build by teaching a few papercrafting techniques. When [Luca] got a hold of a precision Air India 777-300ER schematic, he started building this 5 foot long 1:60 scale model. His project has received a fair amount of media attention over the years, including some false reports that he was so focused on the build that he dropped out of college (he did, for 2 years, but for other reasons). 6.5 years in the making, [Luca] is rounding the homestretch.

HAD - 777 Gear
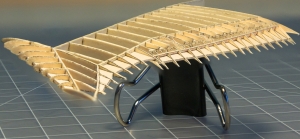
The design is manually drawn in Illustrator from the schematics, then is printed directly onto the manilla folders. Wielding an X-acto knife like a watch-maker, [Luca] cuts all the segments out and places them with whispers of glue. Pistons. Axles. Clamps. Tie rods. Brackets. Even pneumatic hoses – fractions of a toothpick thin – are run to their proper locations. A mesh behind the engine was latticed manually from of hundreds of strands. If that was not enough, it all moves and works exactly as it does on the real thing.

Continue reading “Boeing 777 From Manilla Folders, A 6+ Year Effort”

Automatic 3D Scanning On The Cheap

After hearing about a few 3D object scanners, [Will] thought one of these tools could find a place in his workshop. The price of these scanners made him reconsider simply buying one, so he just made one out of parts that were sitting around. This was the first version of his 3D scanner. It worked, but there were a few shortcomings. [Will] had to rotate the object manually. That’s a cheap way of doing it, but the method is tedious.

Now [Will] is back for round two. He’s made some improvements, and this time a few bits of electronics automate the process, allowing [Will] to hit a button, walk away, and come back to a scanned object.

Even though [Will] has improved his setup immensely, the theory of how to scan an object remains the same. He’s projecting a straight vertical line on an object, taking a few snapshots with a webcam, and reconstructing the object with computer vision algorithms and Meshlab. The new additions include a BeagleBone Black, a stepper motor and an EasyDriver from Sparkfun, and a turntable.

[Will] wrote two scripts for this project. The first does the mechanical heavy lifting – turning the stepper motor and taking a picture, while the second converts the output from the webcam to a point cloud. From there, the point cloud is sent over to Meshlab, and an object appears on [Will]’s hard drive.

There’s about $80 in hardware invested in this setup, and considering the inspiration for this project was the $800 Makerbot Digitizer, we’re going to call [Will]’s experiments in 3D scanning a success.

Peculiar Radial Mill From Car Parts

Whether 3D printer, lasercutter, or mill, most CNC machines use human-friendly, square-angle Cartesian geometry. This intriguing concept mill instead uses radial axes where motion is derived from scrap Chevy flywheels. It may look and feel weird at first, but it works – sort of.

Cartesian axes are intuitive. If you want to go to the right, increase X. If you want to go to away from you, increase Y. If you want to lift, increase Z. On a manual mill this is easy for making rectangles and blocks, or, with creative clamping, straight lines of any sort. But if you want to carve a circle? As we all learned on an Etch-A-Sketch, you increase your swearing and then throw it in the corner.

HAD - Radial Mill2[Jason] knew that with a CNC machine all geometry problems are reduced to math done by software. With two offset discs, any position is possible by rotating both the correct way. It may look odd that both plates drunkenly meander about just to draw a straight line but the computer is ambivalent. Software can be complicated without penalty and is free once written – more on that later. If a machine is physically simple then it can be built and repaired easily and cheaply. This design does away with almost all the familiar – and [Jason] argues complicated – components of normal hobby CNC machines. No slides, rails, carriages or belts here. His design uses only about a dozen parts.

Because automotive flywheels are made from cast iron the machine is rigid and naturally dampening. Sticking with the junkyard theme he pulled bearings from an F-450 truck, good for a few thousand pounds. Some steppers and a Raspberry Pi and he was done – well, sort of.

[Jason] let us know that his project has sat for long enough that he has become passionate about other things and decided to move on. He documented his progress and submitted the tip in hope to inspire someone else to continue the design further. Any type of CNC is possible, not just a mill. 3D printer perhaps?

Two big caveats: it needs a Z-axis (linear, probably standard) and there appears to be deeper-seated-than-expected G-code demands to chit-chat about rectangles and only rectangles. Nothing insurmountable, just nothing he has solved yet himself.

[Jason] said not to expect any further updates from him but he would love to see what the next person could do with it.

See the video after the break of the mill drawing our skull and wrenches logo, (soft of, without a Z-axis to lift).

Continue reading “Peculiar Radial Mill From Car Parts”

Reverse Engineering The Kayak Mobile API

The travel meta-search website Kayak apparently used to have a public API which is no longer available. We can’t say we mourn the loss of the interface we’d never known about. If you are someone who was automating their searches for that perfect vacation getaway deal, there’s still hope. But either way you’ll like this one. [Shubhro Saha] figured out how to access the API used by the Kayak mobile app. We like that he details how to sniff the traffic between an app and the internet and make sense of what is found.

His tool of choice is the Python package Mitmproxy. We haven’t heard of it but we have heard of Wireshark and [Shabhro] makes the case that Mitmproxy is superior for this application. As the name suggests, you set it up on your computer and use that box’s IP as the proxy connection for your phone. After using the app for a bit, there is enough data to start deconstructing what’s going on between the app and remote server which which it communicates. We could have a lot of fun with this, like seeing what info those free apps are sending home, or looking for security flaws in your own creations.

[Thanks Juan via Twitter]

Sega Controller Hack Updated For Windows Auto-Launch

Who knew that modern versions of Windows have nixed the option to auto-launch when a USB drive is inserted? Not a big deal unless, like [sonicdude10], you want to base a hack on the behavior. He did find a workaround and recently built a Sega Controller emulator to autoplay on Windows computers.

The bulk of the hack was inspired by a Sega Emulator built in a controller which he saw on Hackaday a couple of years back. It’s simply a Sega-like USB gamepad which has a hub and thumb drive internalized. The hardware changes on [sonicdude10’s] version gets rid of the old thumb drive and replaces it with one that supports U3. This is a hardware emulation trick supported by some USB drives which allows them to enumerate as CD drives instead of USB mass storage. Autoplay for CD drives is still functional in Windows.

We’ve heard a bit about U3 over the years. There was a now-dead hack covered all the way back in 2006. And we even found a comment suggesting its use for USB-based game emulators. [sonicdude10] points to two useful tools that let him customize how U3 performs. u3_tool is a multitool for tweaking how the hardware behaves, u3-autorun makes customization of the auto-launching app a snap.

Continue reading “Sega Controller Hack Updated For Windows Auto-Launch”