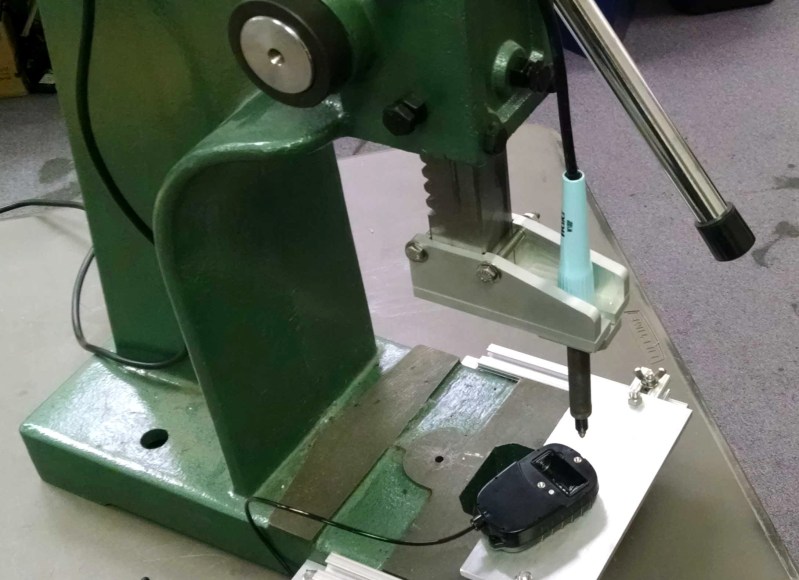
You might not know what a threaded insert is, but chances are you’ve seen one before. Threaded inserts are small metal (typically brass) inserts that are pressed into plastic to give a strong point of attachment for bolts and screws. These inserts are a huge step up from screwing or bolting directly into tapped plastic holes since the brass threads are very strong compared to the plastic. The only major downside to these inserts is that the press to install them is incredibly expensive. Thankfully, [Alex Rich] came up with a cheap solution: a modified soldering iron mounted to an Arbor press.
Commercial threaded insert presses typically use ultrasonic welding or heat welding to fuse inserts with plastic. [Alex] chose the simple route and went with heat welding, which (as you might imagine) is way simpler than ultrasonic welding. To provide the heat, [Alex] mounted a 100W Weller soldering iron to the press, which he says handles the impact with no problem. Unfortunately the copper tips of the Weller just wouldn’t hold up to the impact, so [Alex] made his own tips out of some brass he turned on a lathe.
If, like most people, you don’t have the capability of making injection-molded cases, let alone an Arbor press on hand, you’re not out of luck! Using this same technique people have successfully added thermal inserts to 3d-printed parts using a soldering iron and much smaller DIY presses. Have any ideas on how you could use thermal inserts in your 3d prints? Let us know in the comments.


Good idea, but I think that if it’s used enough that the tips are failing, repeated compression through the handle will cause mechanical failure of the heating barrel. It might be better (if more complicated) to braze an attachment point on the heated tip itself, then attach that to the press via an insulated mount so that compression force is only on the more durable tip.
You’re assessment is correct, but this particular iron has a really strong handle which will take a long time to fail. We used it to press over 5,000 #8 inserts on a product run last year. Plus the iron is like $50, not a big deal to replace.
Where did you source your inserts from?
I did a writeup on project page about this, hope it helps: http://hackaday.io/project/4529-threaded-insert-press/log/14760-threaded-insert-sources
Thank you. Good luck with your projects!
I usually use that putty-type epoxy with my 3D prints.
It won’t seep through thin walls, sticks well and is definitely harder than all print materials.
So I would design the holes in a way that the insert would fit fine, put putty into the hole and press the insert it.
Or make the hole so that the insert sits tight and then heat the insert with your soldering iron to melt into the surrounding plastic.
For 3d prints and one-offs I still use a soldering iron by hand to press threaded inserts. the only advantage of the press is for situations where you need precise repetition. You can make a fixture to hold your part, then use a z-stop on the press to get consistent insert depth.
That, and getting them inserted straight.
gnaa, I’m to late… working on the same setup, altough I build my own press. :D
Cool! Keep in mind, you can get an arbor press very cheap. The one we have is the bigger 3 ton press but only cost $200. Smaller 1 ton presses go for ~$50 and are a great starting point for a lot of different hacks.
I’m not sure of the forces involved, but when I need a quick and dirty arbor press, I use my drill press. Yes, it will not handle 1-3 ton pressing force, but to push out pinned inserts, or pushing in small bushings, etc. it works just fine.
And, as an added feature, if you plug it in, it drills holes!
I actually had this setup on our drill press at one point. That will work for sure, the power of the arbor press is overkill. I just didn’t like having a production setup on my drill press because it prevented me from using it.
would it be possible, do you think, to just use a piece of the appropriate sized allthread and the drill at high speed to friction weld the insert in place? Put the allthread in the chuck, spin the insert on, and then run the insert into the housing while spinning the drill at better than 1000 RPM. The heat from the friction should melt most engineering plastics.
I feel like spin welding is usually for plastic-plastic where both parts melt smooth surfaces together. You could give it a try, our call an insert mfr and ask.
I just make the hole a little larger and glue them in. but I can see if you are trying to do 100 enclosures with 4 in each, I would want this setup.
I usualy heat insert nuts into my 3d printed parts with a soldering iron.
Does anything hold the 80/20 on the sides of the arbor press?
Yes, that’s another hack unto itself! The arbor press base is cast iron which machines like butter. I drilled and tapped the sides of the press in a few places and then bolted the 80/20 rails to the sides. I then have a cross rail that I can bolt things to, move around in X/Y and lock in place. In the picture I have a flat plate, but for production I usually 3d print a fixture and bolt that to the cross rail. This lets me place the fixture exactly where I want it to minimize misalignment and other accidents.
not having a 3D printer, any plastic parts I make are molds filled with a 2 part or in one case, UV cured resin-not thermal set. Ive done inserts with coarser threads that are drilled and tapped in, secured with CA glues, or recycles inserts epoxied into place. Stinky but effective.
Curious – would a reloading press – such as the common RCBS Rock Chucker – would be a decent substitute? I’ve seen those presses (and similar) at rummage sales and such for very cheap.
You could probably make that work somehow. The open area is really small (roughly big enough for a bullet) so even if you got a soldering iron mounted to it you may not be able to fit the part that you want to press inserts into.
That and it would be sacrilege to use such a fine tool for something so trivial, If you have a 3d printer you could easily make something with gears and rod that would suffice. You could even make something out of wood with a swing arm that would work. Please leave the rock chucker and lyman’s alone unless you plan to exercise your dwindling rights.
Haha! Well said
Up to now I had the opportunity to set threaded inserts more often then to reload a cartridge. I do not own a firearm and in the rare opportunities to use one I happily used factory made cartridges.
Lol yes save that precious tool for taking care of your guns that are literally useless.
If you find a reloading press at a rummage sale for cheap, screw it. Use it however you like. It’s not like tools for guns are somehow holy or anything, despite the opinions of the gun nuts.
Hell you could just chuck it in a drill press and use that without turning on the motor, just operate the crank. I use my beater drill press for light arbor press work like driving small bearings all the time, and this would be way less stress on it.
My concern would be that a reloading press can apply enough force to crunch the soldering iron and plastic part, especially if adjusted to the over-center range.
No, those brass screw mount are NOT stronger than screwing directly into the plastic. I work with Laptops all day long and have to deal with those crappy m2, and m2.5 brass inserts. They are very difficult to repair(always popping out of the plastic), and are almost always broken, or at least the plastic that holds them in place that is. These inserts are just plain bad engineering. They look good on paper, but suck a big one in the real world.
I don’t work with laptops all day long, but I have seen a few failed threaded inserts. However, they looked like they’d been crammed in with mechanical force only, no evidence of heat, and had a different outer pattern suggesting they were designed for this usage. Maybe there are different types of these inserts, some better than others?
Things aren’t quite that black and white in engineering. Threaded inserts are more durable in cases where you need to use the threads over and over, like for a battery door. They hold well when the boss is designed properly and they are installed with heat so the plastic boss is in a relaxed state (not under stress of a press-fit). I have seen them last 10 years or more without failure. Self tapping screws are awesome, but only rated for tens of install cycles. They are great for instances where you install the screw once, I would agree that laptops should use these everywhere they can. This is mainly because they save money, size, and remove an assembly step. In an ancient laptop there are lots of other factors at play as well, you have plastic that has been sitting at elevated temperature for many years. This can dry the resin out making it brittle and weak. You also have an unusual amount of thermal cycling in a laptop as it heats and cools with use, threaded inserts are a dissimilar material. Over time if you’re cycling temperature the weaker material will eventually fail.
You don’t see the survivorship bias in your anecdote?
What about cold-press inserts like EZ Lok? I’ve used them in the past, pressed them in w/ a C clamp, or pulled them through with a bolt.
I’m a bit surprised to hear so many experiences & techniques with the thermal types – are they superior? Cheaper? Easier for some people to source?
Cold press inserts should only be used for thermosets where the plastic won’t melt and you have no other choice. They are inherently inferior because they stress the hole. If you call ez-lock and discuss they probably know more than I do, but they will tell you to use an ultrasonic insert for thermoplastics. The plastic melts and re-solidifies in a more or less relaxed state, so the hole is much less likely to split or crack over time when you install with heat. Ultrasonic inserts can be installed with a soldering iron for prototyping (or even production if you build a hack like this one).
Thanks! That makes sense. I only really used ez lok for low-stress applications like PCB standoffs in an enclosure – which is probably why I never had any issue with them.
If you’re 3D printing something that needs threads, just pause the print at the appropriate height (if you’re using cura there’s a plugin to do that automatically), insert a nut and then resume the print. Modelled correctly, you will lock the nut into your part. Works great.
That sounds like way more work than just putting it on the end of an iron and poking it in though. And if it goes wrong it could head crash your printer.
I use thermal inserts on my prints, and they are great! i use a mixture of M3-4 M8 flanged or not flanged. I prefer the flanged ones than the others nd have used a soldering iron tip to press them into the parts, no arbour just by hand.
I got mine from http://www.harrisonsilverdale.com/ (uk) although moq is 500 for some, but £48 for 500 (1000) beats the £5 for 10 on ebay!
used the to put into my wade extruder to mount my bowden connector onto it
By the way, they make heat insert tips for soldering irons that have a few advantages. Since it’s not tapered it won’t bind on the insert when the heat causes it to expand. It doesn’t allow the insert to gimbal around so it’s always nice and parallel with the iron. Also since it’s dedicated to plastics work you don’t have to worry about bottoming out and mucking up the tinning on a soldering tip.