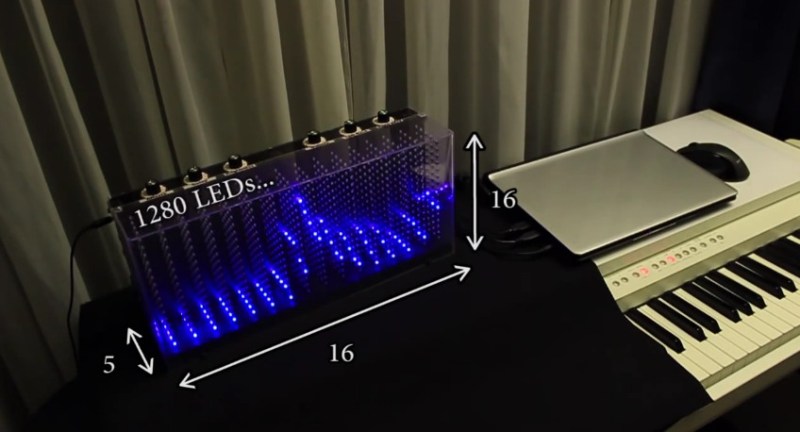
One of [Dooievriend]’s friends recently pressed him into service to write software for a 3d spectrum analyzer/VU that he made. The VU is a fairly complex build: it’s made up of 1280 LEDs in a 16x16x5 matrix controlled by a PIC32 clocked at 80MHz. [Dooievriend] wrote some firmware for the PIC that uses a variation on a discrete Fourier transform to create a 3D VU effect.
 When [Dooievriend] set out to design the audio analyzing portion of the firmware, his mind jumped to the discrete Fourier transform. This transform calculates the amplitude in a series of frequency bins in the audio—seemingly perfect for a VU. However, after some more research, [Dooievriend] decided to implement a constant Q transform. This transform is very similar to a Fourier transform, but it takes into account the logarithmic way that the human ear interprets sound.
[Dooievriend] started implementing the constant Q transform using an interrupt-based sampler, but he quickly ran into issues with slow floating-point math on his PIC32 (which doesn’t have a hardware floating-point unit). Thankfully he rewrote his code using fixed-point math, and the transform runs nearly real-time. Check out the video after the break to see the VU in action, and a second video that gives some details on the hardware build.


I want to make one and combine it with an infinity mirror.
My thought while reading the article. Need !
The making of video is the most impressive one. It must have taken hundreds of hours to build.
Very, very nice work. The “Making Of” video looks like it was almost as much work as the project itself. Top quality hack.
I have never seen such a well narrated how-to video. It was just enough to keep your interest with just enough detail as to not go over the top with techno babble. Great job guys.
I didn’t expect to watch the whole “making of” video… but it was so well done, that I did. Thanks for sharing.. and well done!
This is one of the best build videos I have ever seen. Nice work!
“.. constant Q transform. This transform is very similar to a Fourier transform, but it takes into account the logarithmic way that the human ear interprets sound.”
One thing to note here is that the BIN SPACING in the constant Q transform corresponds to musical notes. So 2 adjacent bins are also 2 adjacent musical notes (twelve-tone equal temperament).
The AMPLITUDE output id often already logarithmic, just like our hearing.
So while this might be a nice visualization for musicians, it servers no purpose as a spectrum analyzer for non-music related science.
don’t get me wrong here, i’m not dissing anything, I just thought that was unclear from the write-up.
It’s a very nice project, and technically it -is- a spectrum analyzer, but you can’t use it to test some filters for instance.
Nicely spotted; I agree! Also, the article is a bit wring on what the Fourier transform does:
> This transform calculates the amplitude in a series of frequency bins in the audio
No, it doesn’t. It calculates the complex coefficients that you’d have to multiply the n.th complex sine
e^(j * 2 * pi * n / l )
with j being the imaginary unit, and l the length of the transform. Based on these coefficients you *can* calculate the amplitude. Also notice that a digitized audio signal would usually be a real signal, leading to a symmetrical spectrum.
Isn’t the amplitude of any particular frequency component just the magnitude of transform at that point.
I’m impressed like I could do the hardware building part, but the programming I would leave up to someone else
I’m like the exact opposite. The programming is no problem but building all that stuff as accurately as he did would end up giving me a migraine. There’s so much that went into this build. And an at-home photoresist-based PCB setup is ingenious.
kudos … great work
Fascinating!!! The ‘Making Of’ is so well worked as the project itself!
I loved the laser cutter and sketchup. Video was worth the watch!
So cool!
Making of was pure gold, not only how it was made but how he solved all the little problems along the way. From sorting the LEDs by brightness to figuring out how long to expose the PCB to UV light.
I want to see a long exposure photo of this, set to the mode visible in the animated GIF, and mounted on a linear actuator (with the axis aligned along the VU meter’s thinnest dimension) to create a long, volumetric plot of the sound.
Great Making off, great build, read his youtube description, he had to REDO the soldering of over 1000 leds !
Just for fun, the word PCB was used 47 times in the video.
“the word PCB was used 47 times in the video”
In the club house…. Drinking game alert!
The project is simply amazing. The “making of video…” EPIC!
Thank you for taking the time to not only building this great project, but to also document your build so thoroughly! Bravo!
I’m completely in awe here. And I can’t give the builder enough credit for the making of video. So much great information, so many great tips, and such a professional build.
Hat’s off!
Wonderful to observe and would purchase one in a heartbeat if such a device was for sale in kit form. Please post back if you do ever make a kit version of this :D
I would like to see an 88 note version of it mounted in the top of a piano. I won’t do the math.
Shut up and take my money & when is the RGB LED version coming out? :)
Gorgeous build and a very nice video to boot :) I doubt I will ever build anything this cool but it is what I always wanted after my first viewing thru a wav editor many years ago. Great job and hope you guys enjoy your beautiful device :)
I’m impressed, but a little surprised that audio input is located near the top, it would be a relatively small thing to put it lower so the cable isn’t dangling so visibly. It’s odd after all that meticulous precision you see in the making-of video..
But it can be altered later though.
i hope to see this in my car one day :)
Beautiful device.
is this made in Belgium ?
He might actually not be yuri gagarin.
And talking of which, ‘NASA’? That just insulting.
The video accent has a hint of spanish to my ears BTW, but maybe I’m wrong.
Sounded French to me, if only because of the way he used many of the words. The accent was definitely European though.
it’s not the accent, it’s the water bottle
Reblogged this on Julio Della Flora.
Hi guys,
A friend of mine told me that my 3d spectrum analyser was on hackaday. After reading all these comment I’m just humbled and overwhelmed! Thank you all! I hope you learnt a lot from the making of video.
Here are the answers to some of your questions:
– I’m from Belgium. I’m not sure which accent you hear in the video but in Belgium we study Dutch, French, German and English. So pick the one you want ;-)
– I put the audio input near the top because most of the space in the box was taken by the PCB’s. There was not enough space for the audio jack to be put lower. A slight miscalculation but it’s not disturbing at all.
– Most of the ideas for the “making of video” came when I was biking from home to work and back. A lot of things in the video were added through acting for more clearness after the box was built.
– Unfortunately I cannot make more of this device because after soldering 10.000’s of leds my hands would fall off :-). But I will be uploading videos with this device hooked up to my piano.
Cheers!
Ratmir
Morning Ratmir,
Its an amazing project , I would like to build one, where I can get schematics , pcb and so on?
Please replay….
Andrea
hie Andrea , i m stuck with the same problem here , the schematics and pcb design , so in casee you find something please do tell me ,
thanks
Where can i find you project schmatic diagram and the soft code.
Thank you
Never generally watch a video all the way through but this was amazing – great job!
GOOD JOB !!!!!!! On the project and also on the videos ! Thank you for sharing.
This is awesome!!!!
Best build log video I think I’ve ever seen. Tremendous work.
id like to buy one
it looks awesome
if you use 3 colour leds and scale this up to just about impossible you could make a 3d tv
hie pianistos,
I love your video presentation , and your work inspired me to make one of my own , though i have never worked on any pcb designs before. from getting a copper plate to get the print on the plate is one of the toughest part for me , so can i request a complete step by step process on how you started and concluded , with the circuit board diagrams and also the procedure for making the pcb design . Its nowhere available on the internet .
Thanks for sharing your work
Will be waiting for your reply ..
Regards
Any luck with the complete details? I’ve been searching for the last two days, and started to lose hope ;'(