Build Yourself A Vacuum Tube VU Meter

Volume unit (VU) meters are cool — it’s an undeniable fact. For some reason, humans just dig lights that flash along with sounds. You can build a VU meter using LEDs, or bulbs if you’re trapped in 1972. Or, you could use special vacuum tubes. [mircemk] did just that in their latest VU meter project.

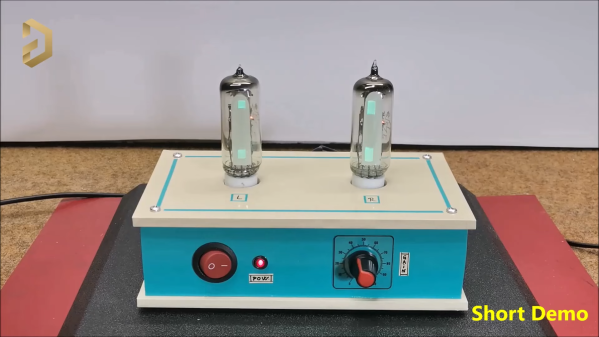
The 6E2 vacuum tube is the part for the job in this case. You might think a specialist tube like this is expensive, but they can be had for just a few dollars from online retailers. They were often used as tuning indicators, but here, they’re used as a responsive VU meter instead. However, instead of a single bar going up and down, you get a pair of bars that raise to meet in the middle.

[mircemk] explains all the circuitry required to drive the tubes, and how to hook them up to create a two-channel stereo VU meter. The final circuit largely relies on a transistor, a diode, some passive components, and a DC-DC boost supply to generate 250 V for the tubes.

The final result looks pretty neat, particularly as it’s built into an old-school blue project box. We’ve seen similar projects from [mircemk] before, too. Continue reading “Build Yourself A Vacuum Tube VU Meter”

Salvaged Meter Movements Really Pop In This DIY VU Meter Bridge

If you’re going to build a nice VU meter bridge for the recording studio, the first thing you need is a nice pair of VU meters. But lest you think it’s as easy as putting some meters into a nice box and calling it a day, think again.

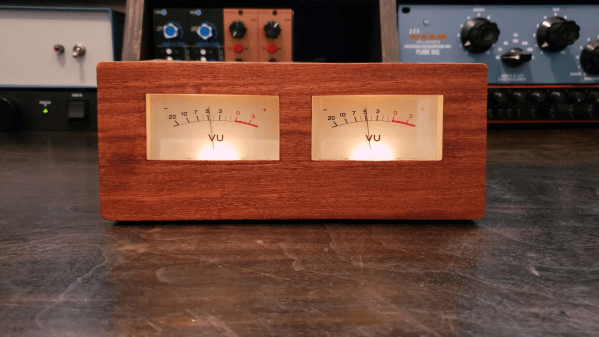
This project comes to us from [Frank Olson], whose projects usually incorporate wood as part of the mechanism, as with his famous wooden ribbon microphone. This build does indeed use wood, and to excellent effect, but only in the project’s final enclosure. Before that, [Frank] had salvaged a pair of good-looking moving coil meters from an old tape recorder. He muddled through some ideas before settling on a design. A NE5532 dual-channel audio buffer module is used as a preamp, with each channel feeding into a bridge rectifier before heading to the meter. Wisely, [Frank] chose to illuminate the meters with their existing incandescent bulbs, so a small DC-DC supply was added to provide the necessary 8 volts.

As for the enclosure, that’s where [Frank]’s experience working with veneers paid off. He chose mahogany, carefully cut all the pieces to shape with a knife, and glued it all up with CA glue — at least we assume it was CA; based on previous efforts, he uses a lot of the stuff. The tung oil finish looks fantastic, and the completed build aesthetic looks great! The video below shows it all.

If you need some backstory on the VU meter, we can help with that.

Continue reading “Salvaged Meter Movements Really Pop In This DIY VU Meter Bridge”

Recreating The Quadrophonic Sound Of The 70s

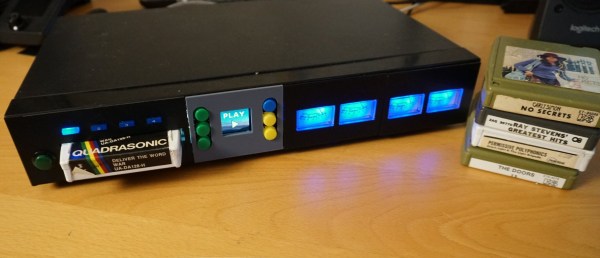
For plenty of media center PCs, home theaters, and people with a simple TV and a decent audio system, the standard speaker setup now is 5.1 surround sound. Left and right speakers in the front and back, with a center speaker and a subwoofer. But the 5.1 setup wasn’t always the standard (and still isn’t the only standard); after stereo was adopted mid-century, audio engineers wanted more than just two channels and briefly attempted a four-channel system called quadrophonic sound. There’s still some media from the 70s that can be found that is built for this system, such as [Alan]’s collection of 8-track tapes. These tapes are getting along in years, so he built a quadrophonic 8-track replica to keep the experience alive.

The first thing needed for a replica system like this is digital quadrophonic audio files themselves. Since the format died in the late 70s, there’s not a lot available in modern times so [Alan] has a dedicated 8-track player connected to a four-channel audio-to-USB device to digitize his own collection of quadrophonic 8-track tapes. This process is destructive for the decades-old tapes so it is very much necessary.

With the audio files captured, he now needs something to play them back with. A Raspberry Pi is put to the task, but it needs a special sound card in order to play back the four channels simultaneously. To preserve the feel of an antique 8-track player he’s cannibalized parts from three broken players to keep the cassette loading mechanism and track indicator display along with four VU meters for each of the channels. A QR code reader inside the device reads a QR code on the replica 8-track cassettes when they are inserted which prompts the Pi to play the correct audio file, and a series of buttons along with a screen on the front can be used to fast forward, rewind and pause. A solenoid inside the device preserves the “clunk” sound typical of real 8-track players.

As a replica, this player goes to great lengths to preserve the essence of not only the 8-track era, but the brief quadrophonic frenzy of the early and mid 70s. There’s not a lot of activity around quadrophonic sound anymore, but 8-tracks are popular targets for builds and restorations, and a few that go beyond audio including this project that uses one for computer memory instead.

Continue reading “Recreating The Quadrophonic Sound Of The 70s”

VU Meter Built With Neat Graphical VFD Display

VFD displays are beloved for their eerie glow that sits somewhere just off what you’d call blue. [mircemk] used one of these displays to create an old-school VU meter that looks straight out of a 1970s laboratory. 

The build uses an Arduino Nano as the brains of the operation, which uses its analog inputs to process incoming audio into decibel levels for display on a VU meter. It’s then charged with driving a GP1287 VFD display. Unlike some VFDs that have preset segments that can be illuminated or switched off, this is a fully graphical dot matrix display that can be driven as desired. Thus, when it’s not acting as a bar graph VU meter, it can also emulate old-school moving-needle meters. Though, it bears noting, the slow updates the Arduino makes to the display means it’s kind of like those dodgy skeumorphic music apps of the 16-bit era; i.e. it’s quite visually jerky.

Overall, it’s a neat project that demonstrates how to work with audio, microcontrollers, and displays all in one. We’ve featured other projects from [mircemk] before, too, almost all of which appear in the same blue and grey project boxes. Video after the break.

Continue reading “VU Meter Built With Neat Graphical VFD Display”

Build A Circuit Sculpture-Style VU Meter For Music

One of the coolest things any sound system can have is some kind of musical visualization. Thumping level meters that pump with the volume are a great example, and were particularly popular in the 1980s. Now, you can build a rainbow set with great response, thanks to this guide from [Invexlab World].

The build relies on a very simple circuit that relies entirely on analog electronics in lieu of the usual digital signal analysis usually employed for the job. It’s a barebones design that’s assembled using a jig to create the attractive circuit sculpture structure. It uses simple colored LEDs, assembled in a line with red at the bottom, stepping through yellow and green, to blue and white at the top. A series of diodes is placed in series, with the sound level having to exceed the voltage drop of successive diodes to light the higher LEDs. It’s intended to be directly connected to a speaker’s audio input, and thus likely does load down the amplifier output slightly.

The result is an attractive rainbow VU meter display that would look great as a part of any old-school stereo setup. We can imagine it would look even better if it was cast in clear resin. Video after the break.

Continue reading “Build A Circuit Sculpture-Style VU Meter For Music”

Teensy Spectrum Analyzer Has 170 Channels

While high-fidelity audio has come a long way in the past several decades, a lot of modern stereo equipment is still missing out on some of the old analog meters that were common on amplifiers and receivers of the 60s through the 80s. Things like VU meters don’t tend to be common anymore, but it is possible to build them back in to your sound system with the help of some microcontrollers. [Mark] shows us exactly how to reclaim some of the old-school functionality with this twin audio visualizer display.

Not only does this build include two displays, but the microcontroller is keeping up with 170 channels in real-time in order to drive the display. What’s more impressive is that it’s being done all on a Teensy 4.1. To help manage all of the data and keep the speed as fast as possible it uses external RAM soldered to the board, and a second Teensy audio board is used to do the real time FFT analysis. Most of the channels are sent to the display hosting the spectrum analyzer but two are reserved for left and right stereo VU meters on the second display.

The project from [Mark] is originally based on this software from [DIYLAB] so everything is open-source. While it was originally built for a specific piece of hardware, [Mark] has it set up with a line in and line out plus a microphone input so it can be used for virtually any audio hardware now. For another take on the classic VU meter, take a look at this design based on an Arudino instead.

Continue reading “Teensy Spectrum Analyzer Has 170 Channels”

VFD Character Display Turned Into Audio VU Meter

Humans love visualising music, whether it’s in the form of an inscrutable equation drawing squiggles in Winamp, or a simple VU meter pulsing with the beat. This build from [mircemk] is of the latter variety, repurposing a VFD display to do the job.

The project is built around a VFM202MDA vacuum fluorescent display, which provides that lovely green-blue glow we all know and love, driven by a PT6314 driver chip. This has the benefit that it can be readily driven by a microcontroller in much the same way as the familiar HD44780 character LCD driver chip. With some minor tweaks, the character set can be modified to allow the display to become a surprisingly-responsive VU meter.

An Arduino Nano runs the show, with an envelope follower circuit feeding a signal for the left and right channels into the analog inputs of the microcontroller. The Arduino then measures the voltage on those inputs and feeds the necessary commands to the PT6314 driver to update the display.

The resulting VU meter has 38 bars per channel, and is highly responsive. The fast flickering of the meter bars in response to the music make it compelling to watch, and the era-appropriate enclosure the project is built in adds plenty to the aesthetic.

We’ve seen other VU meter builds before too, like this one that uses a little physics knowledge to create a more realistic analog-like needle meter. Video after the break.
Continue reading “VFD Character Display Turned Into Audio VU Meter”