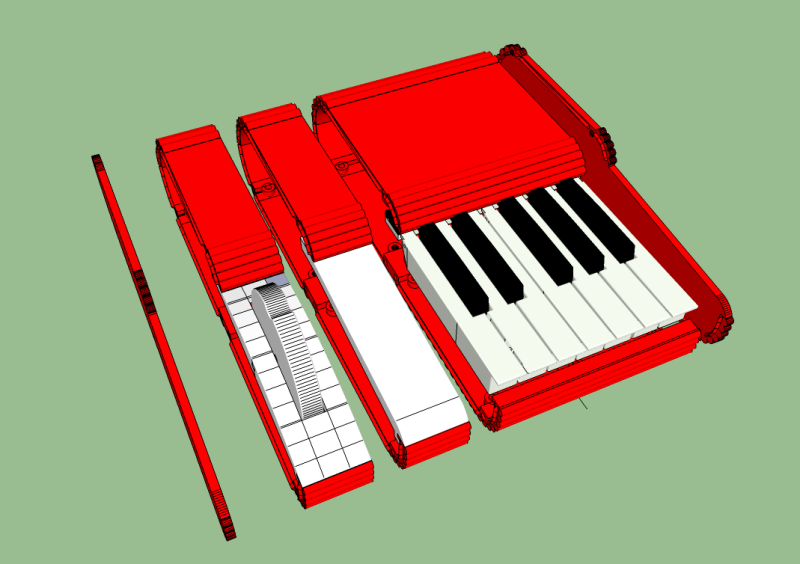
There is a big community of people creating all kinds of synthesizers, but until now no one has attempted to make a keyboard controller like the one [Tim] created. Not only has he created the keyboard synthesizer, but he’s developed one that is modular and 3D printed so you can just expand on the synth you have rather than go out and buy or build a new one.
The design has a lot useful features. Since the design is modular, you can 3D print extra octaves of keys if you need, and simply build off of the existing keyboard. The interior has mounts that allow circuit boards to be screwed down, and the exterior has plenty of available places to put knobs or sliders. Anything that could possibly be built into a synthesizer is possible with this system, and if you decide you want to start small, that’s possible too!
All of the design files are available from Pinshape if you want to get started. The great thing about this controller is that you could use a 555-based synth in this keyboard controller, or a SID synth, or any other synth you could think of!


555 based? Get out all the multi-turn trim pots and start tuning up. Midi yes.
Make those keys as long as the case is deep. There are a lot of crap keyboards that are pivoted at the very rear of the playing surface just like yours. Why make more crap. Look at (inside) and play a Hammond.
I would rather print up a [C-Thru Axis] keyboard.
Just find a old line music store with junker organs if you want to get cheap with standard keys made well. Or hit Craigslist. There is a 3 manual Conn for free in town. Conn was the other maker with a full length key.
3D printing will not make the felt or rubber top and bottom and guides or combs, however the guides are often plastic. There are a lot of poor materials used for these felts resulting in knocking keys as they age. A hard down felt is hard on the fingers.
Hey, thanks for the input! I’ll try to answer your questions as best I can.
1) The 555 thing are Hackaday’s words, not mine. I think they were just trying to tie it to other articles for relevance, which is completely cool with me. The idea is that you can put whatever you want in it. I’m building an Arduino-based synth myself…
2) I based my mechanism on the design of Casio keyboards and other cheap portables. I like them and enjoy playing them, and it seemed pretty easy to do, so I really wanted to do something like that to start. I’m sure it is possible to make much better mechanisms, and I hope that somebody does, but last time I looked I could hardly find any music keyboards for 3d printing at all.
3) If you like the C-Thru Axis (which I only know about because of your comment just now), you should REALLY check out my music software “Rhythm Core Alpha 2” for Nintendo DSi and 3DS! It has a very similar arrangement of notes for one of the solo modes (There are 10 variations!) and you can play it with the stylus which allows for nice glides between notes. Check it out at http://www.rhythmcorealpha.com and download it from the Nintendo eShop!
4) While you can print my project at any size, I modeled it to be correct at about 7″, so this was intended to be a mini-keyboard rather than a full-sized organ keyboard. I’m trying more to elevate small electronics projects than to compete with store-bought synths. I’m hoping my design is a jumping-off point for folks to design more interesting enclosures and mechanisms through the wonder of 3d printing!
5) There is nothing to say you can’t or shouldn’t enhance this design with other materials. I highly encourage everybody to refine the design, and I look forward to seeing what you come up with! This is very much a first draft. I’m doing 3d printing because that technology seems to be widely available to reproduce my designs. I’m open to any and all new ideas for producing better concepts for future designs… perhaps laser-cut wood and acrylic would be cool!
Thanks again for the input! Let’s all make awesome homebrew controllers!
I wish you the best of luck and wish they were all like you. Keep on doing what you are doing :) I am a fan of the minikeys myself :) I wouldn’t even worry with echodelta’s comments-that is just his way. Take care
I love it
I wonder what is involved in getting a key input with velocity, anything ready made and cheap ?
could it be done with two tactile switches and calculating velocity from delta time ?
Here’s how to scan 76 weighted keys with only 26 I/O’s :
https://acidbourbon.wordpress.com/2014/05/18/yp40hack/
Most of these earlier keyboards were well built, with real metal leaf contacts not rubberized carbon and silicone (suckers).
There are 2 European key-scaning kits that output midi. But not velocity, as much as I know.
Two switches and delta time is usually how they do it, yes.
Thank you so much! I’m glad you like it!
I like aftertouch, so I think I would probably do a pressure sensor rather than a velocity sensor. I’ve heard of a thing called a Force Sensitive Resistor that might do the trick:
http://www.interlinkelectronics.com/FSR408.php
The delta time thing is a neat idea too! If anybody wires something like that up, please let me know!
I appreciate the dedication that went into this.
That said, I just have to do justice to my nick when reading the article:
> “… but until now no one has attempted to make a keyboard controller like the one [Tim] created …”
That holds true if you insist in 3d printing stuff – which I definitely wouldn’t do for a KEYBOARD that you would want to actually PLAY on. It’s cools for proof-of-concept, no doubt, but, come one – try playing something slightly more advanced than “ballade pour adeline” on a 3d printed surface!
But, in fact, a good friend of mine (synthesizer “self-made-guru” in the 80s) actually had a neat modular synth system where you could plug octaves together, have control blocks on the sides – or, as he did it, in the center of the keyboard, so that he had right hand and left hand with keys and center with some LED and button controls.
So creating a modular synth keyboard/case is in no way new. It’s just the hipster “3d-print” approach that is. And that, sorry, just doesn’t appeal to me.
maybe I should add: That was in the times when internet wasn’t widely available (1983 around-ish) and not everyone had a camera, nor did anyone actually WANT to have everything filmed/fotographed. We had real lifes back then :-)
Thanks for your feedback!
I chose 3d printing because it seemed like one of the few vaguely accessible technologies that would allow me to design something and have it actually realized and be sharable with other people. I’m sure many folks have designed keyboards in the past, but when I went looking for designs online, I didn’t find much at all! Please point me at the plans if you know where to find them!
Certainly the print quality of many 3d printers leaves much to be desired, but I understand that the output of some of the SLA and SLS printers can achieve quite smooth results indeed!
Also, my friends over at Deezmaker have treated some models in acetone vapor to smooth the surface, which might be enough to make the keyboard surface reasonable to play.
Ultimately, this is all experimentation at this point. Nobody should be expecting perfection straight out of the gate, but I hope that it is a good jumping off point for folks to move forward and come up with even better ideas.
I think the promise of 3D printing is that it allows us to investigate design ideas that before were only possible for large companies with great budgets and manufacturing resources, and perhaps to implement designs that might not be cost effective for them to reproduce and manufacture, but are useful and easy for the hobbyist or experimenter. But I just don’t see a lot of that going on (please tell me I am wrong and send me links for great designs for electronics cases and music hardware!)
Keep in mind that this case is modular and can be used for other electronics even if you don’t like the keyboard itself. I added some nice features, like a grid on the back of the front panel so that when you want to drill holes for knobs and sliders your drill will not wander off, and all your parts will be in a nice, even line. I made sure there were screw holes and spacers in it so that you could attach your circuit boards easily. Grooves in the edges help the parts to stay aligned when put together.
Anyway, I’m really glad that you appreciate my dedication, even if you don’t dig the idea of a 3d printed keyboard. I might do something with laser cutting in the future…
I’d love to see a couple or angle adapters being designed for this so you can make a keyboard circle or u-shape. This would be excellent for onstage use.
That would be kinda cool, wouldn’t it? I’ve been working on newer versions that extrude the whole shape as a kind of tube based on a sketch of the side. It would probably be pretty easy to loft that on a curve to make what you want. That version is a long way off though…
Neat. Building keys has been the hard part, usually you go buy an Alesis Q-series or cannibalize an existing one (not product-izable). Maybe this will help pave the way to some new niche synthbuilders selling complete keyboards.
Maybe make something that can be easily capped with injection molded parts, like these: http://www.alibaba.com/product-detail/88-key-piano-part-piano-white_60256249904.html It’s probably not the best way to approach an OSHW project but I’d argue it’s better than designing something that relies on cannibalizing a specific old keyboard or worse, trying to come up with designs that accommodate several different types of cannibalized keys.
Thanks for the heads up on those parts! Those could be pretty handy. I could never figure out how to order anything from Alibaba tho… it seems like they are all wholesale only, and cagy about telling real prices. Has anybody actually done it? Is it possible? Did you get what you wanted ok?
Is there any source out there for keyboard mechanisms, short of buying an instrument and ripping it apart?
I’ve been looking into this as well after restoring a Hohner clavinet, with a mind to build a smaller custom instrument based on its design, but haven’t gotten around to trying to order stuff. Some other options would be to have a printable template that you could use a knife/saw with to cut sheets of plastic all even. Maybe some custom sanding blocks to profile the keys, so that you have a nice rounded, smooth profile on them. Apparently there’s an Elephant Ivory colored filament available, so with some additional work after printing you might wind up with keys that have a genuine manufactured look to them. Good luck with the project, I’m definitely following, as I’ve got about 3 different things I still want to tackle, keyboard-wise.
syntaur.com has some classic ones for parts- a bit pricey though. You could honestly make a mint just doing Microkorg replacement keys if my bench is any testament. 6 units in two months. Currently, I just use old gift cards as the little plastic tab where keys always breaking if it is a key or two. For a more complete loss, I have been buying an octave of keys for 30 bux or swapping things around. Musicians stay broke, so that would help. Anything to lower the parts overhead on that end would be great :) You can also hit up ebay for “parts repair” under keyboards. Been a bit light lately, but things show up that might give you some ideas. Best of luck and I will definitely keep an eye out to see what comes in the beta.
Thanks!
I, personally, have a hard time bringing myself to cannibalize working gear, or even non-working gear. I’ve got a dead Roland W-30 taking up space I can’t bring myself to tear apart… but it probably isn’t worth the cost of repairing, either.
At the moment, I am actually tearing down a truly atrocious (but very pretty) toy keyboard for a mechanism, and it is a real pain to decipher their single-sided circuit board routing…
I still need to solve a few problems to actually make the keyboard in my design function, namely what to use for key switches. Most of the toy keyboards I have disassembled are using metalized rubber on PCB contact pads, but I don’t know any way to source or build that kind of thing. I might end up just using standard pushbuttons under the keys, but I worry that wouldn’t feel very good to play.
By releasing the design, I’m hoping other folks solve a bunch of that stuff before I do and then I can just do what they did!
You are probably better off hitting the thrifts to get parts/toy units for the time being. Most keyboards function on a scanned diode matrix so the grid does the “switching” thanks to the nature of that component. The printed ink on circuit boards “can” be reproduced with the conductive ink but it leaves a lot to be desired. You are probably best to find a cheap production house if you ever get to that level. Sorry to hear about the W-30. If you want me to help give you guidance on repair/troubleshooting or take a crack at it myself, let me know and will help however I can :) I have a Roland S-10 that is in a similar situation in terms of prohibitive repair cost. It just makes me sad when they get tossed, so it stays here until I figure out a cheap cure for its cancer lol.
I have WAY too many thrift store keyboards already! I kinda love them, in all their cheezyness. Some of them actually sound really cool in their own lo-fi way…
I was finally able to decipher the circuit board layout on the toy I am currently dismantling after much circuit tracing and double checking with the ohmmeter. I’ll probably tear out their silicone blob and add some sort of connector, header, or ribbon cable to it next.
Eventually, I’ll be making some circuit boards for my own projects with an eye to some sort of commercial release (gotta eat!) I might try routing test versions on the CNC router at the local hackerspace before I actually order real boards. It would be cool to do surface mount stuff, but I don’t think I can solder stuff that small…
For the keyswitches, if one could find a way to print in the rubbery material, you can get this stuff called CaiKote 44 that you can paint on to do the contacts. It is meant for restoring the contacts on stuff like this. But I’ve no idea how to print the rubbery bits.
On the W30, I think the repair manual suggested that the IC for I/O had gone bad. It never gets past the boot screen. I’ll have to look at it again… it has been years since I touched it.
My brother from another mother lol. You are on the right track it sounds like. I would look at ripping one of those simple toy keyboards out and let the arduino be your scanning chip. There were some articles on HaD a couple of years ago about a guy doing just that, so it would probably be pretty helpful with figuring out scanning and key matrices. Yep that CaiKote is the stuff I was talking about. Alright for contact repairs, but long runs of it would probably cause errors in the matrix at some point. It is a pretty standard control mechanism so all of the board shops should be able to do it. They even use the stuff as a fuse in the cheapo shenzhen special laptop replacement supplies “Fiyastahta!” (my best Keith Flint). The W30 may just have some garbage stuck in RAM not letting it complete the boot process (insanely common for Rolands). I would suggest whipping the service manual back out and check out a system reset/test mode by holding down F1 and F2 while powering on. It may help clean the garbage out and get you back up and running if the magic of “letting it sit for a while” didn’t help this time (although it has saved my skin several times and I always am thankful lol). I would also look into an HxC Floppy/USB adapter if you do get her back going as it is a 20 dollar upgrade that keeps you from having to hang on to as many floppies. Best of luck and hope the reset/test mode works. Even if you have done it before, try it again-time heals all wounds. Take care
Sweet, now I can print my own Boîte Diabolique!
LOL