With tools, especially cordless tools, you’re going to pay now or pay later. On one hand, you can spend a bunch of money up front and get a quality tool that will last a long time. The other option is purchasing a cheap cordless tool that won’t last long, having to replace it later and thus spending more money. With cheap cordless tools it is common for the battery to fail before the physical tool making that tool completely unusable. Sure, another battery could be purchased but sometimes they cost just as much as the tool and battery combo originally did. So what’s a cordless tool user to do?
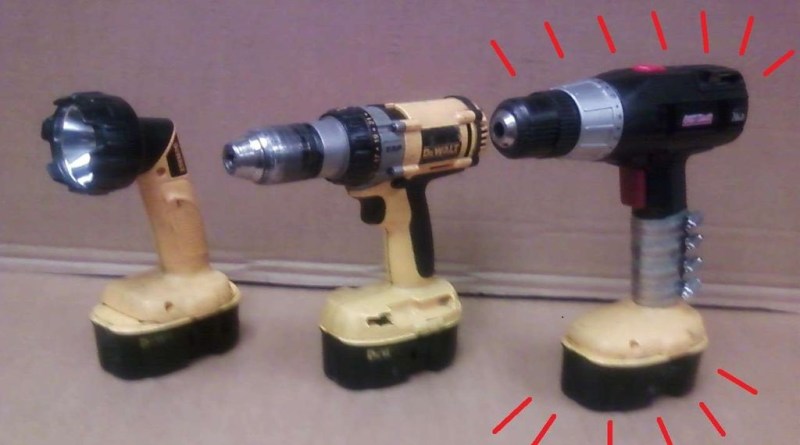
[EngergySaver] had a set of DeWalt cordless tools with a bunch of working batteries. He also had a cheap drill where the battery had died. His bundle of tools included two flashlights, one of which the case physically broke in half, probably from a clumsy drop. Instead of tossing the broken flashlight pieces in the garbage, [EngergySaver] kept them around for a while. Then one day he had the idea of combining the base of the broken DeWalt flashlight with the top of the old battery-less drill. He had the parts so why not?
The battery pack was 18 volt and the cheap drill expected 16.8 volts. [EngergySaver] figured the voltages were close enough and decided not to worry about the difference during his hack. He started by disassembling both the drill and flashlight down to the bare plastic housings. He marked an appropriate place to splice the handles and made some cuts. After the wiring was spliced together and the tool casings reassembled, a piece of sheet metal was cut and bent around the handle at the joint between flashlight and drill. Hose clamps hold the sheet metal tight around the handles, keeping the new hybrid tool together. And although we’re not crazy about the sheet metal and hose clamp method, it seems to be working just fine. With a little work and ingenuity [EngergySaver] resurrected an old tool for our favorite price; $0.


I did something similar once. Except that I cut so the mount from the flashlight sat flush under the cut I made in the drill. Then I used some repair putty and let it set up properly. Holds up well, and doesn’t ruin the ergonomics like the pipe clamps do.
a Frankendrill loll Done that too in the past
Discharing nickle-based batteries to 1V/cell before recharging will help get a lot more life out of them. Also don’t leave the batteries in the charger for weeks.
http://nerdralph.blogspot.ca/2014/12/reconditioning-nicd-batteries.html
I need to do this on an old craftsman drill I have. Any thoughts on better way than sheet metal and hose clamps?
Just Like the OP did ; sheet metal and hose clamps .. Then drill holes and install aluminum Rivets , remove clamps , and paint on “plastic dip paint” or “bed liner paint” , or a Sugru pistol grip…..
OR Option 2:
I would use card board paper strips and hot glue to get everything aligned , then I would wrap the entire grip with tons of Yarn or twin, then I would paint it with Fiber Glass Resin , and add a Sugru Latex Pistol grip to finish it off.
fiber-fix.
Buy epoxy resin and a small piece of glass fibre. After cutting it so that the gap in between is as small as possible, clean the surfaces with alcohol (acetone will most probably dissolve the plastic), rough it with rough sandpaper (100-400 grid) and than put epoxy and glass fibre cloth over the gap (3 layers are a good starting point). 5 cm overlap on both sides should be fine for rough handling.
Sometimes called a surfboard repair kit…
Where I’m coming from there are no surfers :)
When our cordless packs fail, we buy more cells in bulk and just rebuild the packs by replacing the cells but keeping the rest of the battery pack hardware. They are not made from one giant wet well, they are composed of many tiny dry cells in size, soldered together.
What do you use for your current voltage drop? A test light in line with the multimeter?
No voltage drop. We replace the cells with the same spec cells.
I have a harbor freight reciprocating saw with dead NiCd batteries. New tabbed, sub-C cells to refill the 18V batteries cost more than a new recip saw from Harbor Freight. I’d like to upgrade them to NiMH cells but those cost even more.
check RobotMarketplace, they ahve good prices on cells and packs
“With a little work and ingenuity [EngergySaver] resurrected an old tool for our favorite price; $0.”
Once again though, the time it took to complete the task, the tools available to use and the knowledge that had to gained represents more than $0.
He already had the tools and skills, so for him it was $0.
It would also be $0 for me and presumably for many other users of this site.
If it costs you more than that because you haven’t invested in tools and skills yet then that is sad but fixable.
“Once again though, the time it took to complete the task, the tools available to use and the knowledge that had to gained represents more than $0.”
Sure, if you ignore the knowledge and experience that you gain in doing so. Trying to factor in intangibles like this is pointless. He didn’t spend any money. Any reasonable person would say that is a cost of 0.
The cost out of pocket is $0. My point is that it takes more than $0 to achieve this and that’s all I am trying to say. It takes time, effort and knowledge that isn’t captured by only the cost metric.
Sure it takes time, effort, and knowledge. But you aren’t always working and making money are you? By this logic sitting and watching TV for the same amount of time would cost the same amount wouldn’t it?
Sitting passively and watching TV requires no skill and results in no output though. Your logic analogy is unfortunately a logical fallacy.
So my sitting on the couch doing nothing actually cost me 1 frankendrill….
How much did it cost for you to post that comment? $1000? $10000? $1M? Remember to count your computer, your house, the education that enables you to write, the global development effort in creating the internet, …
I bought a set of Ridgid battery tools (drill and impact driver, each with a Li battery) from Home Depot, also came with a radio and charger. The batteries have a lifetime guarantee, so if one dies, you get another one. About $200 for the set (and they are good solid tools) but I am not going to screw around with batteries ever again.
Sometimes it is best to just go for it and spend the money, though there is something to be said for Harbor Freight stuff under the proper circumstances. I have also had good luck with the smaller Bosch Li tools, batteries have held up for years (and pack a lot of power in a very small package), and I have scored some extras from Lowes for cheepcheep when they were redoing shelves and such. They aren’t cheap initially (though I did get a battery-less drill for $5 from Lowes) but are also quality tools.
Good luck getting those batteries warrantied, even if you do follow the instructions to the letter (register items within 2 hours of purchase, mail your first borne in as collateral) they can deny the claim as ‘normal wear and tear’ which is of course not covered by the warranty.
ugh. I hope not, but yeah the whole deal is probably rigged. They have been going strong for 2 years now though, so maybe they will hold up.
when my old craftsman nimh drill battery died I got a 3x 18650 battery holder and attached it to the bottom. the good: a helluvalot cheaper than the sears replacement battery with more power. the bad: it cant stand on the bottom anymore. I can live with that.
That’s a great use for one of those inane flashlights. I think they’re just a marketing strategy to encourage people to buy more $70 battery packs.
I used a hose clamp to tie a scavenged sealed lead-acid battery to the bottom of a Milwaukee 12V drill. Worked great! Visible here:
http://reboots.g-cipher.net/derelict/
It’s really nice to see repairs and re-use rather than just recycling. Regarding the voltage difference, I am running an 18V line trimmer on 2x 7Ah 12V batteries in series for 24V ( in a backpack because they’re heavy). It cuts better *and* lasts much longer than it used to on the original 1.7Ah batteries, which lost their ability to hold a charge after just 12 months. Sometimes it smells a bit warm and I wouldn’t want to run it hard for more than a few minutes at a time but it’s a serious upgrade. YMMV.
Neil – I did the same thing with a B&D 18v trimmer. It burnt out in about 10 uses so beware.
I find this amusing as I actually met the guy that did this about a year ago. Turns out I work with him. I had a few qualms with the project (my first question was about the voltage difference as was quickly asked here on Hackaday), but it really comes down to what you have on hand to work with. I would not say the project was free, but it was a down to earth real hack that made use of two things that might otherwise have been trash. Good stuff.
> tools failing before the batteries.
that never happened in my life. in fact, i have two battery packs exactly like those that can’t hold a charge. 1.5yrs after purchase.