Sometimes we forget how awesome laser cutters really are. After all, they’re essentially giant plotters that shoot infrared lasers to cut and engrave almost anything. Most of the time, we’ll use the cutting feature in order to make rapid prototypes for different projects. We might engrave a logo or text on there too — but with a bit of image pre-processing, you can actually etch grey scale images that look really good.
[miststlkr] has been experimenting with different processes to get the best engraving, and he’s decided to share his findings. He’s created a guide on Instructables, and it’s a pretty quick read. You’re going to need some image editing software, for which [miststlkr] recommends Gimp — as do we.
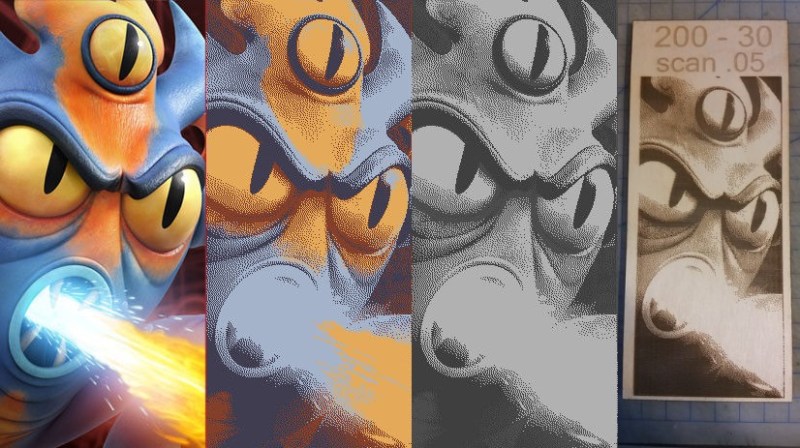
From there it’s just a matter of a few steps to simplify the image. Start by converting the image to indexed colors — this limits the number of colors the image can have, he recommends limiting to about 4 colors for now. From there, convert to grey scale and import into your favorite laser software. Now it’s time to start testing.
 Depending on your laser cutter, the image, and type of material your engraving, you’re likely going to have to do a whole set of different tests, adjusting the settings as you go.
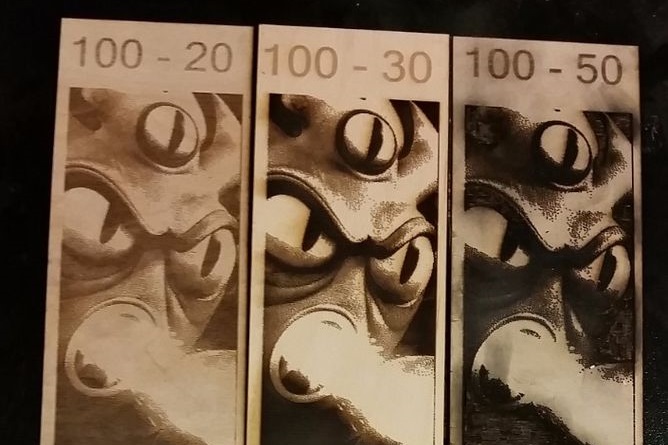
To make this easier for yourself, it helps to throw in some text to indicate what settings you used. That way once you’re done, you can look through all the samples and pick your favorite.
And that’s about it! You should probably bookmark his guide though, as he’s planning on adding some advanced techniques in the near future, including adding some detail back using vector lines. Good luck!
[Thanks Zophar!]


Coming from an extensive image manipulation background, I feel confident to say that the two steps — first reducing the amount of colours and then converting to greyscale — should most definitely be reversed, ideally with some levels adjustment in between. Simply because reducing RGB colours first can and will result in a palette of distinct colours that then convert into similar brightness in greyscale. That’s why he is actually losing detail in the “higher number of colours” step.
In addition to that, there’s a distinct difference between “desaturating” and “converting to greyscale”, especially when dealing with very colourful images. One might get a significantly better result than the other. You could also desaturate the RGB channels with different weight, or maybe even only get one of the channels for greyscale brightness. Of course it all depends on how much time and effort you are willing to invest. But the conversion of a colour image to greyscale is a process with a surprising amount of variables, and more often than not just clicking “convert to greyscale” produces the least satisfying result.
Nice article… But i have an Laser-cutter and also engraver which does this all automatically. Its called Mr. Beam junior. They had a very successful kickstarter campaign last year. It has a blue laser-diode which is able to dim the output power which allows it to not only engrave by dithering but also with a real grey scale engraving. They are using a fork of OctoPrint which is completely web-based and takes care of all the image engraving settings.
Inkscape and Marlin seem to handle the raster making without any hastle at all. You need to have the right plugins and the correct version of Marlin but once that is sorted the images just work.
Coming from a graphics design background, the term you’re looking at is half toning. It’s the process of rasterizing the image into pure black and white dots that when viewed from a distance seems like a continuous tone. I wouldn’t convert it to 4 colors, I’d convert it to 8 bit greyscale which preserves a lot more detail, then apply a half toning effect on it. This can be easily done in Photoshop. You could also first scale up the image to have more half tone detail, then print at the same physical size.
Here’s an example of the same image used above:
http://www.makercentral.net/media/forum/HalfTone.gif
Halftoning is nice if you have the resolution and at least some sort of intensity control. Apparantly a laser cutter has some levels of intensity, which means the dots will not degrade into blobs and specks. But I really doubt it has the resolution to pull it off in a convincing manner.
Image processing, color theory, the psychology/neurology of color perception, and printing combine to form a horrifying maelstrom of opportunities to know just enough to be dangerous. <3
Problem with many lasers is that it takes a few ms for the beam to stop lasing so you end up with blurred images unless you keep the speed of etch down
I like the 100-30 image the best. The lines are much sharper and the color is not too light or too dark. The thing that I think is cool about laser engraving is that you don’t need to have a super complicated software to do it. You can use just a jpeg or other image you found on the internet. Or, it can be something you designed yourself using an illustration software. They’re a lot easier to use than people think.
In my idea, you do not need any software for laser engraving of photos. The simplest method is to convert a photo to pure black and white. I found an online tool at http://techiephoto.com/laser which allow you to simply adjust the photo for optimum edges for laser engraving. It is simple and results are outstanding.