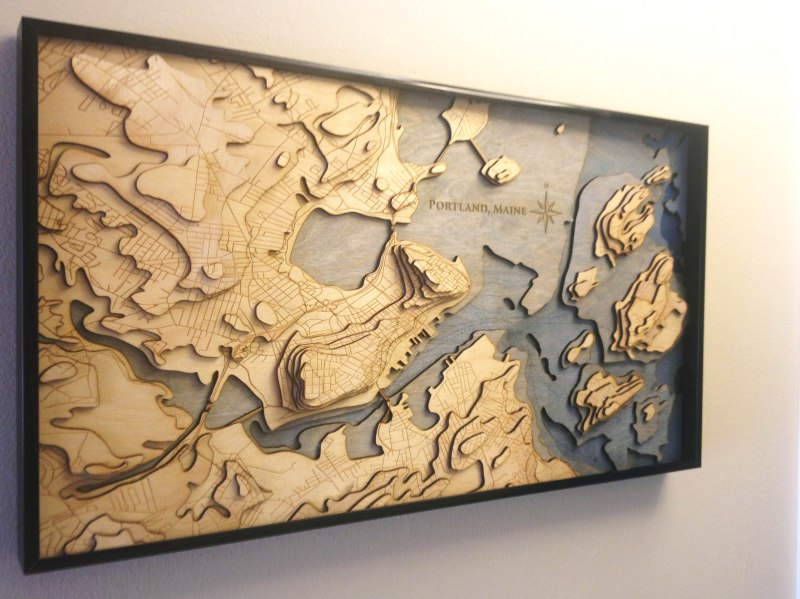
For Christmas this year, [Scottshambaugh] decided to make his family a map of their hometown — Portland, ME. Using topographical map data, he made this jaw-dropping 3D map, and it looks amazing.
He started by exporting the elevation data of Portland using software called QGIS, a free opensource geographical information system — it’s extremely powerful software, but takes a bit to learn. Luckily, [Scott] made a tutorial for us. All you need to do is add the road data, put all the slices into an illustrator file, clean up some of the files, and you’re ready to start laser cutting.
He used 1/8th thick sheets of Baltic birch plywood, a staple material around laser cutters because it burns quickly and easily and is very flexible, which means that it’s harder to break. The map measures 12″ x 24″ — but once it’s laser cut, be ready for a multi-leveled jigsaw puzzle! The small pieces of elevation data can be very tricky!
Once he got all the pieces ready, he colored the water sections with a blue stain — varying the saturation with the depth of the section. The end result is absolutely gorgeous, and you can see a slideshow of the pictures over on his Imgur gallery.
We’ve seen some pretty awesome laser cut maps before, but we think this one might be one of the most detailed so far!
[via r/DIY]


The good thing with this is that when the sea level rises, he can just paint the bottom land slice blue. :p
What a relief!
*groan*
I thought these were pretty commonplace.
Slow news day?
Nope, just idiot bait.
Not everyone can make totally 100% unique and original brand new ideas like ballistas and catapults….
Not everyone has that level of brilliance.
please, keep it up.
then in 20 years, when no one makes their own things because “they’re pretty commonplace”, you can complain about how this site shut down because no one makes anything anymore.
you can either encourage people to make things, or complain about everything. but if you must complain about everything, don’t neglect the impact it will eventually have on people making or sharing things.
https://www.youtube.com/watch?v=0_HGqPGp9iY
If you mark the orientation on each piece and make a grid system in XYZ it shouldn’t be hard to place the pieces.
or you could just etch the outline of the upper piece on the lower piece in the orientation it is going to go… nothing is going to be seen when it is all glued together.
Also can learn from PCB panel fab. Keep the pieces still attached together with break away spokes that you can trim off with X-Acto knife once it is glued in.
Its easiest just to etch the footprint of the next level on the layer below.
I made dozens of these, sometimes with dozens of individual 1/32″ plexiglass layers – models for an arch. studio i used to work at.
Nice job!
What I like about this is that the charred edges, which to my eye detract from many laser cut wood projects, actually work to make the contour lines stand out.
Portland ME is much much flatter than that stupid map would indicate. His elevation scale is completely warped toward exaggeration rather than reality.
Just like every other topo map in existence. Exaggerating the elevation is the whole point.
Topo’s aren’t designed to exaggerate elevation, but to communicate it in 2D . Exaggeration comes in when you view cross-sections, or in this case 3D representations where you have a thickness of the material in addition to the contour interval of the data to deal with.
One solution is to use thinner material, but that probably complicates the cutting operation.
You think that is ‘stupid’…
Do feel free to share your own projects so we can comment on them!