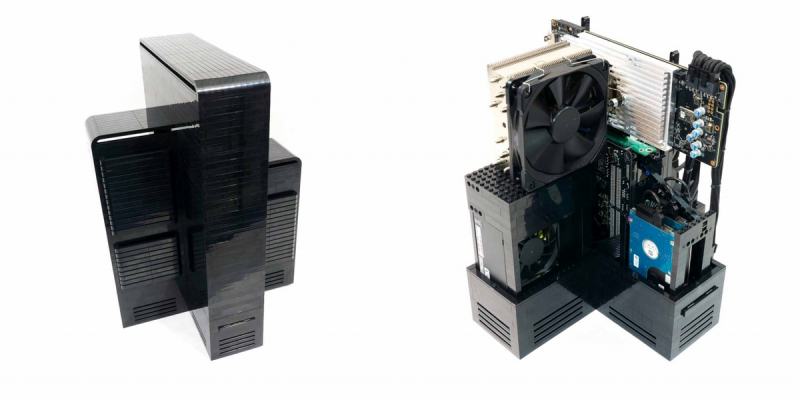
Lego isn’t the first material that springs to mind when you think about building a new gaming computer case, but it does make sense when you think about it. It is easy to work with, can be easily reconfigured, and it’s pretty cheap. That’s the idea behind this very cool (no pun intended) gaming computer case build by [Mike Schropp]. Built around a Skylake i7 CPU and an NVidia 980 Ti graphics card, his build has an unusual X-shaped design that allows for plenty of airflow. The sides of the X hold the CPU cooler, the power supply, the hard drives and the graphics card cooler, so each of them has its own separate flow of cool air from the outside. That avoids the common problem of hot air from one component being passed over another, so it doesn’t get cooled properly. Critically for a gaming system, this design keeps all of the components much cooler than a more traditional case, which makes for more overclocking potential.
At the moment, [Mike] says he is struggling to keep up with the demand for people who want to buy custom versions of his build, but he is planning to release the details soon. “Initially that will probably be in the form of a DIY kit, where you can buy the plans with all the Lego bricks needed for the build, in a kit form” he told us. “Then you can add your own computer components to complete your build. At some point I’ll probably also just offer the plans themselves and allow the end-user to acquire the Lego bricks needed.”
Lego is, of course, made of ABS plastic, so there is the concern of melting. [Mike] isn’t too concerned about that, though: he has used a thermal camera to check the temperature of the case and found that it was consistently below 30°C (about 75°F), well below the melting temperature of ABS, at about 220°F.
[update 2/2/16: corrected spelling of name, graphics card and temperature]


Pretty slick.
Yes!
Thanks!
It probably ended up costing him a lot of money for those lego pieces. I like how the tower in the middle looks, but not a big fan of those things on the side. Its mostly the issue of space. I wouldn’t be able to place something like this on my table since it needs about as much space as a cube.
Still its pretty impressive how much work went into this.
literally smaller than normal desktop
Actually, it seems to be about as tall as the average mid-tower case. The middle part is thinner if you remove the side modules, but those have radiators and PSU. If I was designing this, I would probably make the tower a lot more taller to fit in PSU on the top and then for the other module I would use watercooling and fit radiator somewhere in the extra top space besides the PSU.
The problem with building the tower taller and taller and then adding components or radiators into the top of the case is it becomes less efficient from a cooling standpoint. There are a couple of reasons for this. The first is that in most cases air is brought in through the front of the case, and then exhausted out the rear or top. Once the air enters the case it immediately rises in temperature as it comes into contact with various components and starts removing heat, as well as mixes with the already heated air inside of the case. The problem being, that by the time the air makes it to the upper part of the case, it’s already a decent amount hotter than it was when it entered the case. Ideally we want to use the coolest possible air to do it’s job in removing heat from the components, and that means getting it to the heatsinks and components before it has a chance to rise in temperature from traveling through the rest of the case first.
The other issue with a single large space for all the components to share, is that all of the components share the same airspace, and they all contribute to the total thermal load of the case. This means components that are producing the most heat are also heating each other as they heat the shared airspace. It’s not the most efficient way in terms of cooling, but the standard rectangular box form factor that exists today wasn’t designed with creating the best possible cooling, it’s more of a compromised design that evolved rapidly in the 90s, and then settled in on a form that was easiest to standardize to ensure that components were compatible and fit, and that there was room for expansion.
The reason I ended up going with this design is because it creates the most ideal cooling arrangement for air cooled components. This design offers a couple of advantages over the standard rectangular box form factor. The first is that the components that produce the most heat (CPU, GPU, PSU) are now moved away from each other and isolated. This prevents them from adding heat into the central section of the case, and lowers the component temperatures in the central section of the case. Additionally this allows for each component to have it’s own direct access to fresh air, and has it’s own path for inlet air and exhaust. This gets the air to the heatsinks before it ever has a chance to warm while traveling through the rest of the case. This offers the best cooling performance in terms of air cooling. Finally, this approach allows for direct airflow over every component. This is another area where the standard rectangular box just does an adequate job, but doesn’t do a great job of directly cooling all the components. With a standard case you have an air exchange system, but you don’t get direct airflow over every component in the case, and this allows for localized hot spots to form. The X form factor in the Lego Gaming Computer allows for fans to directly blow on every component, with fans placed directly below the motherboard, blowing air over the voltage regulation, PCB, chips, etc. In an overclocked system, or when that is highly stressed, it’s critical to cool all of these components. During testing I found this keeps the case temperature below 30C, in most cases barely above ambient temps.
So these are some of the reasons why I ended up with this X form factor design, as in testing it proved to be by far the most efficient arrangement to achieve the best possible cooling performance when using only air.
I would love to do this, but I gave all of my Lego pieces to my son many years ago. Oh, well. I also gave up overclocking years ago.
You are correct about the “mid-tower” format being a compromise. In the 90s when the AT standard was established, the 386DX was the fastest thing around, and it didn’t require any external cooling! No wonder the tower case sucks at cooling, it was never meant for it in the first place.
Your solution is awesome, [Mike]. Kudos for an excellent design, and double kudos for using Lego.
Thanks DainBramage! :)
And I think you should get some bricks and start building! You can come across fairly decent deals on Amazon from time to time for assorted bricks in a box. Or you can go on Bricklink (the Lego version of Ebay) and buy the exact bricks you want. Once you start building you won’t be able to stop.
PS… I couldn’t reply directly to your comment, apparently the comments were already nestled as far as allowed. Hopefully this ends up chronologically in the correct spot below yours.
“Initially that will probably be in the form of a DIY kit, where you can buy the plans with all the Lego bricks needed for the build, in a kit form”
Is he a licensed LEGO retailer?
He could offer the design to LEGO, and maybe he could make some royalties.
Since Lego is no longer copyrighted.(from what I’ve being told) Couldn’t he just sell some Chinese clones of the Lego pieces?
I’m not a licensed Lego builder, more of a hobbyist. Over the years my hobby transitioned into more of a business as more and more people contacted me for custom systems, with Lego based systems being a very popular request. Eventually I decided to design a couple standardized systems to match the most common requests I was getting. This particular system is for those that want a gaming based system.
I don’t think Lego is interested in pursuing it themselves, only because it involves using components that are not those created by Lego (the computer components). Pretty much all of the items Lego offers are those that they create completely in-house.
That’s not to say I would not be open to a deal like that if Lego approached me. :)
I am thinking to make a computer case out of clear acrylic. My question is: PC cases made out of plastic do not shield the components inside against interference. Is this a real problem or not?
I think it is more important to shield from interference caused by the PC! But if you are living in your mother’s basement, it might not be much of a concern.
As Ren said, it’s usually more important to shield the other components from the PC, as opposed to the other way around. The biggest issue usually being RF interference. Pretty much every case that uses plastic, or a plastic side panel, or clear acrylic cases. or those open frame cases end up without much, if any, shielding.
The biggest problem this seems to pose is for amateur radio folks, as the interference can cause an issue. But after talking to a couple of different amateur radio people it seems like there are far more sources of interference from other items beyond just computers. Plus it’s also dependent on your location, and the location of others who could be picking up on that interference.
In my workshop, I have a wind tunnel computer (No shielding), a server (partially shielded), a Lego CPU folding farm (no shielding), between 5-6 different Lego Computer models (no shielding), and then numerous other electronics, TV, video games, stereo, etc. I’ve never had any issues with any kind of interference between any of the computers or devices.
P.S. LEGO is all caps…
Hahaha, my thoughts exactly.
Time to hit Bricklink and place a large order of LEGO pieces.
That’s a lot of PLA, looks heavy.
i mean ABS
The complete system in the build write-up weighs about 20lbs.
Huh, the title does not in the least reflect the work that went into this.
It reads: “Some guy made a case out of Lego bricks” wohoo..
The modifications to the cooling parts are amazing!
Thank you! :)
I spent a lot of time working on the cooling system and how it worked with the overall design of the case, to try and create the best possible setup for air cooling.
I’ll bet you did, kudos for finding a workable solution.
Pffft! On LEGO. Use Mega Bloks.
Nah, I’m still waiting for stickle-bricks to make a resurgence.
What’s wrong with using Lincoln Logs?
They lack the angular connections and axles that Tinker Toys provide. B^)
Lego could be a nice way to prototype cases too!
That’s got to be the first time I have ever heard LEGO being referred to as ‘cheap’!
That’s pretty awesome! My lego case is much less elegant… http://img.photobucket.com/albums/v191/legofreak1988/lego/1222141843_zpsids9vum6.jpg
Thanks!
Cool System! As long as you had fun building it, and it does the job, it’s still a Lego Computer, so it’s cool to me!
What about dust filters?
Dust filters were something that I tested and considered for the system, I tried a number of different DEMCifilters, but wasn’t happy with the results. Here is the section copy/pasted from my site that covers that in regards to the system
“Beyond user-friendliness and the possibility of building your own computer, it is important that the case is easy to take apart for cleaning purposes. As anyone familiar with computers knows, dust is a system’s nemesis. I’ve built a ton of computers over the years and have tested out various methods of keeping dust out of systems, the most common being dust filters. While they do okay, you have to clean the filters regularly, and they still allow dust into the system. True, it’s a lot less dust, but it’s still dust. The only foolproof way to keep dust out of a system is to use a sealed enclosure with fans and a filter system – basically a big clear case that goes over your case. Seeing as how that is just not an option, I decided that the next best thing would be to make the case as easy as possible to clean.”
This is why the case is designed to come apart so easily and the outer shell just slips off. It’s also why the components are laid out like they are, so you have complete access to each and every component. That way cleaning is as simple as taking the outer shell off and given the system a blast of air to blow all the dust away.
I have soo many legos it is absurd.
Um… 30°C = 86°F. Not 75.
30°C × 9/5 + 32 = 86°F
Maybe another update?
This case is definitely interesting in terms of design, but the functionality of it is what really interests me. I also wonder what kind of customization you could make to a case like this. Thanks for sharing.