Hackaday Belgrade — our first ever conference in Europe — is coming up fast. One of the really exciting things for me is the hardware badge which [Voja Antonic] designed for the conference. He’s done a great job with hardware choices and I think we’ve hit the sweet spot for badge hacking. Let’s jump into the hardware and firmware details after the break.
Get your ticket now for ten hours of talks and workshops, evening concerts, and of course badge hacking the entire time. Earlybird sales close Monday. We’re still in the process of going through talk proposals but we’ll publish a post next week announcing all of the speakers.
Demoscene
 We’ve made the badge eminently hackable with one goal in mind: challenging you to come up with something cool to run on it. What we’ve got in mind is a demoparty based on the Hackaday Belgrade Badge. It’s a fairly spartan design, featuring an 8×16 LED matrix, four buttons, and IR transmitter/receiver components, so you’re going to have to bring the creativity. At the end of the evening, you’ll have your moment in the sun — or at least on the big screen.
To inspire you, we currently have two separate sets of firmware in development. Voja is a master at coding assembly and is putting together the main firmware for the badge. As mentioned in an earlier post, he has already implemented the game of Tetris for the badge. He also has pause and sleep support (managed through a fifth button attached to INT0) and working code for using the IR reciever and the IR LED that serves as the emitter.
If assembly isn’t your thing, the second firmware is a barebones C implementation that I have been working on. It is a basic API which takes care of scanning the display and buttons inside of a hardware timer interrupt and exposes function calls that let you code applications for the badge at a higher level. The C implementation of the firmware includes an emulator written using SDL2 so you can test your code without having the badge itself.
Both of these firmwares need a bit of refinement before they’re ready for you to dig in. But the goal is to enable anyone to submit a demo, even if you can’t make it to the conference. If you just can’t wait to get your hands on one, you can always build your own copy of the badge since it’s Open Hardware.
Hardware Design
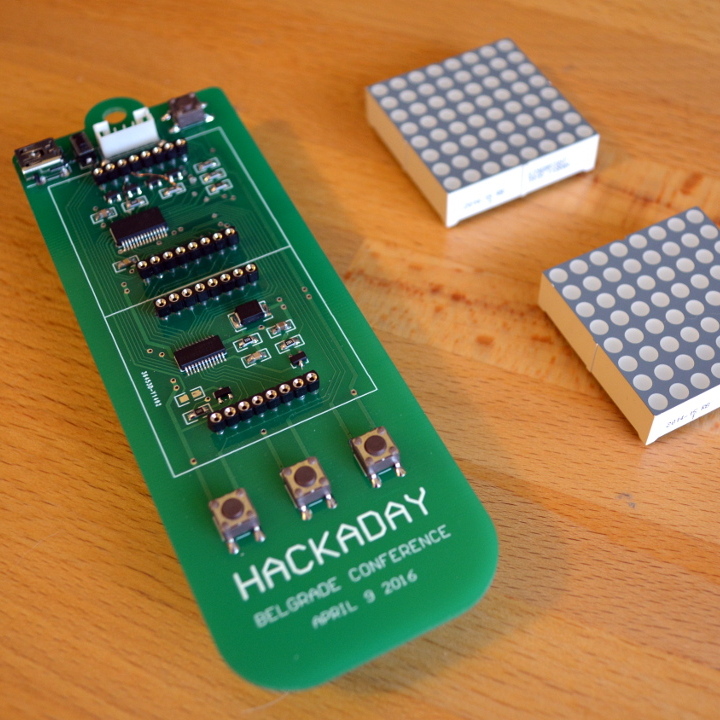
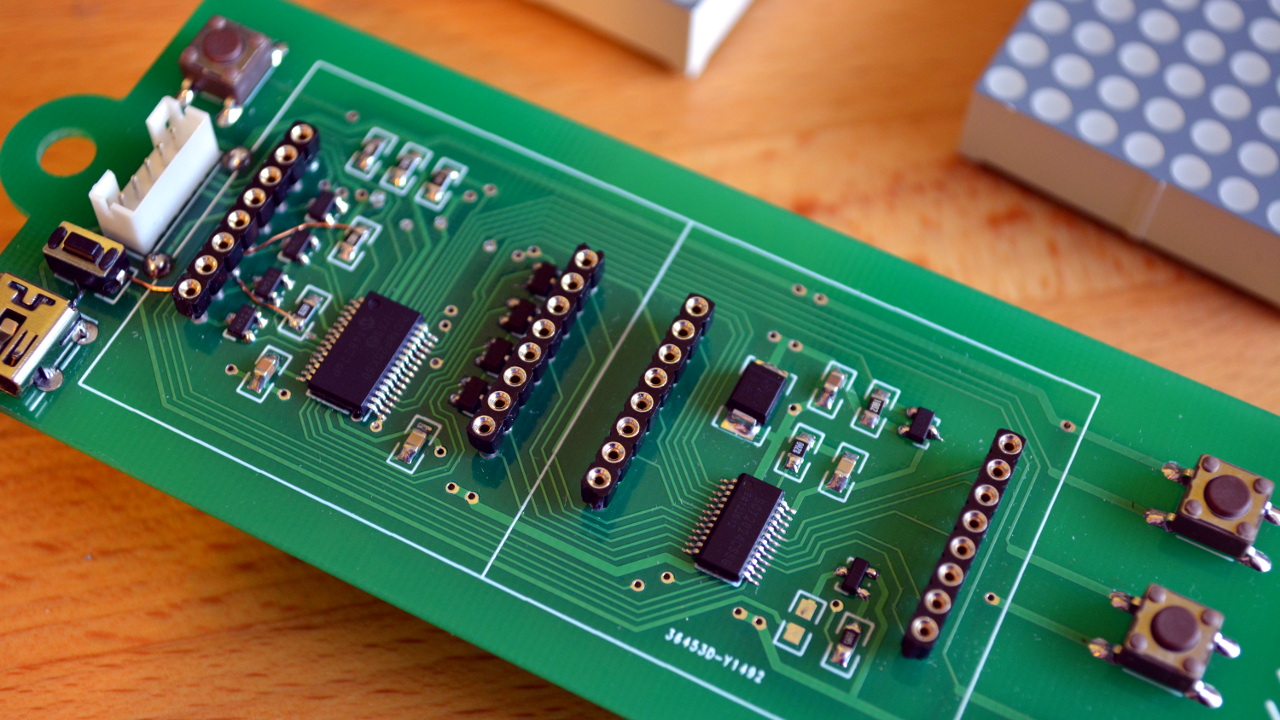 Voja has gone through a few revisions to his design. You’ll notice the prototypes we are using for testing have three buttons. The finalized design will have four buttons in cross pattern (up/down/left/right) and those buttons will be the larger 12mm variety — easier to play Tetris with, naturally.
The displays are two Kingbrite 8×8 red LED modules. These are common cathode displays and use a 16-bit sink driver and eight high-side P-channel MOSFETS to switch the columns. The Starchips sink driver is constant current so one resistor sets the current for all LEDs.
A PIC microcontroller drives the whole show, specifically a PIC18LF25K50 that includes USB support. Voja adapted a USB bootloader for this project, so you won’t need a programmer to flash code to the board. Instead, you’ll just compile the code and use a USB cable and simple software to flash the HEX file.
Finally, all of the badges have IR send and receive connected up to the RX/TX pins of the PIC microcontroller, so the badges will be able to talk to each other. We’re especially interested to see what you’ll make with this functionality.
Spread the Word
Please help us get the word out about Hackaday Belgrade. Tell everyone you know and share http://hackaday.io/belgrade on your social media. Thanks!


Men, I wish flights to Belgrade were cheaper but 200 Euros for a weekend only in flights, too much. Next time maybe.
You forgot to tell that you will have to install Windows on the laptop you are taking to the conference to be able to hack on that.
Not true at all. I only use Linux and that is what I used to develop my badge demo shown in the video. I see no reason that OSX couldn’t be used either. MPLAB X works on all three systems and flashing the HEX file to the badge can be done with the Windows program that Voja mentions in his badge project page, or using a simple script from the Linux command line (I believe this should work from OSX as well).
Anyone from Germany wants to join? Maybe we can car pool to Belgrade.
Hmmm 16 hour drive from Holland… Why did they choose Belgrade? It’s not very central in Europe. I don’t think many people from Ukraine or Romania will come. Most people will come from the west side. Hopefully next year it will be in Germany or France.
Or just in the Netherlands :)
Or in Czechia
Spain is sunnier, just saying…
If you go with more people it will be cheaper and easy to go and stay there and have really great time. Trust me :)
p.s look “belgrade apartments for rent” and you will find all you need. The food and drink is great and really not expensive and you can enjoy your time there, everyone can pay it.
Dutch people love to go there :D
If need more tips , let me know , misschien kan ik helpen ;-)
Uh nice, there is also a IR receiver and led on the board schematic. Hope they have no uncovered TVs there ;)
I like this way of thinking :)
All the cool things happen in the West! Thanks HaD for getting something cool to the East also! Awesome badge too..!
Nice badge.
Why you think that people from Romania would not come? Romania is very close. And why always must be held somewhere in west Europe? Explore a little. It is not too much expensive. In Belgrade everything is affordable. It would be a shame not to come.
Cool! Bought my plane tickets yesterday, I just have to get a hotel room then I’ll be set!
It would be interesting to break out the remaining, unused pins of the µC to use them for something else :D
There are no unused pins – some of them (B6 and B7) are even used for two functions.
Not very central at all and the price for tickets from UK is nearer 300 euros so not that cheep.. Just as well the event is a good price!
Yes, we had the same thought and have kept the registration cost low (really just covers the cost of making the badges) so that there is still room for some travel costs. I hope to see you there!
Also Belgrade is both nice and affordable.
And people from UK earn their money in pounds, so you’re technically not allowed to complain about prices! ;) (Just imagine how expensive it all would be for someone coming from Poland or Hungary to the UK.)
That’s awesome. While the hackaday superconference was awesome, I wish the badges were anything even close to as cool as these.
Someone to car pool from East Czech/Slovak rep/South Poland ?
Seriously, guys? You’re offering to car pool? Have you thought this through at all?
After all the articles about how easy it is to hack into a car, you’re offering to let a bunch of bored hackers (who’ve read those articles) sit in your car for 8 hours or so?!
:)
Most cars require physical access to the OBD port to hack and depending on the age of the car there might not even be any useful features on the CANBUS assuming his car is new enough to have OBDII and CANBUS.
Okay,
I haven’t seen this question (or answer) so far…
Is the badge available to non-attendees?
No, the badge is only a present for conference visitors, and no extra samples will be produced.
We got our tickets last week. Are the badges handed out on the event or earlier?
Pozdrav iz BG-a :)
On the event
Maybe give everybody laser pointers and turn the conference into a giant LASERTAG arena.
http://hackaday.com/2012/07/27/writing-on-leds-with-a-laser-pointer/
http://hackaday.com/2010/05/04/laser-command-game-uses-laser-for-control/
what about making the top LED matrix “receive” and the bottom “transmit” and share contact info by mating the badges?
I think it’s possible to share contact info by just using IR. It’s probably easier too.
I’m a little late, but I just remembered that Olimex’s devboards usually charlieplex the input buttons. Not that you need more than the 4 buttons the current design has, but with the 4 lines here you should be able to detect 12 total buttons
Two of those four lines are shared with ICSP and should be held in high impedance state during programming. Of course, there is a lot of anode drivers which could be used for buttons multiplexing, but there is a question does such a limited hardware need more than four buttons
“All of the badges have IR send and receive connected up to the RX/TX pins of the PIC microcontroller, so the badges will be able to talk to each other. We’re especially interested to see what you’ll make with this functionality.”
Let’s fire up some malware! ;)
Also, one could code a program to input text/data to the badge using something as simple as a regular tv remote? Interesting…
> Also, one could code a program to input text/data to the badge using something as simple as a regular tv remote? Interesting…
Good idea, Elias. External keyboard? I’ve never thought about that…
So happy to see another PIC project make open-source status.
I’ve opened two pull requests for the emulator. One adds a EMULATOR #define (so you can have testing code that only runs in the emulator) and one adds support for rotating the emulator screen (so you can have a landscape mode).
Woops, meant to post it on the newer thread…
Wow, they really did use all of the pins on that! I was trying to find some way to wire a speaker up to a PWM port, but the only thing that seems usable would be to take over the USB port on pin 13, which seems a little risky.
Design files?