
Hackaday reader [Jan Ostman] has been making microcontroller-based DIY synthesizers for quite a while now. Recently, he’s opened up the source for a lot of them so that you can play along at home. All of these virtual-analog synths and soundmakers can be realized on an Arduino or AVR ATmega328 if you happen to have one lying around.
Extra parts like a keyboard, some pushbuttons, or some potentiometer knobs to twiddle won’t hurt if you’d like to make something more permanent or more obviously playable, like [Jan] does. On the other hand, if you’d just like to get your feet wet, I’ve tweaked his code to be more immediately plug-and-play. The code is straightforward enough that it’s a good learning platform. So let’s take a quick tour through three drum machines and a string synth, each of which you can build on a breadboard in just a few minutes.
To install on an Arduino UNO, fetch the zip file from this GitHub repository, and move each subfolder to your Arduino sketch directory. You’re ready to play along.
Simple Drum Machines
[Jan] has two sample-playback~based drum machines that he’s published the code for: the dsp-D8 with straight-ahead drum samples and the dsp-L8 loaded with Latin percussion. They’re essentially the same code base, but with different samples, so we’ll treat them together.
Working through [Jan]’s code inspired me to write up a longer article on DDS playback, so if you want to brush up on the fundamentals, you can head over there. The short version is that you can change the pitch of playback of a sample by using a counter that’s much larger than the number of data points you’re going to play.
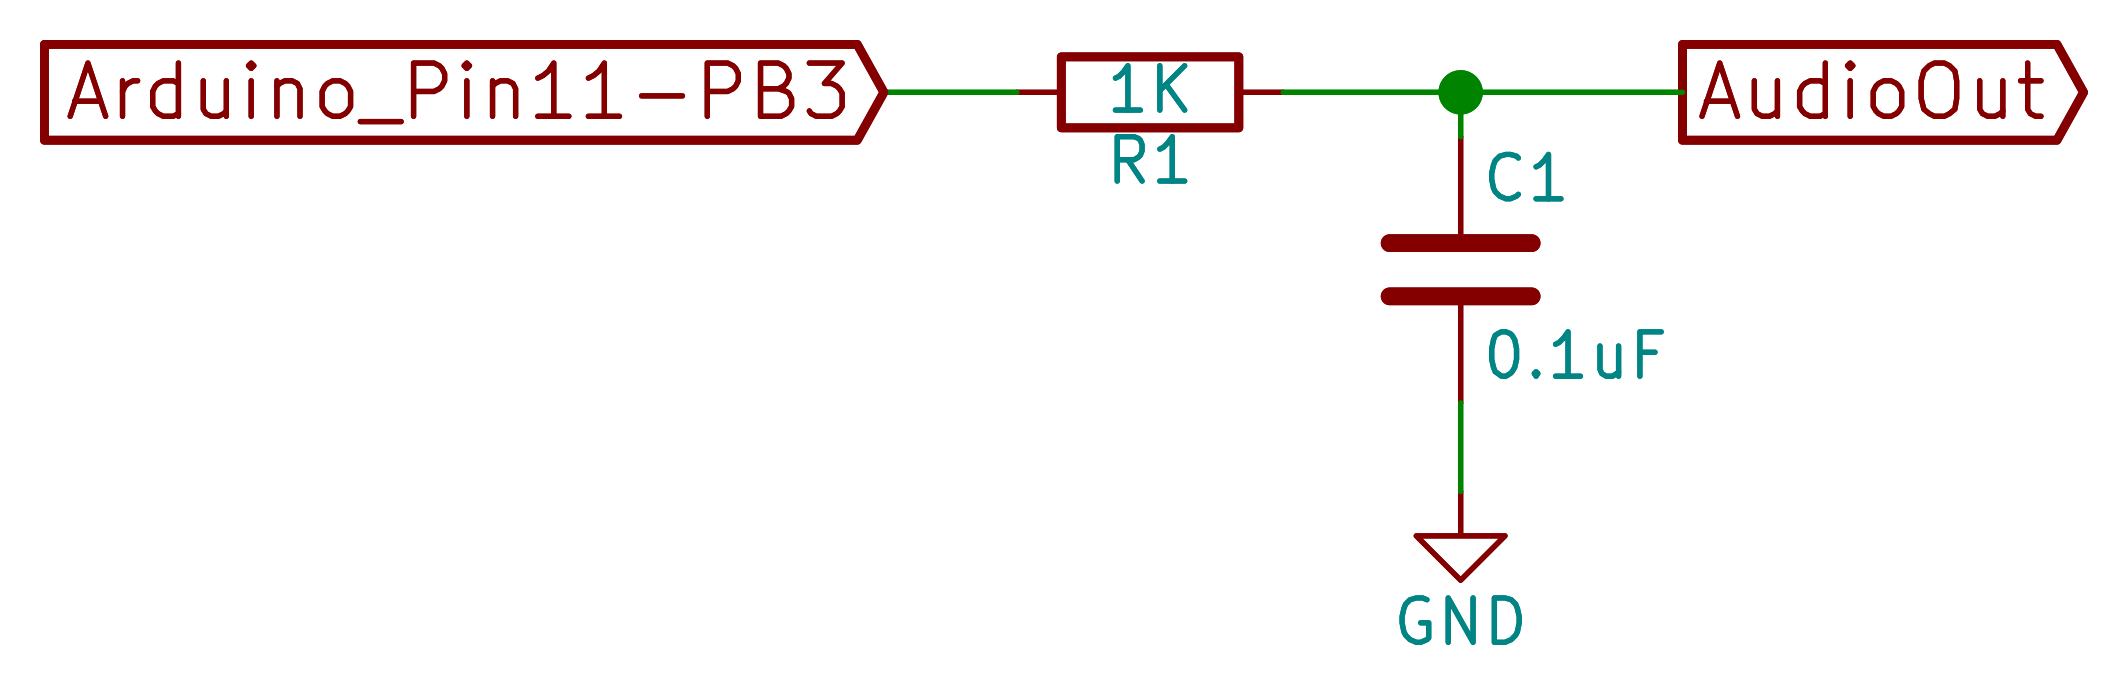 [Jan]’s drum machines all use the AVR’s hardware pulse-width modulation (PWM) peripherals to play the samples back out. You could use something fancier, but this gets the job done with just an optional resistor and capacitor filter on the output, bringing the total parts count to three: Arduino, 1 KOhm resistor, and a decent-sized (0.1 uF?) capacitor. An interrupt service routine (ISR) periodically loads a new sample value into the PWM register, and the AVR’s peripheral hardware takes care of the rest.
One nice touch is the use of a circular buffer that holds the playback sample values until the ISR is ready for them. In the case of the drum machines, there’s not much math for the CPU to do — it just combines the samples from all of the different simultaneous voices — but in his more complicated modules this buffer allows the CPU to occasionally take more time to calculate a sample value than it would otherwise have between updates. It buys [Jan]’s code some breathing room and still allows it to make the sample-playback schedule without glitching.
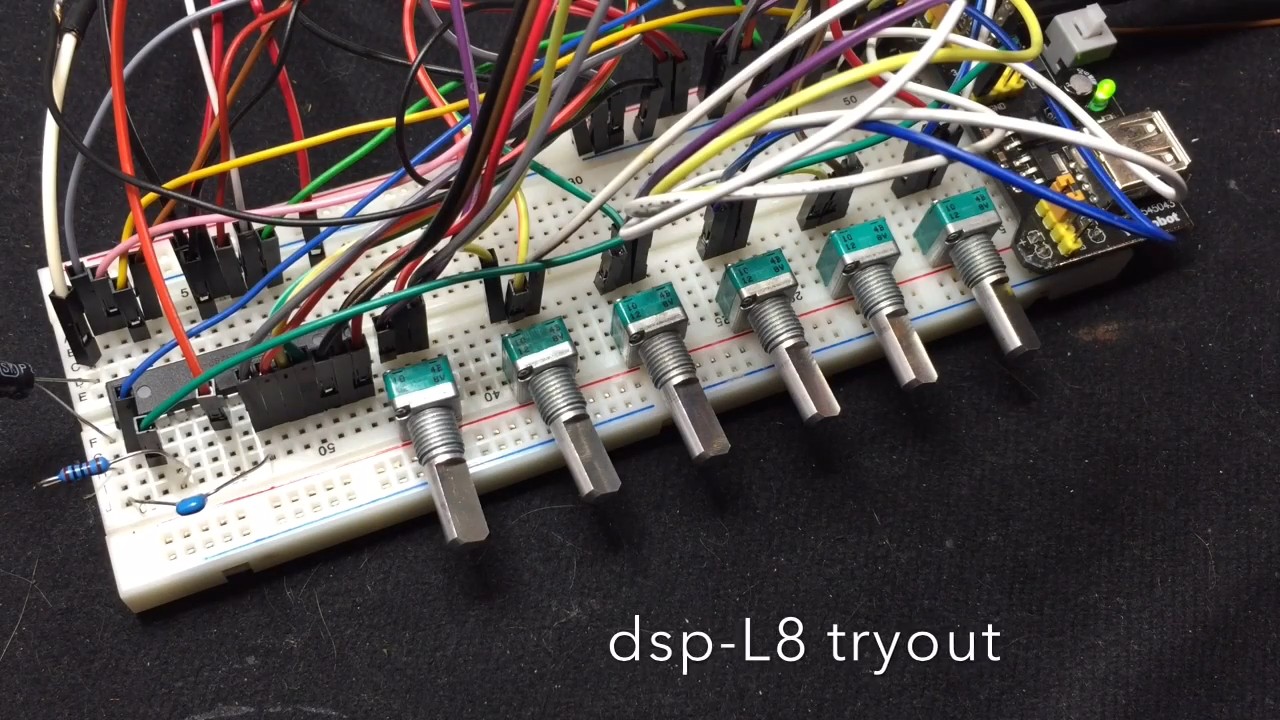 [Jan] adds individual pitch control for each sample, which is great for live playing or tweaking, and you can watch him use them in his two videos: one for the dsp-D8 and another for the dsp-L8. Wiring up so many knobs is a breadboard-salad, though, so I’ve gone through the code for you with a fine-toothed chainsaw, and hacked off [Jan]’s button-and-knob interface and replaced it with the Arduino’s built-in serial I/O.
To play my version of [Jan]’s drum machines, each sample is mapped to a key in the home row: “asdfjkl;”. If you’ve got a proper serial terminal program that transmits each keystroke in real-time, you’ll be tapping out rhythms at 9600 baud in no time. Note that the Arduino IDE’s built-in terminal only sends the keystroke after you hit “enter” — this makes playing in tempo very difficult. (I use screen /dev/ttyACM0 9600 or the terminal that’s built-in with Python’s pyserial library myself. What do Windows folks use for a real-time terminal?)
If you haven’t already, download this zip file, move each sub-folder to your Arduino sketch directory, and connect an amplified speaker either directly to your Arduino’s pin 11 and ground, or include an RC filter. It’ll only take a second before you’re playing. When you want the full version with all the knobs, head on over to [Jan]’s site.
O2 Minipops
[Jan]’s O2 Minipops machine mimics an old-school rhythm box: the Korg mini pops 7. Whether this primitive drum machine is horribly cheesy or divinely kitschy is in the ear of the beholder, but it’s a classic that has been used all over. [Jan]’s named his after an epic album Oxygene by Jean-Michel Jarre. You’ll hear them starting around 1:40 into the clip. Jarre famously used to press multiple buttons on the Minipops, making more complex drum patterns by playing more than one at a time.
The nice thing about having your own Minipops in 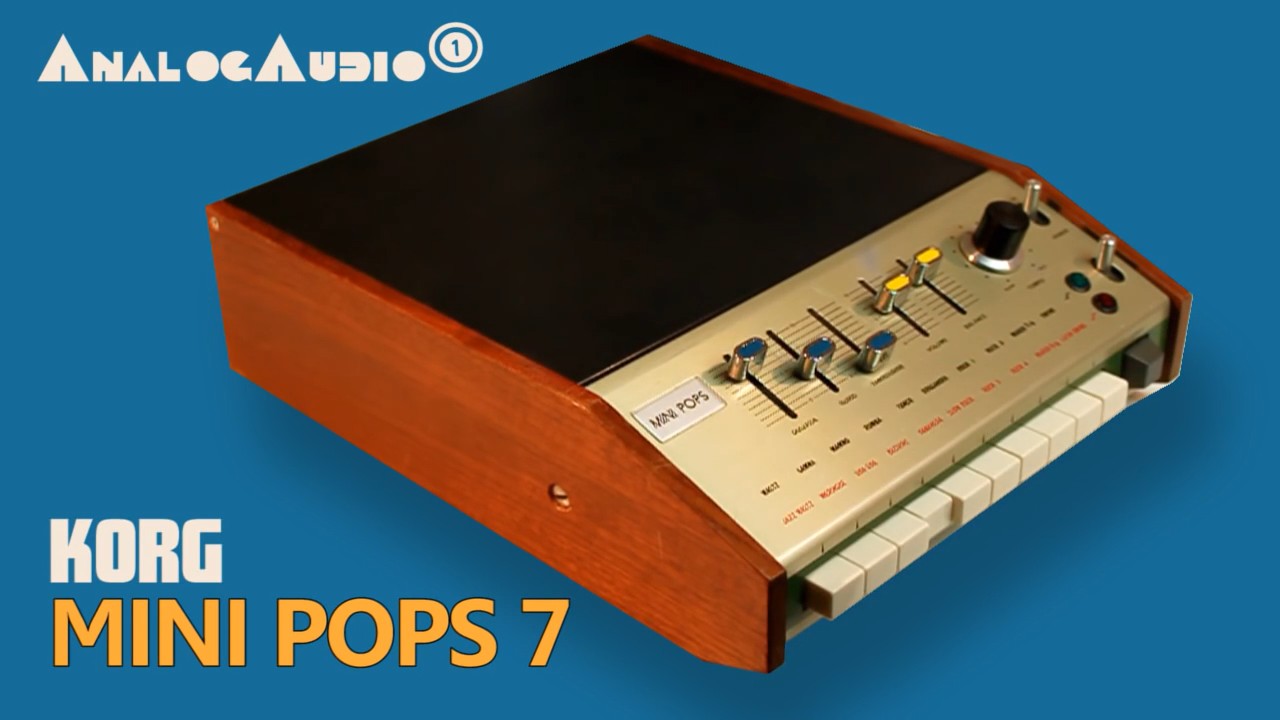 firmware is that you can add the features you want to it. Instead of having to mash down multiple plastic buttons live on stage like poor Mr. Jarre, you can just tweak the firmware to suit. Need longer patterns? You’ve got the RAM. Emphasis? Swing? Tap tempo? It’s all just a matter of a few lines of code.
The sound playback code is just like the simpler drum machines above, so we won’t have to cover that again. The only real addition is the sequencer, but that’s where the real magic lies. After all, what’s a drum machine without some beats? Because there are eight possible drum sounds, each beat is a byte and so four bars of 4/4 time is just sixteen bytes stored in memory. I broke the data out into its own header file O2_data.h, so have a look there for the pre-programmed rhythms, and feel free to modify them to suit your own needs.
In order to make the O2 Minipops immediately playable, I stripped out the potentiometer code again (sorry [Jan]!) and passed off control over the serial port. The “user interface” has five controls. Press j and k to switch between patterns and f and d to speed up or slow down. (They’re under your first two fingers in the home row.) The space bar starts and stops the drum machine.
Try switching between the patterns on the fly with j and k — it’s a surprisingly fun way to create your own, slightly less cheesy, patterns. You need to download this code and give it a try. Trust me.
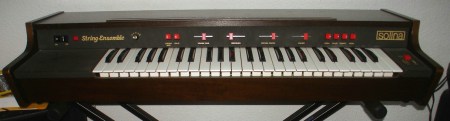
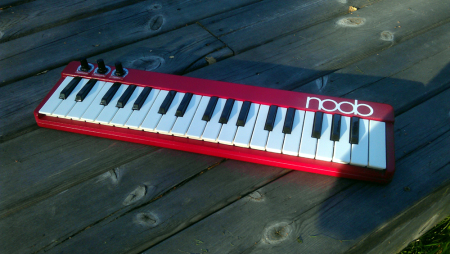
The Solina
[Jan] has also built up a full-fledged string synthesizer keyboard out of just an Arduino Nano. It’s patterned on the Eminent Solina String Ensemble, and we’ve got to say that it gets the sound spot on.
[Jan]’s Solina is a “virtual analog” in the sense that it builds up sawtooth waveforms in the microcontroller’s RAM and then outputs the corresponding voltage through PWM. And that’s a good start for a string synthesizer, because a filtered sawtooth waveform is a good first stab at the sound put out by a violin, for example.
The secret to the sound of the string section of an orchestra (and to string synthesizers that mimic it) is that it’s a combination of many different bowed instruments all playing at once. No matter how precise the players, they’re each slightly differently tuned, and none of the strings are resonating exactly in phase. The Solina mimics this by detuning each oscillator, naturally, and by moving them in and out of phase with each other. If you want to dig into the details of how exactly [Jan]’s Solina works, he explains it well in this blog post.
Again, I’ve converted it for direct-serial control, and you can control the envelope, detune, LFO speed, and modulation depth over the serial port. Press the spacebar once to simulate a keypress, and again to let go. Try the Solina with detune and pitch modulation around twenty, and play with the LFO rate and other parameters. That’s a lot of useful noise for just some sawtooth waves.
Keyboards and What’s Next
 [Jan]’s builds are much more than what we’re demonstrating here, of course. His blog kicks off (in 2009!) with a project that essentially shoe-horns a PC into a keyboard enclosure, and the Solina and others get their own keys too. We’ve just presented the kernel of any such project — there’s a lot of labor-of-love left in wiring up all of the diodes necessary to do detection on a keyboard matrix, to say nothing of building enclosures, wiring up potentiometers, and making nice-looking front panels. But if you want to start down that path, you’ve at least got a good start.
[Jan]’s current project is the Minimo miniature monophonic synth that takes the Solina a step further and adds a lowpass filter with (digital) resonance to it. The resulting sounds are great, so we’re excited to see where [Jan] takes this one in the future.
Thanks again, [Jan], for opening the code up. And if any of you build something with this, be sure to post in the comments and let us all know. Since I started playing around with these, I’ve got the hankering to modularize the code up a bit and make it into something that’s even easier to adapt and modify. Maybe we’ll have to start up a Hackaday.io project — these little simple synths are just too much fun!


I’m currently waiting on a new sync cable for my TI83+ so I can put HoustonTracker on it (my old black serial version broke,) which iirc, you guys covered a couple of months ago. How’s that for an open source synth?
A quick google suggests his understanding of aliasing is severely wanting, so you might want to research a bit before using these as the basis of a device.
I went against Oliver, which you’re not supposed to do since he’s God, and got burned.
No, you stubbornly refused to accept that your understanding of what aliasing is, why it happens, and how to alleviate it was incorrect. From the looks of it, it would have been a simple fix, but pride got in your way.
I don’t care that you think it sounds good, I don’t care that you’ve made mad bank from your synths. I care about making my own, and I can’t do that with bad underpinnings. That’s why I warned people: so they don’t start trying to make something great based on it, only for them to be disheartened when they find their core algorithm is broken, and they can’t fix it without ruining the rest of their creation.
I can almost certainly guess what you found in your google search, but the code is up there to hack and improve and am sure people using it as a basis of a device will do just that. :-)
My understanding of aliasing is lacking a *bit* too.
I see what you did there
You mean the ramp waveform in Solina, right? Not band-limited. Meh.
The drum machines are awesome, and the string synth gets pretty nice 4-voice chorused pads out of an AVR/Arduino. He could maybe get a DDS routine working, but my guess is that the cycles are kinda tight. Especially since Jan’s version runs MIDI at the same time.
The sound quality of the drum chips are outstanding.
Especially the Minipops.
There is no trace of aliasing in those.
Consider, they are 8-bit PWM DAC?
Open-Source desktop size synthesizer (midi expander), creative common hardware, gpl software, avr atmega:
http://mutable-instruments.net/shruthi1
https://github.com/pichenettes/shruthi-1
And you can run it on any Uno/Nano?
I never tried but I reckon so. However the synth is designed as a digital/analog hybrid, so you’d only have half a synth.
The Shruthi requires at the least an ATmega644 and a 12-bit DAC chip to make it’s digital sound source.
Then it uses analog filters, outside the ATmega, to shape the sound.
The Shruthi is great. It’s just a few orders of magnitude more complicated.
The projects presented here are: plug in an Arduino and optionally a resistor/capacitor filter, and you’re playing around.
And it’s ATmega644
Open source polyphonic synth module based on ATxmega128a4u microcontroller. I wrote all the firmware using an xmega port of the Arduino API, so hacking the firmware will be familiar to Arduino developers. Successful Kickstarter campaign about a year ago.
http://synthino.com
https://github.com/synthino/synthino_xm
Why did you use the ATxmega?
Most people go to the ARM for a huge increase in processing power.
Same language.
I only did this with the ATmega so that anyone could follow?
I already had synth code for AVR (that I had done on ATmega328), so it started out as a port of a synthesis engine I had built before. Then I used the extra power to do more. I squeezed 5-note polyphony @ 22KHz out of the 32MHz xmega. I’d do it on an ARM today, though.
I actually started making VA-synth’s on ARM, namely the NXP LPC-810.
That’s 60MIPS on a 48MHz 8-pin DIP with 4Kb of flash.
Turned out pretty well, turned into the dsp-G1, sold by Adafruit.
Yes, 5 voices of MIDI synth an extremely small package.
So I thought why not AVR and 20MIPS?
It can only be 3 times slower?
Turned out it can do alot with clever code optimizing.
After all it’s 20 times faster than the C64?
http://www.linusakesson.net/chipophone/
How did this got forgotten? (Watch videos too.)
Too simple
How about the Hopkins Electronic Aerophone?
https://www.youtube.com/watch?v=e7Gd0bjZoBo
*Bzzt* Sorry, too unconvincing.
Chtulu in the background
Cool.
The chipophone, and Linus, are amazing. I’m not sure that they _did_ get forgotten. The article wasn’t an overview of everything awesome in 8-bit synths, although it’s certainly turning into that in the comments — which isn’t a bad thing. :)
I’ll definitely be breaking the Arduino back out to give these a go :) Thanks, Jan :)
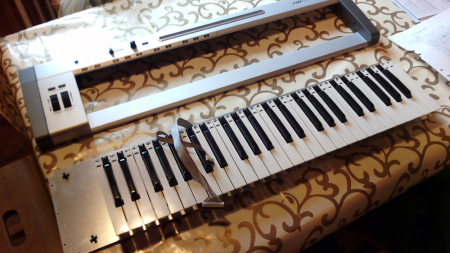
And this is taking over my desk at the moment:
http://imgur.com/Mkk4UtB
I suspect my end goal (Mono/Paraphonic Hybrid synth) is a bit different than Janstoman’s, but his code has an efficient key scanning routine and there are some cool tricks in the sound code, particularly the delay / phaser. It’s worth the time to tinker with but that said if you want HiFi sound look at 12 or 16bit DACs and faster MCU’s.
I was using the nebulaphone code earlier and suggest that is also worth looking at, though it has some basic issues (off by one errors and wave tables for square waves come to mind)
Janstomans code fitted my immediate needs to connect the keyboard and test paraphony better.
Janostman, would you please consider licensing your code? GPL or CC-NC-SA might suit if you don’t want commercial usage, otherwise MIT is a good permissive licence.
Some quick things I have found tinkering with the code:
At ~64kHz there is very little time to do anything else in the DCO, I implemented a simple 2/ sub oscillator and had issues.
The current code uses a variable sample rate, this make it hard to modify the VCO as sometime things will work when 1-2keys are pressed, but more start glitching.
I’ve tried backporting the code snippets from the monophonic synth post on his blog and could not get it to work, I did not expend much time (as I assume he will release the code soon, please:) ), but I’m not a novice programmer either.
Each oscillator is less than 6bits, with 2 oscillators per voice, the remaining bits are used for phaser feedback.
On the breadboard is a VCF / LPG (Low pass gate) based on the Korg Monotrons / MS-20’s VCF with a DIY Vactrol instead of transistors. If you want to put the current output through a LPG then you need to remove the VCA code and either use the gate output to control a Attack / Decay circuit, or output the envelope on a different PWM pin (I’m still working on the later)
It is very easy to overdrive the VCF with paraphony, sounds like an electric guitar distortion!
And yes, thats a CD4051 and a bunch of POTs in the background waiting to be wired up.
I see your lack of ground disturbing… :) (ground path through the PC?)
I am not poor to need to have live alterable not intended by design “hacks” in a drum machine. I can’t program anything live or ahead of time anyway, nor do I want to. I was pretty young when on seeing one of the first gen drum machines in an organ I mashed down two buttons and heard a new beat. The store salesman said not to do that simply because it was not intended, and not musically correct! Later the Minotaur was the first all electronic hit. In it Kingsley mashed several buttons for a hypnotic beat to go with first gen Moog tracks.
Sadly when organs went from diode matrices to serial ROM this great feature went away.
I have a Roland CompuRhythm machine with multi rhythm button capability and separate hi hats or cymbals in 1/4, 1/8, or 1/16’s. You can drop the rhythm and keep that hi hat ticking, just like a good live drummer just by mashing a few buttons. The only thing programmed in the thing is the basic rhythms. Though they are chip based they are mash-up able.
Lastly I will pay attention when one of these micros can run ZynAddSubFX, which shouldn’t be too long if not now. Some Romanian software ain’t bad.
Then you would love the Mattel Synsonics. The Rhythmic 8 by vtech uses the same type of drum programming setup where it is separated by note length. Lots of fun :)
O2 Minipops demo:
http://www.youtube.com/watch?v=-17b7U7VQEY
I made the Euro-G1 Eurorack module with Jan’s DSP-G1. Awesome little chip. Write-up and demos here http://syinsi.com/projects/euro-g1/
And I like that one.
Awesome job!
Another VA synth: http://www.quinapalus.com/goom.html
I’m thinking of making the CZ-VCO open source.
Its based on the classic Casio PD algorithm, a Yamaha FM ripoff because at the time it was patented and could not be used.
It runs at a 66.9KHz samplerate and can do resonant sweeps without a filter.
Great writing Elliot, as always.
Could you suggest code for making the Minipops sync to external clock?
Thanks,
Izhar
External sync for minipops would be very cool. Anyone know how to modify (or even MIDIfy? :-) the O2 minipops original janost’s code, please?
akademie
We have a working prototype with sync in and other extended features.
Soon on Github.
wow :-o
Great news, izash!
Keep us posted, please.
Thank you.
akademie
Will do!
Here’s a short demo.
https://youtu.be/dd9EwUtFd-s
Well, very nice :-)
I am looking forward the code…
akademie
Hi, any news??
Is sync-input abandoned?
Sadly, as of November 2019, Jan’s website is dead and content an out of reach…
Try this Github for the code: https://github.com/hexagon5un/jan_ostmans_synths
Oooh, look at me, I mirrored it. :)
Jan, what’s up with your site?
I was wondering that myself. About 2/3 of the way down this page of this Thread Jan explains that he had to shut down his site as he sold his IP:
https://www.muffwiggler.com/forum/viewtopic.php?f=17&t=196703&start=175
If the URL gets munged it’s page 8 of a thread titled “DSP Synths – Jan Ostman” on Muffwigglers.
Just discover this and also that Jan’s page (and codes) is down… What a pity
You can still find his stuff on https://web.archive.org/
Links down! :(
If these projects requires a code, I don’t know how to do work these awesone machines.
Quick question: Is there a handy utility to convert audio files to byte arrays like those used in Ostman’s include files? I would like to use my own samples but don’t want to do hexadecimal math on my fingers and toes.
…And one more thing. Although I do not know why Jan Ostman went offline, I can see he was relentlessly bullied by someone who never lost a chance to criticize his minimalist digital-to-analog style. It’s pretty darned strange. Here you have a very creative hacker outputting audio over PWM, and someone who thinks his lack of a high-resolution anti-aliased DAC makes him some kind of a crook. Here we are in 2020 and Teensy-based polyphonic synthesizers are selling.
Ostman was an explorer who kicked open a door where there was no door before, and that is how others then come in with their calipers, oscilloscopes and ieee standards to exploit the possibilities.
People were angry because he ripped them off. It wasn’t because of “style.”
Ostman ripped people off. He took money and did not deliver product, and gave no explanation or refunds.