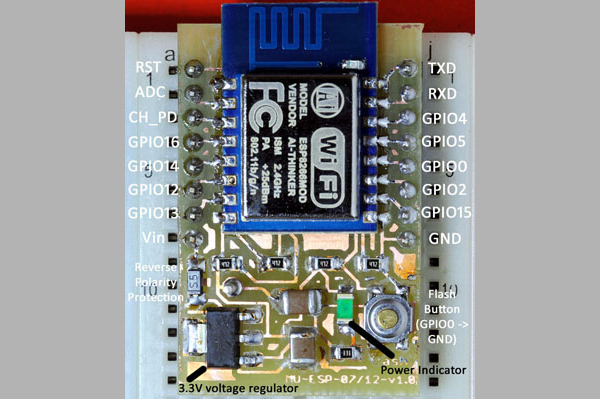
Want to play around with the ESP8266? You’ll need a breadboard adapter, which allows you to connect the ESP8266 to a breadboard as you refine your design. Sure, you could just buy one, but where’s the fun in that?
[Markus Ulsass] designed a simple breadboard adapter for his ESP8266 that can be easily etched and built at home, but which has most of the features of the commercial versions. His adapter features a voltage regulator that can handle anything up to 7 volts and which has reverse polarity protection and a reset switch that puts the ESP8266 into flash mode, where it can be reprogrammed.
It’s a neat, simple build that makes it easier to tap into the power of the ESP8266 , which can be used to do everything from running a webcam to automating your home.


You know whats even easier and faster than making a pcb? Using a bunch of thin solid core wire to solder a esp on to veroboard and going from there, do wish I left enough room for a regulator, the pullups/downs and a switch tho.
You know what’s easier than making two veroboard wire-ups? Making two PCBs. He’s probably planning on making a few.
That said, with the layout work already done, it’s maybe even easier to just print out this guy’s PCB design, even in single quantities. I’ll race ya! :)
“Want to play around with the ESP8266? You’ll need a breadboard adapter…”
No you don’t, just solder some wire to the castellations. Done!
If using the ESP01 you can just use two longer headers and some female jumper wires – (see project image here) https://hackaday.io/project/5909-vpn-light-switch
Two things – I would skip the ground plane and use bigger wire width where you can.
“Want to play around with the ESP8266? ”
Pay 2 bucks more for NodeMCU which has 2 buttons, microusb connector and serial bridge.
This. Seriously…
Use a readily available board as a devboard and move to “bare metal” once done… simple…
Nodemcu and its clones are terrific. Having a USB-serial integrated makes them a breeze to work with as it can be used for writing new code on the device, for debugging, for communication with the code you have running on the device — all without you having to so much as touch any of the buttons or anything in-between!
Yep…. right here. Stop screwing around with the raw devices and grab a nodemcu for the exact same price and get everything already done.
Or a Huzzah board from Adafruit.
NodeMCU – $5 with integrated USB-serial chip and microUSB connector, Huzzah – $10 without that bridge.
True. I guess I’ll buy one and see if I like it.
After using the NodeMCU (v0.9) for a while, I switched to using WeMos D1 Mini boards. They’re quite a bit smaller and fit nicely on breadboards.
I was going to mention the WeMos boards, I just ordered a couple from Aliexpress. Not only is the D1 mini a little smaller than the NodeMCU, it still features a USB-to-serial adapter.
WeMos also sells an R2 variant that features an Arduino form-factor, so you can use some Arduino shields on it.
Where is everyone finding a NodeMCU for $2 – $5?
Or you could connect it to a breadboard without soldering anything, just use some jumper wires and a piece of foam.
http://www.andremiller.net/content/solderless-method-to-connect-esp-12-module-to-breadboard
you and this guys that created this hack wins the internet today~
congrats~