Making beautiful things from epoxy and wood happens to be [Peter Brown’s] area of expertise. He was recently quested with reverse engineering the ring design of the Canadian manufacturer secret wood — a unique combination of splintered wood and epoxy — and achieved impressive results.
As it turns out, splintering wood on purpose and in just the right way is harder than not taping the kerf. [Peter] tried breaking wooden boards in half over his knee, in a vise, he kerfed the wood to make it crack more straight, he tried thin boards and thick boards. Eventually, he got the results he wanted by breaking a thicker slate of beechwood in an improvised bending press.


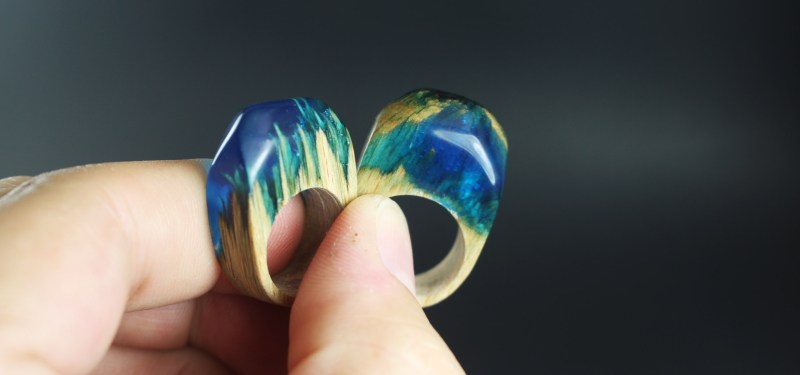
He then filled the crack with epoxy resin, to which he added just a few drops of blue dye and – intentionally – a few air bubbles. The embedded fog effect is achieved by consecutively pouring two different shades into the mold. With the secret sauce sorted out, [Peter] could start working on the ring shape of the mysterious material. He drilled a center bore, cut out the rough shape on the bandsaw and finalized the cut on the belt grinder.


After manually sanding the epoxy gems through all the grids and giving them a spin on the buffing wheel, they turned out just as beautiful as the original ones. Enjoy the video below, where [Peter] goes through all the details of how these rings are made:


Well, sure – those Secret Wood rings look great… But if that’s the process… They’re not $150 great. They’re also not $10 either. I guess my maximum price would be …$50 to $70?
Throw in an additional surcharge for the ones with flowers and stuff embedded in. An additional 10 to 20% might be reasonable for the added complication?
Per wood blank, it looks like you could get 4 rings: splinter the board on both ends and center it in the mold tray.
Figure how many batches of wood and epoxy you could do in an hour. I’d say splintering the ends takes the longest, but I’d say 15 minutes to get a good splinter effect due to having to open and close the vise so many times. Maybe 10. Leave 15 minutes at the end to mix and pour epoxy, that’s 3 to 5 boards: 12 to 20 ring blanks per hour to start with. And I’m pretending it would take way less time than I think it would. But all said, 8 hour day, that is at most 160 rings; I’ve heard some crafters say that a minimum value should be $500 per day’s work but that only puts the value at materials + $3 and change per ring so far.
Now, turning a batch of 4 blanks in to rings. Here is where it gets tricky, I think. Sure, you can bandsaw and drill them quickly, I’d say that if you have both tools in your work space you could probably completely separate a blank into 4 ‘rings’ in about 10 minutes. That would be 6 boards an hour, almost twice as many as my conservative estimate for boards per day, and in line with the maximum. So, to maximize time in production, you’d make boards for 6 to 8 days, then spend one day just splitting those into ring blanks. Value added is very very small here, per ring about $2.70
Now, polishing. That’s a beast, I tried to get my desk to a nice glass finish by wet sanding even the primer with 2000 grit before doing many thin coats of color and then several of clear poly top coat. Spent more than an hour sanding between each layer of paint. If it takes these folks just 2 hours to polish a ring down from a blank, that’s making their price right around $130 value added in those two hours. Now you might argue that their artistry isn’t worth $500 a day, and that’s your opinion.
Personally, if I had $150 for jewelry I might consider one of those rings, I don’t think my skill with the tools used is good enough to get the spectacular results they get. But, while I do value my time and recognize it would take me more than 4 hours spread over several days to make a ring like that, I also value the knowledge gained in that time; so I think I might have to find a nice piece of burl or something.
They might be using several tumblers to polish in stages, it that even works with wood and epoxy.
I have some experience with gemstone cutting. Using professional gemstone tools, a skilled worker should be able to cut and polish those rings in a matter of minutes.
Really? Are you talking about various grits and polishes on a flat lap table, or something else; I’m intrigued and out of my element.
I was making my guess on polish times based on watching Peter Brown’s other videos, using sand paper and polishing cloths. Those are the tools I was thinking of, not the professional gemstone business.
Stop believe there is a relation between price and cost.
Price comes only from one thing: how many $ you want in the end of the month.
Given that your product is a niche product (ie low volume), you must sell it with a big margin (over 50%, 80 to 90% is better). Cost is only eating your margin. Price is given by how much customer are willing to pay for it.
The answer to your last question (for me, obviously), I think I just stated. ;)
The fundamental idea of competition economics is that price should tend towards manufacturing cost as competitors undercut each other to gain custom. However, like many, many companies who have realized that there is a ‘better’ way to make profit; this brand is built around cachet as much as product. Why else would one of their main menu items give a big number of people as ‘Lovers’ of their product.
This is not an artisan company making particularly special items. It’s more like Zox, using the layered allures of both ‘uniqueness’ and popularity to sell their items. For real hand crafted jewellery, try local craft fairs, not mass-market online stores.
I wish them the best, but I’m not ordering one. That’s all.
Another plus, if they turn out evil, you don’t need the fires of Mount Doom, or even a furnace….
$100-$150 for the rings doesn’t seem unreasonable to me. It looks like a lot of the work is finishing work, which I hate doing anyway. =)
The rings are nice. I’m pretty sure, the originals are poured vertically. Especially the fog effect in some of them is probably infused with a syringe etc.
But my main question: can they actually be worn? I would think they are way to bulky and probably not resistant to any wear at all.
Have seen some of the rings some girls get around wearing – these are rather sleek by comparison ;)
Looks great!
Time to make a lamp. :)
Would assume they would be using less resin probably smaller containers (maybe vertical) for the wooden ring blanks but yeah I would think that is pretty much how they do it. Pretty cool :)
Had no idea about that ring style until I read/watched the article, have to say they have a rather nice look to them.
couldn’t you use another thin clear layer of epoxy in the end to skip the sanding/polishing process?
or make a mold of the ring’s top section.
then belt sand through to the finished polished look on the wood only.
hang wood part out of the mold using a rod through the finger hole
pour epoxy into pre-polished mold wait till cured
pull out shiny ring ready set sell.
Great looking ring. Might be a nice birthday present.
Wow that’s really nice reverse engineering, and if I had a wood shop I would definitely make one rather than buy, looks like a fun project. But that name “Secret Wood” has got to go, it sounds like that embarrassing erection you got under your desk in grade 8.
I think that is entirely intentional.
why is it that I often see these youtubevideos and 2 weeks after that ha makes an article about it
Maybe they have 2 weeks worth of backlog in their submitted tips.
Cant wait to go nuts making these, someone has thankfully taken the guess work out of the sharding process… end finish of the jewellery looks kick ass!
What exact epoxy resin did you use and where could I purchase it (hardware store etc…). Also what did you use as a dye ? Thanks for the information and it looks amazing
Don’t know what kind of dye was used, but the epoxy:
“West System resin (105 resin & 207 hardener). The reason I chose this brand was simple. I’ve always had trouble getting all the bubbles out when using it in the past. Since I wanted micro bubbles in this casting, it seemed the correct epoxy.”
That’s from the imgur link. You might have to click ‘load remaining images’ to see it.