What’s not to love about animatronics? Just peel back any puppet’s silicone skin to uncover a cluster of mechatronic wizardry that gives it a life on the big screen. I’ve been hunting online for a good intro to these beasts, but I’ve only turned up one detailed resource–albeit a pretty good one–from the Stan Winston Tutorials series. Only 30 seconds into the intro video, I could feel those tentacles waking up my lowest and most gutteral urge to create physical things. Like it or not, I was hooked; I just had to build one… or a few. This is how you built a very real animatronic tentacle.
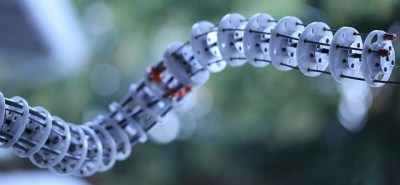
If you’re getting started in this realm, I’ll be honest: the Stan Winston Tutorial is actually a great place to start. In about two hours, instructor Richard Landon covers the mindset, the set of go-to components, and the techniques for fabricating a tentacle mechanism with a set of garage tools–not to mention giving us tons of real-film examples along the way [1].
We also get a sneak peek into how we might build more complicated devices from the same basic techniques. I’d like to pick up exactly where he left off: 4-way two-stage tentacles. And, of course, if you’ve picked up on just how much I like a certain laser-cuttable plastic at this point, I’m going to put a modern twist on Landon’s design. These design tweaks should enable you to build your own tentacle and controller with nothing more but a few off-the-shelf parts, some Delrin, and a laser cutter… Ok, fine, a couple 3D printed parts managed to creep their way in too.
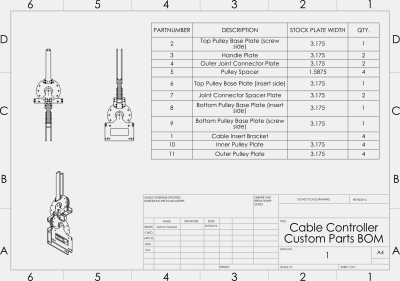 In a good-ol’ engineers-for-engineers fashion, I’m doing something a little different for this post: I’m finishing off this series with a set of assembly videos, a BOM, and the original CAD files to make that beast on the front page come to life. As for why, I figured: why not? Even though these mechanisms have lived in the robotics community and film industry for years, they’re still lacking the treatment of a solid, open design. This is my first shot at closing that gap. Get yourself a cup of coffee. I’m about to give you every bleeding detail on the-how-and-why behind these beasts.
All right; let’s get started.
The Mental Model for Two-Stage Tentacles
I’ll spare us the math this time, but it’s still critical that we get a rundown of how these mechanisms operate. Before we get ourselves a live one on the table, we need to arm our brains with the right model of how these beasts ought to behave. That way, we’ll have the right insight to start refining it’s behavior until it meets our expectations–expectations that are properly backed by physics. First, let’s get comfortable with our beasts’ range of motion.
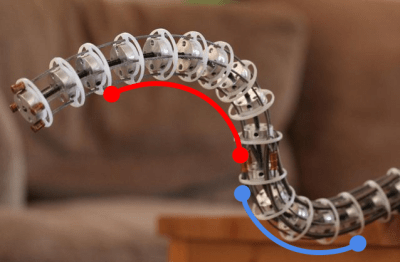
Our tentacle has two stages, each of which has two degrees of freedom. These two degrees of freedom enable that stage to arc in two directions, both orthogonal to each other.
With a linear combination (a mix!) of all four of these degrees of freedom, we get quite a bit of freedom to spoof some pretty convincing organic moves. If we watch the clip below closely, we can actually see the point where those two stages join, about half way down the body.
When it’s properly assembled, we can control each stage independently without influencing any curvature in the other… ideally. In the real world, nothing’s perfect, and our materials especially have their own limitations. With that said, we’ll need to refine our tension and vertebrae spacing until the behavior is good enough for us.
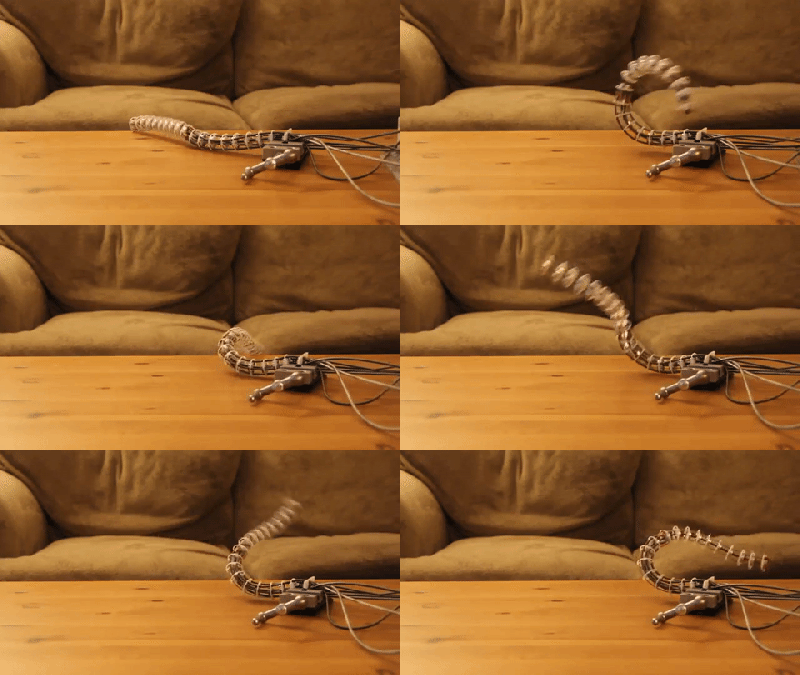
In an ideal world, tugging on the each stage’s cable would form a perfect arc that decreases in diameter the more we tug. Friction causes losses at every vertebrae, so we can’t achieve that perfect arc, but we can get close enough to fool those humans off-screen.
Keep in mind that, while we can achieve a range of poses, none of them involve twist along the tentacle core! This design choice is deliberate from puppeteers of the past who see it as unnatural–especially among the cat’s tails and elephant’s trunks that we may be trying to emulate [1].
Tentacle Mockup
To get some intuition of the cable drive, let’s build up a crude tentacle consisting of two plates, and a flexible core. Here’s a diagram of our pre-natal tentacle below:
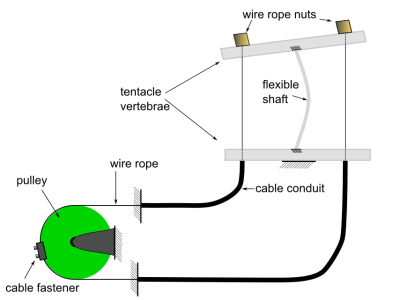
By exhibiting a torque on the pulley, we simultaneously slacken one rope while tightening the other by the exact same length. The resulting shortened wire length curls the tentacle towards the wire. Since these cables can only apply force in tension, they must be paired with complements for the full back-and-forth range of a single degree of freedom. Hence, we have a messy grand total of 8 wires to manage later, but we’ll talk about cable management in the weeks to come.
The tentacle holds its pose because of two key features here. First, the cable conduit resists compression. Second, the cables are pre-tensioned and fixed rigidly to the pulley. Because a change in cable length is the only way to move the tentacle vertebrae and because the cable conduit cannot change length, keeping the pulley in a fixed position will likewise keep the tentacle fixed in its current pose.
The Role of Cable Conduit
The big player in this scenario is the cable conduit. Without it, movement in the upper stage would also cause unwanted movement in the lower stage, and that’s exactly what we don’t want. Instead, we’d like our two controllers to independently control each stage they’re connected to.
Cable conduit lets us freely reroute the direction of our forces from one end of the conduit to the other without causing any unwanted forces along the way. The key here is that conduit remains flexible while simultaneously resisting compression.
As an interesting phenomenon, in the setup above, we can grab this cable conduit at any point and move it about any way we like without any resistance for two reasons:
- The conduit is flexible.
- the center, where the cable is routed, does not change length.
Because any sort of bend in the conduit will not change its length, we can bend the conduit as much as we like, and the tentacle will remain in a fixed pose. Pretty neat!
This phenomenon lets us do two things at once: it lest us slide our control cables for the upper stage into the lower stage while they move freely with the lower stage and it lets us control the upper stage through the lower stage without influencing the lower stage.
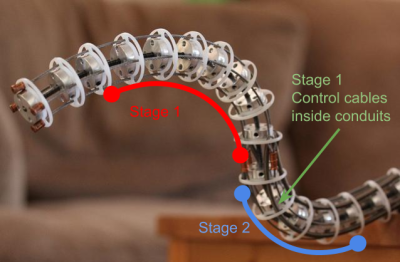
Now, let’s have a double take at that graphic from earlier. If we look closely, we can see the control cables for stage 1 are actually hanging out for the ride inside of stage 2 after they get sleeved into conduits.
Tentacle Nuts and Bolts:
And now for another deep dive into a new vocabulary of parts. I promise that we haven’t made friends with these off-the-shelf components just yet, so keep a sharp eye and read on, fearless reader!
Core Material:
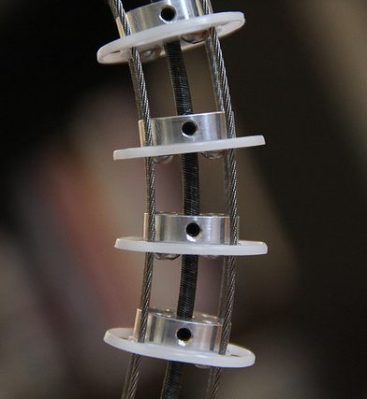 The key to achieving that slick, isolated movement from each degree of freedom comes from building the tentacle out of a structure that resists twisting along its core. Most folks tend to use replacement speedometer cables from old cars that do just that [1]. On my first few passes at these puppets, I too used speedometer cable. Unfortunately, these cables are limited to a single diameter: 0.125 inches, which means our puppets can’t get all that large without starting to twist under their own weight. These days, I’m finding somewhat better performance from flexible shafts for rotary tools, since they come in a slightly larger diameter. Heads-up: unless otherwise noted, most pics on this round, though, are using speedometer cable, which is fine for puppets that are fairly small and light.
Segments:
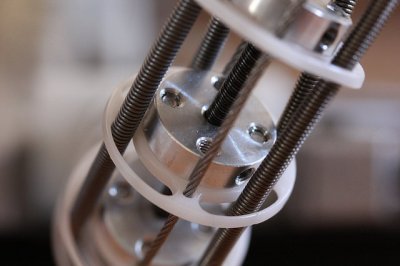 For each segment that will become our tentacle’s vertebrae, we need a way to rigidly affix that segment without slipping or twisting. These vertebrae serve to both properly route the cable and, where needed, cable conduit too, while they maintain their fixed location to the speedometer cable. Landon’s design solves this problem with an all-in-one CNC’ed alumimum piece. Luckily, with a little shopping online, I’ve mocked up a component that does the same thing but relies on mostly off-the-shelf components. The key to this element is all thanks to hackers like you. Since hobby robot parts are such a commodity item these days, I managed to create the vertebrae from just a Pololu motor hub with an extra Delrin plate to hold the cables at the right places.
Control Cable:

The cable actually driving these mechanisms is just as we’d expect to see on bicycle brakes: wire rope. These are far thinner, however. I’ve had luck with two varieties of the 7×7-core: the 3/64 inch (1.190625 mm) diameter and the 1/32 inch (0.79375 mm) diameter. The super-fancy flavor of this wire rope doesn’t fray since it’s annealed at manufacturing by squeezing it through an undersized hole [1]. Alas, I can’ t afford such goods, but a few folks at the Stanford Cable Mechanisms class have found a nice alternative. It turns out that torching the cable tip for a few seconds until it glows is sufficient heat treatment to prevent it from fraying [3]. Presto! Now our cables won’t fray.
Cable Conduit:
For the cable conduit, there’s a host of options that include nylon tubing, derailleur cable housing, and extension spring. At the end of the day, we’re trying to achieve one goal: we need a housing that resists compression while retaining flexibility. Our conduit needs to resist compression such that it provides that “equal-and-opposite” force needed to create movement.
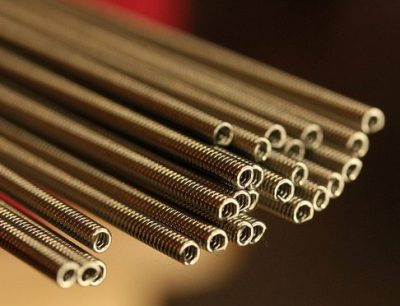
It needs flexibility so that it also doesn’t prevent any of the other sections of the tentacle that it’s routed through from bending. For single stage tentacle mechanisms, any option from that list above will do. For multistage mechanisms, though, that flexibility is key. So far, I’ve found that extension spring really does the job best since it’s far more flexible than any of the other options.
I’m convinced that McMaster-Carr might be able to sell you just about anything. You just need to know the right name for it. Around those parts, our cable-conduit substitute goes by the name “continuous length extension spring,” (9664K12) and for $4.40 at 36 inches, I can’t complain!
If your needs are truly custom or you need something smaller, I’ve had some great luck getting smaller diameter springs fabbed from Dr. Templeman and Co. Their pricing for any lengths beyond their default 8-inch length will cost a bit more than McMaster’s 0.125-inch diameter, but the range of tiny sizes might just be worth the few extra dollars. Anything in the extremely tiny range might get you in conversation with the folks at Molex with their micro-miniature coils. Heads up: if you end up finding yourself picking up medical-grade extension spring, please drop us a line and send us some awesome pics of your project when it’s done!
The Inflection Point
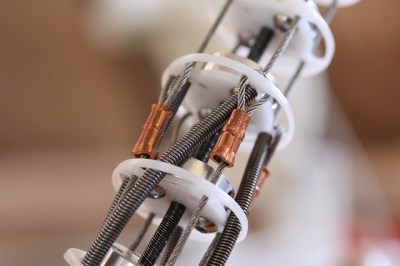
This section marks the transition of control from one controller to the next, and it was a big headache to wrap my head around on my first pass at this device. Nevertheless, it’s actually pretty straightforward to construct once we understand the proper termination points for each wire rope. Each wire rope that controls the lower section terminates with a wire crimp. On the same vertebrae, the cable conduits that house the next set of control cables also terminate; and, from them, the next set of control cables spool onwards.
Design Alternatives
It’s worth wondering–for those vertebrae, couldn’t we just use a different material like wood to save ourselves the expense of having to buy these motor hubs? The answer is ‘maybe’, but this design choice and many others in this design are rooted down with a couple goals in mind.
First, any complexity in the design needs to be farmed off to either off-the-shelf components or a readily-available fabrication method (in this case: laser cutting and 3D printing.) I make this choice so that no special hand-eye coordination training will stop anyone from building one of these. Yes, sliding heat-set inserts into a thermoplastic might be a bit tricky the first time, but it’s nothing outside the bounds of the hacker who can solder up a few through-hole components.
Second, the techniques to fabricate these prototypes must be deterministic and repeatable. They need to behave exactly the same no matter what part of the world you live in. There’s no magic and no praying to the adhesive gods on one foot while your epoxy cures at some oddball humidity level. Just a few techniques that behave the same way anytime, anywhere.
As for design alternatives, I’d say–go for it! I’ve refined both the controller and the tentacle at this point, but that doesn’t mean it’s finished. When I’ve finished off the assembly post (part III), the design will be in your hands. Make it yours!
Stay Tuned for Part II: the Cable Controller
That’s it for this round! Tune in next time to take a serious look at a controller design used to drive these beasts. There, we’ll talk parts, fabrication techniques, and future improvements. Until then, hang tight!
References:
[1] Stan Winston Cable Mechanism Basics
a detailed tour of basic tentacle design with a peek into more complicated mechanisms
[2] Animatronics Demo with Rick Lazzarini 1:21:01
Speedometer Cables Example Uses in Animatronics from Rick Lazzarini
[3] CS235: Applied Robot Design, Lecture 7-Introduction to Cable Transmissions
Stanford’s Introduction to Cable Drives in a Haptics Context.




I see this, but my brain is yelling muscle wire at me.
Yeah, problem is you usually only get 3 to 4% change in length out of muscle wire. You could make yourself some SMA springs. They give you much greater change in length (for less power). Just wind some Nitinol wire on all thread. Secure the ends. and heat to ~450C. Five minute soak in a furnace once it’s come up to temperature, or just hit it with a blowtorch and cut out what didn’t heat teat properly. Either way please post if you try it.
Try some carbon nanotubes. 240% length contraction upon applying 5kv. 40% contraction upon applying 240v. Lighter than air and superstrong too!
The other thing this was yelling out to me was why pay for custom springs. At least on the first few iterations. Net curtain wire is exactly the same stuff, just with a plastic coating, and it’s far cheaper in longer lengths. I’ve used it for similar projects. It also makes reasonably good, quick and dirty, motor couplings amongst other things but I’ve used lengths of it soldered in a circle around aa rotating wooden disk to make a high frequency oscillator before. Imagination is key when it comes to repurposing things.
I’ll just leave this here
https://www.google.com/url?q=http://m.youtube.com/watch%3Fv%3DpQ2dI_B_Ycg&sa=U&ved=0ahUKEwji78PBxYzPAhUGpB4KHYi9BfsQtwIICzAA&usg=AFQjCNHAutNd4Qb5HRtcCMJJ0qTCkoXKCw
http://hackaday.com/2015/11/30/arduino-powered-knife-wielding-tentacle-will-leave-you-in-stitches/
I need one to mow the tall grass in the backyard!
????
@John: You could have left most of that URL somewhere else.
It looks like you could salvage pulley / motor hub mechanisms out of automotive power window regulators – just hit up a junkyard, open up a few doors, and pull out the mechanisms you need.
There’s a bunch of those been booting around in surplus, Princess Auto has them.
Hmmm, reminds me of a early noughties 2005?) documentary or an inventors program which showed a 4m or so animatronic python which had very similar wire tension control to orient & make it wriggle but, needed a power cord though it did have a camera at the head end. Ostensibly set up for squeezing through rubble post earthquakes – nothing came of it – I seem to recall a couple of patents at that time as my friend was interested. As there didnt seem much interest & the combination of controls/power/utility wasn’t evident – those patents might have lapsed…
Well done here however, modern approaches could well make this thing slither along rather nicely, if at least to scare the local feral cats & provide much laughter as it hides in the bush awaiting errant human campers on me farm aye laddie ?
Who says tech has to have immediate utility to alleviate human suffering when so much fun can be had
*grin*
Wonderful! Now I won’t have to buy any Halloween candy, but can still give the impression that I’m participating. As a bonus, the neighborhood kids will have nightmares for years to come, and never again think about treading on my garden. Joshua, you are my hero.
P.S. The Japanese are going to love this.
Another inexpensive option is the small size closet auger (plumbing snake). New is preferable to used. I picked one up at a dollar store a few years ago that would be wholly unusable for the labeled purpose, but was about the same size as clutch-cable housing, while more flexible and US$1 for 25 feet (about 8m).
But can it wield a swiss army knife.
This looks awesome. Just ordered the $60 DVD, cause I’m happy to spend a little money on learning and supporting people making such great educational material, and also because my skills are mostly electronics & software… a little time with machine tools could do me some good. :)
To everyone who’s commented they could do this with some random junk or cheap materials, I hope you’ll put your time & effort where your comments are, and actually post something useful on hackday.io about how you actually DID DO it, rather than dismissive comments about how you could.
Well their project is impressive and a lot more thought out than mine, that said if I still had the old tentacle arm I made about a decade or so ago I probably would post it. Used old harddrive platter end caps for it. Tho it was only single stage and ran into issues where in which the wires would wear and snap which was probably because the central support was a bit too ridged causing the wires to strain against the metal segments. Alas it went the way of the first robot I built, trashed for parts and eventually junked.
I use Klixx toys, and bicycle brake cable for my tails:
https://youtu.be/8NQH2B-Mnvg
Do you also have a link with the thing actually doing something, it looks awesome but it only shows advanced wire soldering for experts.
Some kind of Medusa hat that can also crawl around autonomously.
The snakebots have returned!
I really need to get to that twisted-string actuator tentacle I was planning…
oooh kinky
Hi,
Does anyone know the diameter of the flexible shaft mentioned in the article? I like to build something for halloween this year. So I am looking for parts :)
https://www.aliexpress.com/item/98CM-38-6-Length-Rotary-Tool-Flexible-Metal-Tube-Inner-Shaft-Cable-For-Foredom-F-Flex/32510179656.html?spm=2114.13010608.0.53.rXrB2n
Hey Armin,
The flexible shaft from AliExpress is 4mm. I used a hack saw and a grinder to cut off the tips and clean up the exposed ends. Hang tight. I’ll try to get a BOM out sooner rather than later.
Heads up: there’s a 2-week lead time with standard shipping on that part.
Thanks! I just ordered the part. If it is too late I will hack something together and use the flexible shaft for something else (the way it is normally used ?!?)
Hi,
Just a quick update. The flexible shaft was already in my mail today! So it seems they are pretty quick with shipping
I would like to suggest deep sea fishing line and leaders as possible ‘cables’.
Some of the stuff is absolutely ridiculously strong (shark fishing!), slippery, and versatile. Look at the expensive stuff at a fishing/camping outlet. :)
Did I mention how strong the stuff is? Seriously, it is difficult to cut.
“Two-stage Tentacle-Mechanism”, sounds like a technique that a Japanese pickup artist would use.
二段触手-機構
http://lh3.ggpht.com/-aDuJGoQxWGg/UMjHt1izJDI/AAAAAAAADao/d7qInk-Fip0/Squirming-USB-Tentacle-200×200%25255B4%25255D.jpg
Tentacles can be quite dangerous:
https://www.youtube.com/watch?v=pQ2dI_B_Ycg
Nylon Pneumatic Air Line pipe is also quite good. Not quite as flexible but much lighter. I haven;t found it smaller than this:
E.g. https://www.aliexpress.com/item/4mm-2-5mm-Nylon-Pneumatic-Air-Line-Tubing-Pipe-Plastic-Compressed-Tube-2m-A129a/32691180320.html
There are several well made tentacles on this page: http://www.bitegroup.nl/author/paulbreedveld/
I’m especially impressed by the extremely miniature i-flex.
That is fascinating stuff! Mostly ridiculously thin endoscopes for surgery.
http://www.bitegroup.nl/maneuverable-devices/the-multiflex/
There is also a shape-memory endoscope in the works; looking forward to seeing that design. :)
I had an idea years ago for a “tentacle” like device I called the electric fin since it moved back and forth using magnets and electromagnets to attract and then repel to move the linked fin/tentacle. Probably not a very efficient idea, but might be quieter more stealthy than a standard prop in the water.
The fraying problem can be further helped with just a touch of solder on the hot wire, gluing the ends together. I’ve done this on bike shifter/brake cables for a long time.
This is an amazing article/resource. I’m adding it to my “practical effects” Pinterest and keeping it bookmarked. I did an ultra low budget tentacle mechanism for my chestburster Halloween costume last year. I also did a tutorial for it. https://youtu.be/Qn2AvGGFkOs
That really was ultra low-budget! Looks like everything even the springs came from around your house; nice Halloween project. :)
Good luck with your comic and films!
could you specify the size and where you bought these “segments”.
would you specify where you bought the “segment” pieces and their specific size?
I created this last year for a Halloween decoration in my front yard. I used the same Stan Winston video as inspiration and then created the design in Autodesk Fusion 360. Let me know if you have any questions!
http://www.thingiverse.com/thing:1114406
Link to part two: http://hackaday.com/2016/10/05/two-stage-tentacle-mechanisms-part-ii-the-cable-controller/
can’t you do a stage with just three cables? also that seems to lend itself more intuitively to the natural tentacle phenomenon where there is much stronger force (and a grippy surface) in one particular direction
Link to part three: http://hackaday.com/2016/10/21/two-stage-tentacle-mechanisms-part-iii-putting-it-all-together/
Somebody better make the octopus robot, or else! :P
Hi, I don’t know if this can help someone but I think I found a flexible rod with a much larger diameter: 7.5 mm: https://fr.aliexpress.com/item/4000139338667.htm :)