
In recent years, Cosplay as a hobby has seen improvement in the props department by leaps and bounds. Thanks in part due to the rise of the Maker culture and the easy availability of design and manufacturing tools and processes. Case in point is this awesome set of Animatronic Wings that programmer [Nelson Stoldt] built for his daughter who wanted to be Nightmare Moon.
[Nelson] had no idea what he’d gotten himself in to when he answered “Sure, I can do that”. Making motorized cosplay wings that open up to 8 feet wide and close again at the flick of a switch without weighing a ton is not a trivial project. The final rig did end up tipping the scales at just over 9 kgs, but we guess that’s a load that Cosplayers are used to hauling around.
Using a nifty program called Linkage, he played around with a few different design approaches until he found a mechanism that worked well. If you ever want to build one of [Theo Jansen]’s Strandbeest, give this program a spin. Armed with this information, and a spreadsheet to help determine the exact length of each linkage element, he modelled the project in Sketchup. The wings are operated by a scissor mechanism that is driven by a motorized screw operated sliding carriage. Wing position is measured by a potentiometer coupled to one of the wing elements. Basically, he just built a huge, powerful servo.
The linkage mechanism was built out of Aluminum bars. This part of his blog — measuring, marking, cutting, drilling, tapping, sanding, sawing — sounds like a Harbour Freight advert, but we’ll let that pass. He cut an acrylic sheet, heated it in an oven, and then bent it to shape to fit the back of the cosplay dress. Attached to the body using straps, this acrylic backpack has a kind of hook mechanism that allows the main wings to be easily clipped in and removed. Handy since they weigh a lot.
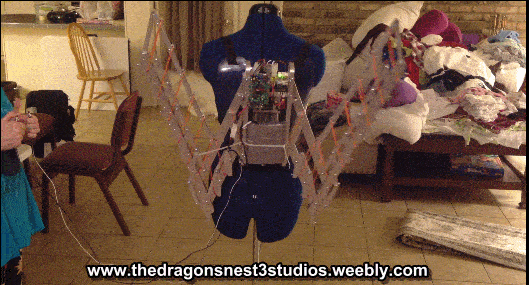 Unfortunately, after adding all of the skin and feathers to the wings, the original motor turned out to be underpowered. A cordless drill was then hacked to help power the wings (maybe he didn’t get the memo about Harbor Freight chainsaws?). The electronics are pretty simple, an Arduino Uno with two input switches and a DPDT relay for controlling the motor direction. A beefy FET recovered from the cordless drill helped drive the new motor. The dual switches helped ensure safety. With the master switch pressed, click slave switch once to raise, or twice to lower. While the motor was moving, a click on any switch would stop it immediately.
There were some last minute hiccups with the wings not opening fully, but some quick code edits solved the problem. His daughter showed off her animatronic wings and went on to win the Best in Show prize, so the effort totally paid off.


Red Bull not included.
These look amazing! What a great job!
Yeah it’s nice.
And then these cosplayers take the most of the attention, even that they didn’t make the cosplay itself…
Bitter much?
Sure it would have been even better if she had designed it herself but she asked her dad not wetta workshop! I imagine she was heavily involved in the design as well as the rest of the costuming but lacked the specific knowledge this time on how to make an 8ft aluminium skeleton with custom control system. Next time on a smaller project she may tackle it herself or get more involved as time goes on.
No one here can say they jumped straight into a huge project, there is always smaller steps taken first. Looking forward to their next piece. However if you chip away at peoples achievements people stop getting involved and the community doesn’t grow just leaving rooms of bitter people bickering among themselves.
+1 Also I would imagine the wings looked better on her than on dad’s back, nessesity is the mother of invention, she had the need and together with his skills they built them. I would think that most Dads would love to work on a project with their teenage daughter.
+1. but for the record, i routinely begin projects well above my knowledge, driven only by the determination to do it myself and see it through to completion.. some of us are just bullheaded like that.
Linkage? Wow, Linkage!
I’ve been banging my head on design of 4-bar linkage systems, to create a hinge attaching an LCD to a 60% keyboard. Target is a dumb terminal / ultra thin client, for use with assorted Dev boards.
And the software I need is casually mentioned as a comment. God, I love this site.
Nice project!
‘And the software I need is casually mentioned as a comment. God, I love this site.’
I agree! I’ve been doing that kind of stuff the hard way, and never heard of Linkage. Perfect!
Thanks… I think it as the forgotten love-child of a Psion Series 5 , and a Sharp PC-3100.
Ideas are easy, implementing them is harder.
Just goes to show whatever one’s problem is someone else already ran into it and has a solution.
If someone happens to need 3D linkages, solvespace has some useful features for that purpose also. But for 2D linkages the “Linkage” application is probably better as that is its whole purpose.
Very neat mechanism, but I can’t help but feel the fake feathers on the wings look pretty weird. It can’t be *that* hard to get real feathers, can it?
That last 10% is just as hard as the first 90%. Getting past the uncanny valley stage is extremely difficult.
Humans are exquisitely sensitive to the last 10%.
https://www.youtube.com/watch?v=v2p_6gMgoXE
I think yes, getting real feathers that size would be very hard. Not sure how you go about making fake feathers but I think the lack of a natural curve to the vein of these is what sticks out to my eye. Perhaps the shape near the tip as well. But all in all they don’t bother me — It’s an impressive overall effort and I’m glad both that she won an award, and that they showed off the underlying mechanisms.
Ostrich feathers
https://www.amazon.com/s/ref=nb_sb_ss_c_1_17?url=search-alias%3Daps&field-keywords=wholesale+ostrich+feathers&sprefix=wholesale+ostrich%2Caps%2C950&crid=3E1773OZJPDW1
While real, and large, they do not look like flight feathers.
https://en.wikipedia.org/wiki/Flight_feather
Real feathers are a NIGHTMARE to work with. Also there are no commercially available feathers large enough to look realistic with wings like that, and even if there were you have the horrors of trying to attach them to a rig and then get them to stay stable. Birds have tiny muscles attached to every single primary feather to keep them pointing the right way, and without that they twist and ruffle even if you’ve got a good attachment method. Source: Experience with taxidermy. Getting all the feathers of an eagle into place took me longer than either skinning or mounting the bird. And that’s with them all still firmly attached to the skin.
Nightmare Moon? Rainbow Dash would have been at least 20% cooler.
… I’ll see myself out.
I saw the title and assumed it was going to be Mercy…
Well everypony can have a opinion.
….. wonder where that guy went?
It’s an inside joke.
http://knowyourmeme.com/memes/20-cooler
So was mine ‘everypony’
Nice build. Adding some counterbalance springs can reduce the amount of force required by the motors.
How do you spec the strength of the springs so they are just right?
They don’t have to be “just right” — the mechanism functions both ways, it’s just that right now gravity is making it work harder one way than the other. Anything between the current situation and the completely reverse is an improvement, so it’s very amenable to experimenting with whatever springs you have to hand, or with making springs from whatever music wire you have. If it’s not too hard to remove the nut and/or leadscrew, you can operate the linkage directly (lifting and lowering the input slider) to compare the force until you get it close enough.
That said, it’s not terribly imbalanced as is. Note how the outer tips of the linkage move in very nearly horizontal lines, with only the “elbow” having substantial vertical movement — there’s a little that could be gained, but given the tight timescale by the end of the project, I can see why he didn’t bother.
Measure the tension force at the maximum tension (stretch) and measure the length relaxed. The force is a linear progression between these two points. That’s why you can use a spring to make a scale to measure mass (as weight under gravity).
The same software he used to design the linkages would also do the spring linkages.
Balance the load with springs and you should reduce the load on the motor, too.
Maybe even add some [black] handles at the elbows, allowing manual open / close in the event of a power failure.
Damn- I was listening to “She Burned Me Down” when I saw the .gif and it gave me chills. Now I wanna build animatronic cosplay props! Maybe a powered mockup or the CAT powerloader from Aliens.
Love it. It would have been nice to see a video of the finished product.
Awesomeness Stoldt. Good job!
wow! what did you use to animate the wings? a servo? stepper motors? a salvaged fan?