
Guitarists are a special breed, and many of them have a close connection with the instruments they play. It might be a specific brand of guitar, or a certain setup required to achieve the sound they’re looking for. No one has a closer bond with an instrument than Brian May to his Red Special. The guitar he toured with and played through his career with Queen and beyond had very humble beginnings. It was built from scratch by Brian and his father Harold May.

It was the early 1960’s and a young teenaged Brian May wanted an electric guitar. The problem was that the relatively new instruments were still quite expensive — into the hundreds of dollars. Well beyond the means of the modest family’s budget. All was not lost though. Brian’s father Harold was an electrical engineer and a hacker of sorts. He built the family’s radio, TV, and even furniture around the house. Harold proposed the two build a new electric guitar from scratch as a father-son project. This was the beginning of a two-year odyssey that resulted in the creation of one of the world’s most famous musical instruments.
Brian was already an accomplished guitarist, learning first on his dad’s George Formby Banjo-ukulele, and graduating to an Egmond acoustic guitar. Brian’s first forays into electric guitars came from experimenting with that Egmond. If you look close, you can even see the influence it had on the final design of the Red Special.
Body and Neck
The neck of the guitar is mahogany, made from a Victorian era fireplace mantle. The building which housed the fireplace was long gone, and Harold happened to have the mantle in his workshop. Brian filled the wormholes with matchsticks as he carved out the neck.
The center body of the Red Special was created from oak, the wood recycled from an old table. The sides of the guitar could be made of weaker material since they don’t have to support the string tension. These were made from blockboard — an engineered material made from blocks of softwood sandwiched between two pieces of veneer. All this wood was cut, carved, and shaped using only hand tools. Oak and mahogany are hardwoods, so one can imagine how long it took to carve a block of it into something resembling a guitar neck.
The neck isn’t a solid chunk of wood. Most guitar necks include a steel rod called a truss bar. This rod helps the wood pull against the tension of strings. The Red Special is no different. Brian and Harold heated one end of a steel rod, then bent it into a loop. The loop was bolted at the body side of the guitar, while the rest of the bar runs through the neck to the headstock end.
Brian originally wanted the guitar to be semi-acoustic, so he carved resonant chambers into the block board. He even planned to make an F-hole in the guitar body. Once the guitar was done though, he couldn’t bring himself to cut a hole in the mahogany veneer which makes the outer skin of the Red Special.

Tremolo
Rock guitarists need a tremolo (or vibrato) system. This is the “whammy bar” which can add or remove tension on the strings, allowing the guitarist to bend all six notes at once. The problem with tremolo systems on guitars is that they don’t always come back to a clean neutral point when the musician is done bending the notes. One or more strings will be out of tune. The Fender synchronized tremolo had this issue, and the problems always came down to friction.
Brian and Harold spent a lot of time on the tremolo system. They used the neck of the guitar-in-progress to create a tremolo testbed. The pair went through three revisions before settling on the final design. Friction is eliminated everywhere possible. The entire tremolo assembly rides on a knife edge, which Brian and Harold hardened using case hardening compound over the kitchen stove. The strings ride in roller saddles. Brian made each of the rollers using a hand drill as a sort of manual lathe. The rollers aren’t captive — so a broken string during a show means a roller is bouncing around on stage somewhere. Switching to a captive design would force Brian to change his playing style, so he just keeps a healthy supply of spare rollers on hand. Overall, this was a groundbreaking design. In Brian’s own words “…everybody was saying I should have patented it, but patents are a pain in the neck, and why not share everything with the world?”
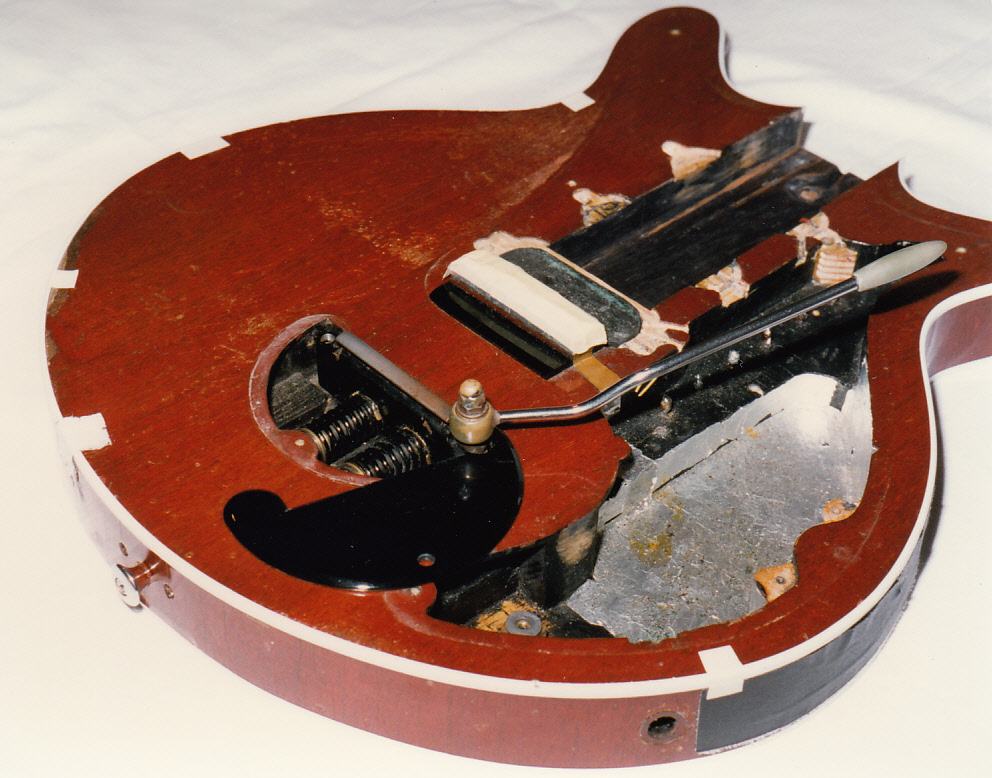
The nut, or headstock end of the strings, is also a frictionless design. The Red Special uses a zero-fret, so the strings don’t rely on touching the nut to stay in tune. It simply is a guide between the zero fret. Even with friction eliminated, something still has to provide enough force to hold the strings in tune, yet remain light enough for the guitarist to use the tremolo bar. Most tremolo systems use tension springs in the back of the guitar for this. Brian and Harold went with compression springs mounted on the front of the guitar. Specifically, they used valve springs from a motorcycle. Depending on who is telling the tale, it’s either a Norton or a 1928 Panther motorcycle. Two holes in the bottom of the guitar near the strap button allow Brian to adjust the tension in the overall system.
The tremolo arm is probably the most talked about piece of the Red Special. The arm itself was built from the arm of a bicycle luggage rack. The sharp metal end of the rod would make playing the Red Special a painful experience. Brian solved this by raiding his mother’s knitting supplies. A large knitting needle, cut and formed just right, serves as the tip of the tremolo arm.
Switches
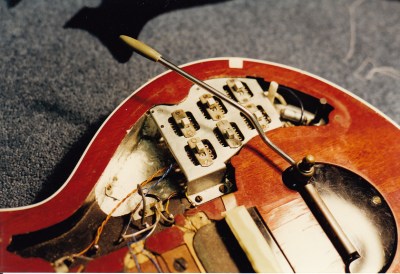
The pickup switching system is one of the most striking differences between the Red Special and ordinary guitars of its day. Most guitars have a two or three position switch to select one of the three pickups. The Red Special has six switches. When the Red Special was initially built, Brian tested out different configurations for pickup wiring. The pickups could be wired in parallel or series, and wired in phase or out of phase. Brian couldn’t decide on only one or two configurations, so he and Harold created a switch matrix which gave him more flexibility. The pickups are wired in series. The top row of switches (from the guitarists view) enables or shorts each of the three pickups.The short effectively acts as an on-off switch for that pickup. The bottom row of switches invert the polarity of each pickup, changing the phase. The different sounds Brian was able to achieve have been displayed on different songs. It’s not uncommon for Brian to change settings during a song — while recording Bohemian Rhapsody he used just about every switch combination.
Pickups
Every part of the Red Special was a process of trial and error. This is the true hacker spirit behind the guitar. Most trials didn’t work the first time, but Brian and Harold iterated until they reached their goals. An example of this is the pickups. Brian’s experimentation with pickups started with his Egmond guitar. He bought some Eclipse Magnetics button magnets from the local hardware store. These formed the core of the pickup. Harold then helped him build a coil winding machine, which allowed Brian to manually wind thousands of turns of fine copper wire around the pickups. It even had a wind counter built from a bicycle odometer.
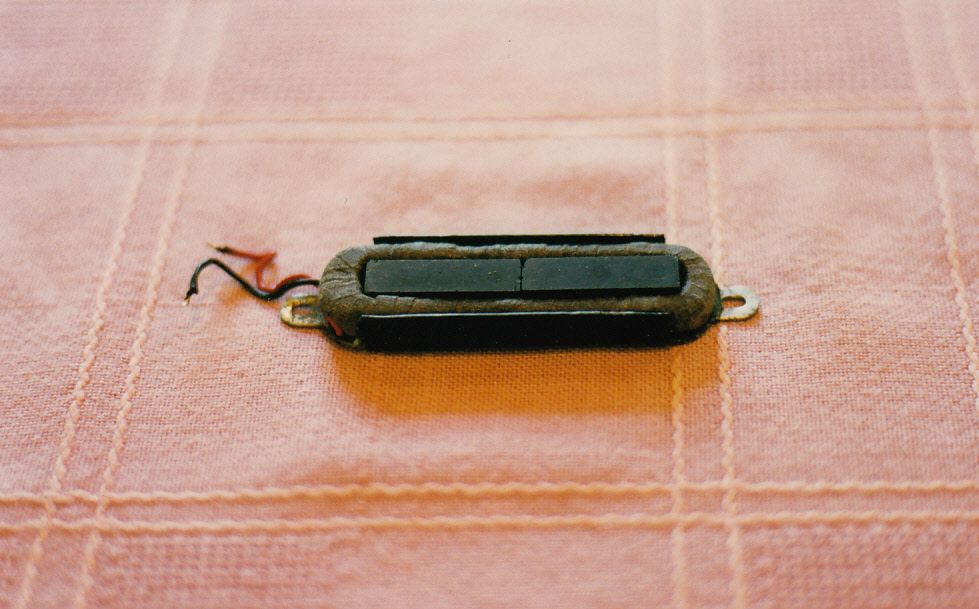
Brian didn’t have an amplifier yet, so he plugged into the family’s radio. The pickups worked! They were very bright sounding, but had one flaw. When bending notes, Brian found there would be an odd sound as the string moved across the pickup. He attributed it to the North-South alignment of the disk magnet poles. Cutting the magnets was beyond the tools he had, and custom magnets were out of the budget. The pickups worked, and these were the original devices used in the Red Special. Eventually, though, Brian had to fix the string bending problem. He headed off to the store and bought three Burns Tri-Sonic guitar pickups. He coated these in epoxy to reduce the microphonics and then installed them in the Red Special. These same three pickups still reside in the guitar today. It’s worth noting that the pickups on the Red Special receive an incredible amount of abuse. This has a lot to do with Brian’s choice in plectrum. Most guitarists use a plastic pick. Brian has always used a sixpence coin. It’s an integral part of his style and sound, the serrated edge sure does a number on the pickup covers.
After the build

The Red Special guitar was completed in the early 1960’s. Brian went on to play the guitar in his bands 1984 and Smile. It wasn’t until Queen in the 1970’s that he really hit it big. Since then the Red Special has been all over the world and played in countless shows. Brian has had backups made, but his primary instrument is still the same one he and his dad built all those years ago.
One might think that a handmade instrument like this would require a ton of upkeep. It turns out that the Red Special was so well made that it never had a major problem. After nearly 40 years the Special was showing its age though, so in 1998, the Red Special was overhauled and refinished by the careful hands of luthier Greg Fryer. His website details the work done, and includes some amazing photos of the internals of the Red Special.
If you do want to read more about the Red Special, definitely check out by Brian May and Simon Bradley’s book on the subject. The book shows the level of detail Brian and Harold went to — not only in building but in documenting the Red Special. These include full-scale dimensional drawings and handwritten reports on each process used to build the guitar.


That’s an awesome read.
I found it amusing that a home made guitar requires a professional luthier to revive.
Well.. when that home made guitar is a priceless piece of music history you do things differently.
Would you want the responsibility of repairing something like that?
An amazing story about an amazing musician’s amazing homebrewed instrument!
Here in Genova we have in custody the “cannone” of Paganini, Niccolò Paganini’s famous violin: once every year it is played with great ceremony. Sometimes in the far future there’ll still be a ceremony where some deserving guitarist will play the Red Special (unless it goes to a Hard Rock Cafe…).
A great story of parent mentoring their kid and also helping them create a lifelong legacy.
Not sure if his father is still around but what a great either reminder or memorial of their time together making cool stuff.
Brian’s father passed away around the same time as Freddie in 1991
Wow awesome article. That’s a very inspiring story!
This goes well with the Deacy amp article published last month http://hackaday.com/2017/05/08/a-queen-mystery-the-legend-of-the-deacy-amp/
Can you tell I’m a queen fan?
What’s next, an article about [Freddie]’s impromptu hack of a broken mic stand?
Either that…. or Maybe a treatise on how Roger tunes his drums. :)
We have a yard broom with a 3ft handle we call “Freddie Mercury’s Broom”. It’s surprisingly useful!
Well, i won’t stop you now, i’m having a good time reading these! :)
Yes! Don’t stop me now! In honor of this comment I will sing that song at kareoke so don’t even try to stop me
Glad you’re a Queen fan! This is once again a very interesting read and John and Brian’s work are definitely hacks!
They were so involved, I mean the four members of Queen, into doing and controlling all by themselves at the beginnings, it’s impressive to realize how true it is and not by just listening to their music in which you can hear how polished and thought everything is.
To be honest, about the red special build with the fireplace pieces, I thought it was some kind of story like we started our business in our garage and now we’re billionaires. It had to have some bits true but I did not believe in it too much but it’s the first time I see such close pictures of the guitar and it’s hard to deny it’s homemade and original and to read about all the thinking process the Mays went through for every bits of it, I’m blown.
The 4 of them were all graduates in different areas and could have worked elsewhere than in music but altogether they also had that magic chemistry that artists and not only engineers can have and created with their brilliant scientific and methodical minds pure music masterpiece (OK I’m a fan too! but being a fan or not, liking their music or not, there’s no doubt their music touched lots of people all over the world, just like Elvis, the Beatles or Justin Bieber.
I have been fascinated by Brian’s choice in switching, but always felt that six switches were a bit too much to keep track of.
I came up with a 3-switch solution. If you use 3x On-On-On sliding switches, you can do Brian’s wiring quite easily.
Here’s a diagram if anybody is curious:
http://imgur.com/VPD2tQB
These switches aren’t too hard to find, as they’re used in Fender Mustang and Duosonic guitars.
Also if I read correctly, the guitar has NEVER had a refret in its entire existence!
I thought the roller saddles that sometimes fly off on stage if a string breaks were the frets. Wouldn’t that kinda mean it gets refretted constantly?
Just the zero fret. I’m still curious how that is possible.
Not sure if you were responding to me – I know what the zero fret is. What I meant is I can’t fathom how Brian could play all those years and still not need to refret the red special.
I’ve been a Queen fan for a long time. But it wasn’t just the music that got the heavy metal head in me. It was the engineering that went into the Red Special that caught my attention many many years ago.
Ah, electric guitars – it’s all about nonlinearity (i.e., controlled-distortion) and instability (i.e., controlled-feedback). Unfortunately much of what we see today in this product field is NOT based on Electrical Engineering principles, it’s simply based on the Pay-More-Sounds-Better (PMSB) syndrome. This is the same kind of nonsense we see with the clueless Audiophile$ people out there with bottomless pockets. You see $1000+ guitar amps out there with the likes of of a 12AX7 preamp and a 6L6 final. What a waste.
For more power I’ve always wondered why these guitar amp “experts” don’t embrace the likes of the venerable 6146B series final tube, an incredibly robust tube that is easy to obtain even today with the high bandwidth to generate (and survive) the massive harmonic content that is much sought-after in guitar amps because of the tube’s bandwidth. I guess the reason why the 6146 series didn’t take off is that almost all guitar tube designers are NOT real EE’s. With bandwidth comes stability issues, so you need to be a bit more careful with feedback control and compensation, but it is not difficult, if you know what you’re doing. That kind of proper design still doesn’t happen in guitar amps – even today.
Finally, an excuse to post the crystal lettuce video:
https://www.youtube.com/watch?v=iVTj08qTwGw
This guy builds the most expensive (new!) tube amps ever made.
Wow. Just… Wow.
How can anyone that ignorant of basic electronic science actually construct a working amplifier? Or any functional circuit for that matter? Yikes.
I bet he uses oxygen free copper wiring…
Umm…
The most charitable explanation is that he was ‘pitching’ his explanation for a ‘non-technical’ audience.
It amuses me as he considers what he just said he mutters ‘I dunno’
DainBramage, babbystep are formed! However, checkout the Tube amp forums, tons of SPICE models and schematics. Fairly close nit and tech savvy groups. Otherwise imagine dozens of vaccum tubes… imploding wonderfully anytime someone plugs one in.
Where did lettuce come from? Yeah it’s funnier but he did say lattice. Then he said “electrons can survive” and I died.
The Ampeg SVT used 6146s early on but they were fragile and had screen grid issues, Later revs switched to 6550.I always thought about using 811s in class B for plenty of power and simplicity. You could even drive it with solid state pretty easily. But again large transmitting tubes don’t like to be thrown around.
Reverb ran a good article on the Fender 400 PS, mentioning their solution to Ampeg’s power tube issues.
https://reverb.com/news/the-most-powerful-tube-amp-of-all-time-behind-the-fender-400-ps
You don’t want high bandwidth in a guitar amp. Guitar speakers start to roll off around 5kHz. Just plug any guitar amp in a PA speaker and you’ll understand the issue.
My first 10 years of guitar playing I didn’t have money for decent gear so I used a 2nd hand Arion overdrive pedal, an old solid state organ amp with a few watts of output power and a HiFi speaker. I had to roll off all the highs to make it endurable.
As for high power transmitting tubes: most of them would like a high HT but don’t like high grid voltages!
“Proper design” leads you to HiFi amps that don’t exhibit the imperfections we love about Fenders, Marshalls and all the guitar amps that built upon the mistakes they made…
That said, check out Merlin Blencowe’s books about tube amp design. They are truly engineer-worthy!
Also, Brian: thanks for the crystal lettuce. Best laugh I’ve had for some time!
By the way, I totally agree with your PMSB syndrome comment! You also see this in the whol e “booteek pedal” business. Craziness.
Hahaha so cool! I NEED THAT STUFF!
Don’t forget to put it on your CDs, but only on the label side.
“You see $1000+ guitar amps out there with the likes of of a 12AX7 preamp and a 6L6 final. What a waste.”
Pretty sure my Epiphone Electar Tube 10 uses one 12AX7 and one 6L6. It’s a 10 watt combo with a closed back achieved by using a low-profile 8″ dia speaker. Sounds like a small Marshall. Cost me 160GBP in about 2001. Need to learn how to adjust the tubes as it’s sounding a bit muffled and fuzzy now, the growl has lost its edge.
Not sure how you’d make an amp with one each of these tubes cost more than 500USD.
I built a guitar from parts many many years ago and I really liked my switching system. Each of the 3 pickups had a switch. Each switch had 3 positions, the center was off, and either side was one phase. That is the switches were DPDT center off switches and the pickup was wired like an H bridge. You could choose any pickup or pickups in any phase arrangement you liked. It worked well for me.
Thanks for a well written and researched article.
> Oak and mahogany are hardwoods, so one can imagine how long it took to carve a block of it into something resembling a guitar neck.
Surprisingly quickly.
And those who use hand tools tend to know how to use them – and how to sharpen them.
Softwoods are more of a pain for fine shaping. The softer wood between the ‘winter’ growth can easily compress and spring up afterwards. But with both hardwoods and softwoods, you can vary the applied force and the sharpness of the tool, to tune the surface from flat, corduroy or valleys. For example, violin bellies and backs should be corduroy, so there’s more varnish over the ‘winter’ growth, darkening those lines; a not quite fully sharp scraper works wonders. Finish them with sandpaper and you get the opposite, with valleys from the easier-to-remove softer ‘summer’ growth being deeper and getting more varnish.
I once used a hand scraper to bring level oak trim around two-person tables in a restaurant refit. Per table, it took a minute to sharpen and two minutes to level the oak, with little noise, and small shavings to sweep up (very hot blade though). The guy using the power sander was taking 20 to 30 minutes per table, tons of noise, lots to vacuum up and off himself, and wood dust was left floating in the air, so they had to run a power air filter through the weekend afterwards.
The beauty of grain from hand finished wood is amazing: the hand tools sheer the wood fibres, cutting them off level; sanding leaves torn fibres sticking up, which can be addressed, but there’s still gouges from the sandpaper grit left in the surface. Doesn’t feel the same; doesn’t look the same, especially after the finish is applied, and again when dry/cured.
Yes… but the guy with the power sander probably took 20 mins to learn how to do the job, whereas your better and faster work was the culmination of many years’ training and experience with hand tools. No criticism there, that’s awesome skill, but that’s the point – there is a difference in skills required. I could use a belt sander fairly competently within a few minutes of having picked one up, whereas I’d imagine I’d spend the first few days using hand tools learning not to cut my fingers off, before I even got to sharpening, let alone doing something useful.
Much as I’d love to be that awesome with hand tools, realistically I’ll never have the time to learn (I do woodwork too infrequently).
I saw a violin workshop a few weeks ago. Awesome woodwork, let alone that the things make good music.
20 minutes to learn how to use the sander, then all of the extra time over and over – every time you do it. Plus the extra time to clean up. Plus the (now believed) hazardous dust in the air. Plus the cost of the sandpaper. Plus the time to address the torn raised wood fibre (yes easy, but for a proper job, should be done). Electricity, cords, noise. With a big/long job, numb fingers/hands.
Learning to:
– prep the scraper with the file jig: 10 minutes.
– roll the edge, reliably, repeatably: an hour.
– load the scraper blade in its holder and scrape to level: a half hour.
Time, material & cleanup savings every time you use it. Better quality finish.
It’s very short-slighted to not put the investment in learning vs. less time to do a better job, and at less material cost.
Ten tables each took:
– by sander, over four hours, plus a lot of sandpaper,
– by scraper, a half hour, plus around 50 cents worth of blade life (forcing that levelling is unusually hard on the blade – it gets very hot).
Elapsed time:
– by sander, his whole day, after time for changing paper and cleanup, plus we couldn’t varnish with the dust hanging in the air,
– by scraper, an hour – the various trades kept wanting a demo of how I did that so quickly, and without power and how the surface was so smooth.
If you were going to learn how to use a plane, you’d spend a lot more time than the above just learning to sharpen the blade properly. Key word there is properly. Learning to use a plane is another skill to learn, but if you get a Veritas plane they have easy to learn adjustment features that have most novices amazing themselves with what they can do after minutes of instruction. To learn to take a plane, set it up, and level those table oak edges, is probably in the four to eight hour investment in instruction/learning range before you’re confident you can do it. You can learn basic sharpening in a day. After a week of accumulated practice, you’ll be o.k.. After a month, much better, and you’re becoming both skilled and efficient at it. But you’ll notice that your jobs take less and time and look better, as you’re using a sharp tool.
Another warning: after you learn how to sharpen properly, and the ease of using a properly sharp tool (and safety – less force required), you’ll love sharpening. You’ll also learn the value and ease of regular honing when you discover that a proper edge needs a lot less frequent sharpening than you thought. My kitchen knives get sharpened every five years (an hour or two each), whether they need it or not. They get honed one to four times a month (20 to 40 seconds each time), depending on usage; I love adhesive-backed micro-sandpaper on a wood paint stir-stick, even if I have to explain what they’re doing in my kitchen.
Next time you’re in a violin (luthier’s) workshop, take the time to see which tools are dust-free (used) versus which are covered in dust (props). ;-)
Tailed-apprentices are used (more so in N.A., but often hidden out of sight), typically for gross material removal, but not for final shaping nor surfaces; except when they don’t know better, and don’t understand why theirs never looks as good nor quite right (valleys instead of corduroy).
Not long at all with the Mahogany. It is only technically a Hardwood, it’s not actually very hard. One of the reasons it was used so extensively in carved furniture is because it has excellent workability. I.e. it isn’t very hard, but resists splitting, chipping, splintering and checking quite well. It’s good for a guitar neck because it is regarded as a “Tone” wood which produces good sound.
The oak would have been hard as hell and difficult to work, but is sounds like there was minimal shaping required for that component.
Great read! I love to see these musical tech pieces, please keep them coming.
Brain May mentioned in one interview that he also hacked together the customised tape based delay units that he used in the early days. The hack was to extend their duration and involved making them physically longer. Does anyone have any more information about these?
http://brianmay.com/brian/briannews/briannewsjan11.html
ctrl-f “echoplex”
http://i.imgur.com/Mcemp0K.jpg
http://i.imgur.com/t4ghtpK.jpg
The switching is elegant. The switches have no ambiguous and hard to just flip to middle positions. In a word, binary. Their locations are graphic and functional. Series is preferred to add the signals, after all they are floating so it’s easy.
Sploosh. Love you HackADay =)
Worth noting that he’s Dr Brian May, and not because he was presented an honorary doctorate. He started studying for his Phd in the 70’s, but gave up when Queen started to become big. He then went back and completed it in 2007.
Astrophysicist to be precise. He talks about that journey in the concerts since he’s finished the degree. Good stuff.
And he did a lot of work with the recent ESA missions, he’s an all around awesome guy. Not to mention rocking the Isaac Newton look.
He describes himself as an astrophysicist who took time off to be in a band.
I am enjoying these history lessons :) Keep em coming HaD!
For those of you needing an introduction to Dr. May’s and Queen’s music I recommend Queen at live aid 1985 – enjoy.
queen at live aid 1985
Ooops https://www.youtube.com/watch?v=teoG5yhV2RQ
I suspect it should be 1964 instead of 1984, shouldn’t it?
No, the band was called 1984 after George Orwell’s novel. It was formed in 1964, though.
Which Is the best Hand handmade guitar?
I’ll bet that, when Brian and his Dad were building this guitar, they had no idea just how famous and iconic it would become.
And for now, it is handcrafted in Czech republic by my hands And other co-workers… :D