Grow Your Own Tin Crystals

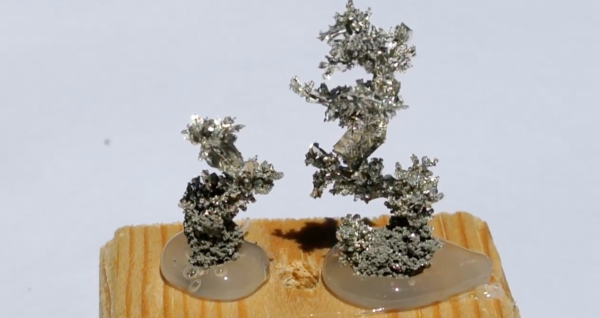
[The Plutonium Bunny] saw homegrown tin crystals on YouTube and reckoned he could do better—those crystals were flimsy and couldn’t stand up outside of the solution in which they were grown. Having previously tackled copper crystals, he applied the same procedure to tin.

Beginning with a 140 ml baby food jar filled with a solution of tin II chloride, 90 grams per liter, with a small amount of HCl as the electrolyte. A wire at the bottom of the jar was connected to a blob of tin and served as the anode, while the cathode, a loop of tin, stuck down from above. A LM317-based adjustable voltage regulator circuit was used to manage the power running through the solution. Because [The Plutonium Bunny]’s technique involves days or even weeks of very low current, he used six diodes to drop the circuit’s voltage from 1.5 V to 0.25 V, giving him around 13 mA.

His first attempt seemed to go well and he got some nice shiny crystal faces, but he couldn’t get the current bellow 10 mA without it dropping to the point where no tin was depositing. Rather than reset the experiment he made some changes to the project: he changed the solution by removing 30 ml of the electrolyte and topping it off with water. He also made a gentle agitator out of a DC motor and flattened plastic tube from a pen, powering it with another low-voltage LM317 circuit so he could get the lowest RPM possible.

With this new setup [The Plutonium Bunny] began to get much  better results, proving his hypothesis that low current with a lower concentration of Sn2+ was the ticket for large crystal growth. We featured his copper crystal experiments last year and he’s clearly making good progress! Video after the break.

Continue reading “Grow Your Own Tin Crystals”

Single Part Boost Converter Challenge (Completed)

[Josh] posed an interesting challenge. Create a boost converter that can light a blue LED using a nearly dead battery and one part. Well, we were skeptical until we saw he wasn’t counting an ATtiny processor as a part. You can see a video of the challenge, below.

The challenge has already been solved, so if you view the link, you might want to avoid the comments until you’ve had time to think about your own solution. We’ll confess, the first one we thought of was probably not workable for reasons [Josh] explains. The final answer neatly fits the criteria of a hack.

Continue reading “Single Part Boost Converter Challenge (Completed)”

Mini Apple IIe

The Mini Apple IIe That Runs On C.H.I.P.

[Cupcakus]’s mini Apple IIe must surely be a contender for the smallest computer running an Apple II emulator. We’d mentioned it a few months ago in a Links post when it had been posted to a forum along with a few videos of it in action, but now popular YouTube channel, [Tested], has released a video wherein they not only show what’s inside, and interview [Cupcakus] about his trials and tribulations in making it, but also go through the steps of making one of their own. Also, at the time of writing the Links post, [Cupcakus] hadn’t yet announced his detailed GitHub page about it.

This mini Apple IIe runs on a C.H.I.P., a small $9 single board computer, and has a speaker and a TFT LCD display. Input is via a full-sized wireless keyboard. He doesn’t have joysticks working but that was an oversight and having realized how many games require joysticks, he has plans to add support for them. The case is 3D printed from models available on Thingiverse and links are on the GitHub page, along with all other details for making one yourself.

He did have to do some hacking. The video signal from the C.H.I.P. wasn’t available from the pin headers so he had to solder a wire directly to the board itself. The C.H.I.P. requires from 3.3 V to 5 V whereas the display wants 6 V to 12 V. To accommodate both he gets power from a 12 V drone battery and uses a 5 V buck converter for the C.H.I.P. And he had to modify the emulator to be legible on the low resolution of the display. The code for that is also available through the GitHub page.

While he uses the display as the screen for the Apple II emulator, it actually has two video inputs. So just in case he wants to show something on the display from another source, perhaps to watch a video, he’s made the second video input available using a socket in the back.

Want to see all the details for yourself? Check out [Tested]’s video below.

Continue reading “The Mini Apple IIe That Runs On C.H.I.P.”

BrdMaker, A DIY Pick And Place Machine

A small, desktop pick and place machine has obvious applications for hackerspaces, small companies, and even home labs. However, despite multiple efforts, no one has come up with a solution that’s both better and cheaper than buying a used, obsolete pick and place machine. [Mika]’s brdMaker is yet another attempt at a desktop chipshooter, and while the prototype isn’t done yet, it’s a fantastic build that might soon be found in your local electronics lab.

The easy part of any pick and place machine is a Cartesian frame. This has been done over and over again by the 3D printing and CNC communities, and the brdMaker is no exception. [Mika]’s robot is a 600 by 600 mm CNC frame powered by NEMA 23 motors. So far, so good.

The tricky part of a pick and place machine is working with the fiddly bits. This means feeders and machine vision. There are several different options for feeders including a ‘drag’ feeder that uses the vacuum nozzle tip to move a reel of parts along, and a slightly more complicated but vastly more professional feeder. A machine needs to see the parts it’s putting down, so [Mika] is using two cameras. One of these cameras is mounted on the toolhead and looks surprisingly similar to a USB microscope. The other camera is mounted in the frame of the machine to look at the bottom of a part. This camera uses 96 LEDs to illuminate the component and find its orientation.

[Mika]’s brdMaker still has a long way to go, but there are indications the market is ready for a cheap, easy to use desktop pick and place machine. The Chipsetter, an exquisitely designed pick and place machine revealed at last year’s NY Maker Faire had an unsuccessful Kickstarter, but they’re still chugging along.

Hackaday Prize Entry: Internet Of Fidget Spinners

We just closed out the Internet of Useful Things round of the Hackaday Prize, which means we’re neck deep in judging projects to move onto the final round this fall. Last week, everyone on Hackaday.io was busy getting their four project logs and illustrations ready for the last call in this round of the Hackaday Prize. These projects are the best of what the Internet of Things has to offer because this is the Internet of Useful things.

We’re not sure how [Matthias]’ project will rank. It’s an Internet of Things fidget spinner. Yeah, we know, but there are some interesting engineering challenges in building an Internet-connected fidget spinner.

This is a PoV fidget spinner, which means the leading edges of this tricorn spinner are bedazzled with APA102 LEDs. Persistence-of-vision toys are as old as Hackaday, and the entire idea of a fidget spinner is to spin, so this at least makes sense.

These PoV LEDs are driven by an ESP8285, or an ESP8266 with onboard Flash. This is probably the smallest wireless microcontroller you can find, an important consideration for such a small build. Power comes from a tiny LiPo, and additional peripherals include an accelerometer to measure wobble and an optical switch to measure the rotation speed.

These electronics are fairly standard, and wouldn’t look out of place in any other project in The Hackaday Prize. The trick here is mechanical. [Matthias] needs to mount a skateboard bearing to a PCB, and no one has any idea how he’s going to do that. A fidget spinner should be well-balanced, and again [Matthias] is running into a problem. Has anyone here ever done mass and density calculations on PCBs and lithium cells? Is it possible to 3D print conformal counterweights? Has science gone too far?

Will the Internet of Things PoV Fidget Spinner make it to the finals round of The Hackaday Prize? We’ll need to wait a week or so to find out. One thing is for certain, though: you’re going to see this on AliBaba before September.

Our Gunpowder And Tea Came From China, Why Didn’t We Copy Their Wheelbarrows?

My dad's low-loader barrow. You would not believe how useful it is.
My dad’s low-loader barrow. You would not believe how useful it is.

Everyone must have a few things that are emotive of their childhood, perhaps a sight, a sound, or a smell. For me, growing up as I did on a small British organic farm in the 1970s, my emotive things are the smell of rain hitting parched earth, or of the slightly sulphurous diesel exhaust from a clapped-out Fordson Major tractor. And wheelbarrows, strangely. My dad, you see, is both a blacksmith by trade and an inveterate experimenter in the field of handcarts and barrows. A small self-sufficient farm generates a huge range of different loads that need carrying around, and he fashioned a variety of inventive contraptions for the purpose. Of most use are his oversized builder’s barrows with a full-size van wheel at the front and able to cross the bumpiest of ground, but other highlights included the low-loading barrow for shifting the heaviest one-piece loads, or the two-wheeler for very long objects.

As you might expect then, I have an eye for a barrow, as I’ve pushed a few in my time. So when I read about how traditional Chinese barrows are constructed, they caught my attention and I had to ask: why don’t we do it that way?

Continue reading “Our Gunpowder And Tea Came From China, Why Didn’t We Copy Their Wheelbarrows?”

A Magic Light Bulb For All Your Bright Ideas

[Uri Shaked]’s lamentation over the breaking of his smart bulb was brief as it was inspiring — now he had a perfectly valid excuse to hack it into a magic light bulb.

The first step was disassembling the bulb and converting it to run on a tiny, 130mAh battery. Inside the bulb’s base, the power supply board, Bluetooth and radio circuits, as well as the LED board didn’t leave much room, but he was able to fit in 3.3V and 12V step-up voltage regulators for the LiPo battery.

[Shaked]’s self-imposed bonus round was to also wedge a charging circuit — which he co-opted from a previous project — into the bulb instead of disassembling it every time it needed more juice. Re-soldering the parts together: easy.  Fitting everything inside a minuscule puzzle-box: hard. Kapton tape proved eminently helpful in preventing shorts in the confined space.

Continue reading “A Magic Light Bulb For All Your Bright Ideas”