Optical Guitar Pickup Works With Nylon Strings

Electric guitar pickups rely on steel strings interfering with a magnetic field, the changes in which are picked up with coils of wire. That doesn’t work with nylon strings, because they don’t tend to perturb magnetic fields nearly as much, beyond some infinitesimal level that some quantum physicist could explain. So what do you do? You follow [Simon]’s example, and build an optical pickup instead.

The concept is simple. You place an LED and a phototransistor in a U-shaped channel, and place it so that the string runs through it. You repeat this for each string. Thus, as a string vibrates, it interrupts the light travelling from the LED to the phototransistor. This generates a voltage that varies with the frequency of the string’s vibration. Funnily enough, this type of pickup will work just fine on both nylon and steel strings, if you were so inclined to try it.

[Simon] designed a nifty PCB with six LED-phototransistor pairs (using off-the-shelf interruptor sensors) for use with a nylon-stringed guitar. He reports that sound from the strings comes through clearly, but that there is some noise that is evident in the pickup’s output, too. Listening to the demo, it seems to capture the sound of the nylon strings well, it’s just a shame that the noise floor is so high.

If you prefer your guitar pickups to be the regular magnetic kind, you can always wind your own from scrap. Demo after the break.

Continue reading “Optical Guitar Pickup Works With Nylon Strings”

Building A Loop Station With An RP2040

Loop stations are neat things, able to replay one or more loops of audio over and over again while you perform over the top of them. Musicians like [Marc Rebillet], [Reinhardt Buhr], and [Dub FX] have made careers out of this style of performance. [Yaqi Gao], [Xiaoyu Liang] and [Alina Wang] decided to build a loop station of their own, using the popular RP2040 chip.

At its simplest, a loop station must take in audio, record it, and then play it back. Generally, it can do this with several tracks and mix them together, while also mixing in the incoming audio as well. The group achieved this by inputting a guitar signal to the chip via an amplifier and the onboard analog-to-digital converter. The audio can be recorded as desired, and then played back via an external digital-to-analog converter. Live audio from the guitar is also passed through to allow performing over the recorded sound. The group also used an external half-megabyte FRAM chip to allow storing additional audio sample data, which can be trucked out over serial and saved.

It’s not the cleanest loop station in the world, with a relatively low sample rate causing some artifacts. Regardless, it definitely works, and taught the group plenty about working with digital audio in the process. For that reason alone, we’d call it a success.

Continue reading “Building A Loop Station With An RP2040”

$30 Guitar Build Shows What You Can Do With Amazon Parts

Most guitarists buy their axes fully assembled from big names like Fender, Gibson, and… maybe Yamaha? Sure. But there are a dedicated set that relish in mixing and matching parts and even building and assembling their own instruments. [Danny Lewis] decided to see what he could do with the cheapest guitar parts from Amazon and a body of his own design, and he put together something pretty passable for just $30.

The wood for the body was cut on a bandsaw, and was essentially free scrap sourced from old furniture. [Danny] went for an unconventional design using a roughly Telecaster outline and large cutouts either side of the bridge. The neck was free, by virtue of being an old Harmony neck sourced off Craigslist. We’d have preferred to see what could be done with a cheap Amazon neck, but it nonetheless fits the vibe of the build.

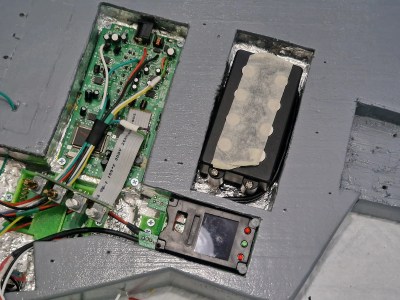
The guitar then received a $9.99 pickup and controls, an $8.80 solidtail bridge, and $11 tuning machines for the headstock. Strung up, it actually sounds passable. We’d want to throw it on a proper amp and give the whole thing a setup before fully assessing it, but hey, for $30, it’s hard to go wrong.

We do love some hacky guitars around here; we’ve even featured some with surprise effects gear built into the bodies. Video after the break.

Continue reading “$30 Guitar Build Shows What You Can Do With Amazon Parts”

Making A Guitar Go To Eleven, The Hard Way

At the end of the day, all it takes to make a guitar go to eleven is a new knob. Making the knob is another thing — that takes a shop full of machine tools, the expertise to use them, and a whole bunch of time. Then again, if you’re pressed for time, it looks like a 3D printer will do nicely too.

While the 3D printing route is clearly the easier option, it sure seems as if [Chronova Engineering] is more about the journey than the destination. In need of some knob bling for an electric guitar, he takes us through the lengthy process (nicely summarized in the video below) of crafting one from a bar of solid brass. Like all good machining projects, this one starts with making the tools necessary to start the actual build; in this case, it’s a tool to cut the splines needing to mate with the splines on the guitar’s potentiometer shaft. That side quest alone represents probably a third of the total effort on this project, and results in a tool that’s used for all of about 30 seconds.

Aside from spline cutting, there are a ton of interesting machining tidbits on display here. We particularly liked the use of a shaping technique to form the knurling on the knob, as opposed to a standard rotary method, which would have been difficult given the taper on the knob body. Also worth noting are the grinding step that puts a visually interesting pattern on the knob’s top surface, as well as the pantograph used to etch the knob’s markings.

Congrats to [Chronova Engineering] for a great-looking build, and the deep dive into the machinist’s ways. If you’re still interested in custom brass knobs but don’t have a machine shop, we can help with that.

Continue reading “Making A Guitar Go To Eleven, The Hard Way”

Two-Channel Guitar Stomp Box Makes Momentary Switches Latching

When we first saw [Maarten Tromp]’s article about a “momentary latching switch” for guitar effects pedals, we have to admit to being a bit confused. When it comes to push-button switches, “momentary” and “latching” seem to be at odds with each other, with different mechanisms inside the switch to turn one into the other. What gives?

As it turns out, [Maarten]’s build makes perfect sense when you consider the demands of a musical performance. Guitar effects pedals, or “stomp boxes,” are often added to the output of electric guitars and other instruments to change the signals in some musically interesting way. The trouble is, sometimes you only need an effect for a few bars, and the push-on, push-off switches on many effects pedals make that awkward.

[Maarten]’s idea was to build a stomp box with momentary switches that act as inputs to an ATtiny2313 microcontroller rather than directly controlling the effect. That way, a bit of code can determine how long the switch is tapped, and activate a relay to do the actual switching accordingly. A short tap of the button tells the microcontroller to latch the relay closed until another tap comes along; a long press means that the relay is held open only as long as the button is held down.

Yes, he could have used a 555, a fact which [Maarten] readily acknowledges, but with some loss of flexibility; he currently has the threshold set at 250 milliseconds, which works for his performance style. Changing it would be a snap in code, as would toggling the latching logic. A microcontroller also makes expansion from the two-channel setup shown here easier.

Looking for more effects pedal action? We’ve got a bunch — a tube-amp tremolo, an Arduino Mega multipedal, a digital delay line. Take your pick!

Rotating Necked Guitar Looks Difficult To Play

Have you ever looked at a guitar and thought “Nah, that’s way too easy to play.”[Mattias Kranz] seems to have done, so he built the 360 Guitar, a new instrument with a circular, rotating neck. The rotating neck means that it can have more strings than most: we think that it has sixteen, but it’s hard to tell. Anyway, it has a lot of strings and looks utterly impractical, which makes it an exciting project.

The basic idea is intriguing: take a conventional guitar design and replace the fretboard with a rotating pillar. Perhaps even stick a motor in there to rotate it on command. Each of the strings is mounted along this pillar using standard string retainers and tuning pegs, with frets along the pillar. Because you can fit so many strings, you can use all of the standard strings for a bass and treble guitar, plus a few extra like the thickest bass string available and the thinnest guitar strings. It’s like a four-dimensional Chapman Stick.

[Mathias] is still working on the project as you can see in the video below the break, so we will be interested to see what new design aspects he comes up with, like the plan to use a motor to rotate the neck. [Mattias] has built a few instruments that we have featured before, like the Helium guitar, which replaces the resonant cavity with a helium balloon, and the Plasma Piano, a combination of piano and tuned plasma coil.

Continue reading “Rotating Necked Guitar Looks Difficult To Play”

Upgraded Toy Guitar Plays Music

Getting the finishing details on a Halloween costume completed is the key to impressing friends and strangers alike on the trick-or-treat rounds. Especially when it comes to things like props, these details can push a good Halloween costume to great with the right touches. [Jonathan]’s friend’s daughter will be well ahead of the game thanks to these additions to a toy guitar which is part of her costume this year.

The toy guitar as it was when it arrived had the capability to play a few lackluster sound effects. The goal here was to get it to play a much more impressive set of songs instead, and to make a couple upgrades along the way as well. To that end, [Jonathan] started by dismantling the toy and investigating the PCBs for potential reuse. He decided to keep the buttons in the neck of the guitar despite their non-standard wiring configuration, but toss out the main board in favor of an ESP32. The ESP32 is tasked with reading the buttons, playing a corresponding song loaded on an SD card, and handling the digital to analog conversion when sending it out to be played on the speaker.

The project doesn’t stop there, though. [Jonathan] also did some custom mixing for the songs to account for the lack of stereo sound and a working volume knob, plus he used the ESP32’s wireless capabilities to set the guitar up as a local file server so that songs can be sent to and from the device without any wires. He also released the source code on the project’s GitHub page for anyone looking to use any parts of this project. Don’t forget there’s a Halloween contest going on right now, so be sure to submit the final version of projects like these there!

Continue reading “Upgraded Toy Guitar Plays Music”