[Joonas] became frustrated with cheap but crappy MIDI to USB converters, and the better commercial ones were beyond his budget. He used a Teensy LC to build one for himself and it did the job quite well. But he needed several converters, and using the Teensy LC was going to cost him a lot more than he was willing to spend. With some tinkering, he was able to build one using an Adafruit Pro Trinket which has onboard hardware UART (but no USB). This lack of USB support was a deal killer for him, so after hunting some more he settled on a clone of the Sparkfun Pro Micro. Based on the ATmega32U4, these clones were just right for his application, and the cheapest to boot. He reckons it cost him about $5 to build each of his cheap USB MIDI adapters which receive notes and pedal data from the keyboard’s MIDI OUT and transmit them to a computer
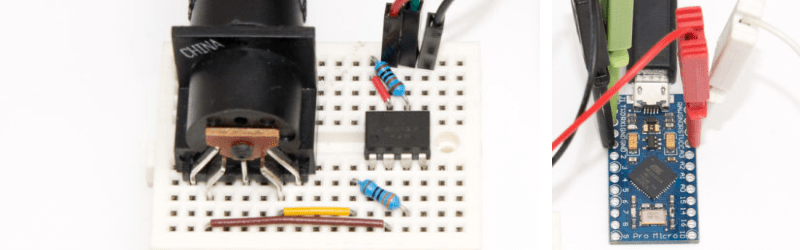
Besides the Pro Micro clone, the only other parts he used are a generic opto-coupler, a couple of resistors and a MIDI connector. After testing his simple circuit on a bread board, he managed to squeeze it all inside an old USB dongle housing, stuffing it in dead-bug style.
The heavy lifting is all done in the firmware, for which [Joonas] used LUFA — the Lightweight USB Framework for AVR’s. He wrote his own code to handle MIDI (UART) to USB MIDI messages conversion. The interesting part is his use of a 32.15 kbps baud rate even though the MIDI specification requires 31.25 kbps. He found that a slightly higher baud rate fixes a problem in the AVR USART implementation which tends to miss consecutive bytes due to the START edge not being detected. Besides this, his code is limited in functionality to only handle a few messages, mainly for playing a piano, and does not have full-fledged MIDI capabilities.
We’ve featured several of [Joonas]’s hacks here over the years, the most recent being the Beaglebone Pin-Toggling Torture Test and from earlier, How to Turn A PC On With a Knock And An ATTiny.


His use of 32150 baud instead of the standard 31250 is almost exactly the 3% fast that is the margin of error for 8n1 asynchronous serial.
The ATmega32 is running off a 16MHz clock, the UART’s rates are quantized to integer divisions of either 1/16 or 1/8 of that, and so the two faster-than-standard rates should be 31746Hz and 32258Hz—personally, I’d have hemmed for the former…
But if it works, who am I to gainsay it?
But it only works marginally. And isn’t universal, so a bit of a fail, albeit working for his specific use.
Ok then, gainsay it.
I’m pretty sure this is actually *two* mistakes, despite his blog saying “baud rate, 32150 is not a mistake”. As you correctly pointed out, 32150 isn’t even possible. With the base division of 16 as his code shows, 32258.065 is the next highest after the correct MIDI 31250 rate. Calling it 32150 is off by about 108.
Unfortunately his code fragment on the page doesn’t show what he actually defined for “ubrr_value”. Neither do the files within his ATmega32u4_miditest.zip file. So this involves some guesswork since we can’t see his actual code.
My guess is he probably believed 32 was the correct number to use, but it didn’t work. He likely experimented and found 31 actually worked. Or maybe Dean’s LUFA code had 31 in it and he just went with that wrong-looking value, thinking it was too fast? He then rationalized this belief with “AVR USART implementation misses consecutive bytes with this exact speed due to START edge being not detected”. No evidence is given for this rather extraordinary claim, other than his assertion that a baud rate the hardware can’t actually do actually worked for his project.
If you look at page 191 of Atmel’s datasheet, the formulas in table 18-1 show BAUD = fosc / (16 * (UBRR+1)). He probably wasn’t aware of the “+1” part of this equation. He probably is actually running at exactly the correct 31250 MIDI baud rate, but mistakenly believes he’s running faster, and is even mistaken about what the faster rate actually is.
I can tell you with confidence from making Teensy 2.0 that the exact 31250 baud rate works. My code in Teensyduino calculates 31 when you write Serial1.begin(31250). So does Arduino’s code for Arduino Micro. In the 8 years Teensy 2.0 has existed, and the 5 years of Arduino Leonardo & Micro, many thousands of people have successfully built MIDI projects using the exact 31250 baud rate.
The combined experience of many thousands of people all says AVR USART hardware doesn’t actually miss consecutive bytes when configured at the correct speed.
Actually, there are two lines of code give the game away, and you are right in that the “+1” part of the equation you give was missed. Firstly the function that sets the baud rate…
void USARTInit(unsigned int ubrr_value) {
…and secondly how it is called…
USARTInit(F_CPU/16/32150);
That works out to 31.1042, but get cast as an integer in USARTInit(), i.e., 31, and so the baud rate does end up being the correct MIDI rate.
The main mistake is assuming that the “32150” used in that equation is the baud rate, and not knowing about the “+1” in the relation between UBBR and baud rate.
So I would assume 31250 was tried–giving a UBRR of 32 and a slower baud rate than required–and it didn’t work, and for whatever reason 32150 was tried next, and found to work. In this case that 32150 is almost arbitrary, and could have just as easily been, say, 32250, or 32151, or…
As you say, thousands of people, myself included, have never had a problem with AVRs when using the proper MIDI rate. But setting a too slow baud rate… that’s going to cause problems.
Nice to see some comments from people familiar with the matter, thanks guys, on behalf of everybody wanting to do MIDI.
It’s not only informative but stop the propagation of an error.
Though ti has been done many times and many different ways, kudos to Joonas for getting it figured out and even cramming things back into a case. I was not familiar with LUFA, so thanks for that :) And yes, those $5 midi to usb adapters are useful but POSes. I have only mainly had baud rate problems with Sysex and patch loading, but everyone has something different they want to do, so it may have been more prevalent in Joonas’s usage.
Why is “CHEAP” the new word for “I did it myself, so assembly cost is 0” ?
If i wanted to design a cheap product, i would not use breadboard and clip wires and modules, but a single pcb, smt components and a ATtiny45 with the famous V-USB
You do know what a prototype is right?
Interesting project. It would be very useful if it was expanded and fleshed out to cover more MIDI devices, but it works, and that’s what is important. I may have missed it in the article, but I’m curious how he’s handling latency in the note stream. Converting from MIDI to USB has to take some milliseconds which has to be compensated for to remain on time and on beat. Perhaps he’s doing it in the DAW? I don’t think it would matter so much in that case.
Cool project, but… He was annoyed by cheap USB-MIDI cables, but then does build one which only supports a MIDI subset? I got one of that cheap ones for less than 20 bucks, it’s bi directional and full fledged.
A cool thing would be if it fits into a DIN plug. Or vice versa, a cheap thing that on can plug into those annoying USB MIDI only controller to get a real MIDI controller for synths which still sports a DIN connector.
How is this new, exciting, or even a hack? Well, the lackluster code is new and probably pretty hacky, but otherwise, this build could have been cribbed from any of dozens other identical projects that have been around since the dawn of the Arduino.
Nicely packaged in the USB dongle but not really new. The code is quite light….maybe enough for basic needs, do not support sysex. This firmware is fully midi compliant and use also LUFA https://github.com/TheKikGen/USBMidiKliK
Which other optocouplers can i use? Is it ok to use 4n35.
PC900 :-)