Smooth And Steady Cuts With An Improvised Power Feeder

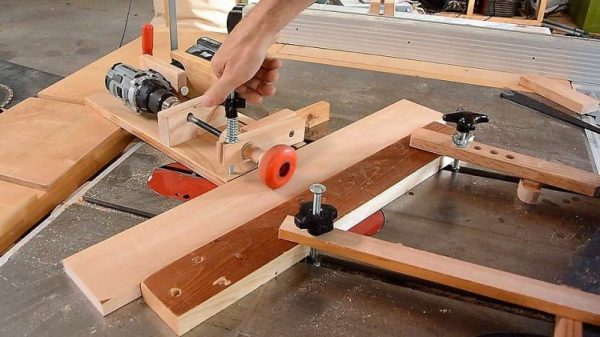
Some woodworking operations require stock to be fed at a smooth, steady rate, for which purpose a power feeder is usually employed. They’re expensive bits of gear, though, and their cost can usually be borne only by high-output production shops. But when you need one, you need one, and hacking a power feeder from a drill and a skate wheel is a viable option.

It should come as no surprise that this woodshop hack comes to us from [Matthias Wandel], who never seems to let a woodworking challenge pass him by. His first two versions of expedient power feeders were tasked with making a lot of baseboard moldings in his new house. Version three, presented in the video below, allows him to feed stock diagonally across his table saw, resulting in custom cove moldings. The completed power feeder may look simple — it’s just a brushless drill in a wooden jig driving a skate wheel — but the iterative design process [Matthias] walks us through is pretty fascinating. We also appreciate the hacks within hacks that always find their way into his videos. No lathe? No problem! Improvise with a drill and a bandsaw.

Surprised that [Matthias] didn’t use some of his famous wooden gears in this build? We’re not. A brushless motor is perfect for this application, with constant torque at low speeds. Want to learn more about BLDC motors? Get the basics with a giant demo brushless motor.

Continue reading “Smooth And Steady Cuts With An Improvised Power Feeder”

The Linux FPGA

It was never unusual to have a CPU and an FPGA together. After all, each has different strengths and weaknesses. However, newer devices like the Xilinx Zynq have both a CPU and an FPGA in the same package. That means your design has to span hardware, FPGA configurations, and software. [Mitchell Orsucci] was using a Zynq device on a ArtyZ7-20 board and decided he wanted to use Linux to operate the ARM processor and provide user-space tools to interface with the FPGA and reconfigure it dynamically.

This sounds like a big project and it certainly isn’t trivial by any means. However, the Xilinx tools do a lot of the heavy lifting, including setting up the Linux kernel and a suitable root file system. The bulk of [Mitchell’s] work was in developing user space tools for Linux programs to interact with the FPGA hardware. You can see a short video demo below.

Continue reading “The Linux FPGA”

Where Can You Fly? Worldwide Drone Laws Mapped

If you are a flier of a multirotor, or drone, you should be painfully aware of the regulations surrounding them wherever you live, as well as the misinformation and sometime bizarre levels of hysteria from uninformed people over their use.

Should you travel with your drone, you will also probably be resigned to being interrogated by airport staff high on The War On Terror security theatre, and you’ll probably not find it surprising that they have little idea of the laws and regulations over which they have pulled you aside. It’s a confusing situation, and it’s one that [Anil Polat] has addressed by collating information about drone laws worldwide, and presenting his results on a Google map.

To do this must have been a huge undertaking, particularly since he got in touch with the appropriate authorities to access the information from the horse’s mouth. Looking at the map, we can almost view the green, yellow, and red pins showing different levels of restriction on flight as a fascinating indication of differing levels of security paranoia worldwide. If your territory has an orange or red pin, our commiseration.

This is a useful resource for anyone with an interest in multirotor flying, and he has also made it available as an app. However, it is always safest to check with the authorities concerned before flying in another territory, in case any laws have changed.

Here at Hackaday we’ve held an interest in the interface between multirotor fliers, governments, and the general public for a while now. In 2015 we took a look at FAA regulations for example, and last year we examined the inaccuracies in British air incident reports.

Via Adafruit.

Cheap DIY MIDI To USB Adapter

[Joonas] became frustrated with cheap but crappy MIDI to USB converters, and the better commercial ones were beyond his budget. He used a Teensy LC to build one for himself and it did the job quite well. But he needed several converters, and using the Teensy LC was going to cost him a lot more than he was willing to spend. With some tinkering, he was able to build one using an Adafruit Pro Trinket which has onboard hardware UART (but no USB). This lack of USB support was a deal killer for him, so after hunting some more he settled on a clone of the Sparkfun Pro Micro. Based on the ATmega32U4, these clones were just right for his application, and the cheapest to boot. He reckons it cost him about $5 to build each of his cheap USB MIDI adapters which receive notes and pedal data from the keyboard’s MIDI OUT and transmit them to a computer

Besides the Pro Micro clone, the only other parts he used are a generic opto-coupler, a couple of resistors and a MIDI connector. After testing his simple circuit on a bread board, he managed to squeeze it all inside an old USB dongle housing, stuffing it in dead-bug style.

The heavy lifting is all done in the firmware, for which [Joonas] used LUFA — the Lightweight USB Framework for AVR’s. He wrote his own code to handle MIDI (UART) to USB MIDI messages conversion. The interesting part is his use of a 32.15 kbps baud rate even though the MIDI specification requires 31.25 kbps. He found that a slightly higher baud rate fixes a problem in the AVR USART implementation which tends to miss consecutive bytes due to the START edge not being detected. Besides this, his code is limited in functionality to only handle a few messages, mainly for playing a piano, and does not have full-fledged MIDI capabilities.

We’ve featured several of [Joonas]’s hacks here over the years, the most recent being the Beaglebone Pin-Toggling Torture Test and from earlier, How to Turn A PC On With a Knock And An ATTiny.

Adaptive guitar: pick board and controller

Hackaday Prize Entry: Adaptive Guitar

Due to a skiing accident, [Joe]’s new friend severed the motor nerves controlling her left arm. Sadly she was an avid musician who loved to play guitar — and of course, a guitar requires two hands. Or does it? Pressing the string to play the complex chords is more easily done using fingers, but strumming the strings could be done electromechanically under the control of a foot pedal. At least that’s the solution [Joe] implemented so beautifully when his friend’s family reached out for help.

There are just so many things to enjoy while reading through [Joe]’s project logs on his hackaday.io page, which he’s entered into the Hackaday Prize. He starts out with researching how others have solved this problem. Then he takes us through his first attempts and experiments. For example, an early discovery is how pressing the strings on the fretboard pulls the string down where the picks are located, causing him to rethink his initial pick design. His criteria for the pick actuators leads him to make his own. And the actuators he made are a thing of beauty: quiet, compact, and the actuator body even doubles as part of a heat sink for his custom controller board. During his pick design iterations he gets great results using spring steel for flexibility leading up to the pick, but thinking of someday going into production, he comes up with his own custom-designed, laser-cut leaf springs, different for each string.  Needing Force Sensitive Resistors (FCRs) for the foot pedal, he iterates to making his own, laying out the needed interlinked traces on a PCB (using an Eagle script) and putting a piece of conductive rubber over it all. And that’s just a sample of the adventure he takes us on.

In terms of practicality, he’s made great efforts to make it compact and easy to set up. The foot pedal even talks to the control board on the guitar wirelessly. Non-damaging adhesives attach magnets and velcro to the guitar so that the control board and pick bridge can be precisely, yet easily, attached single-handedly. The result is something easy to manage by someone with only one working hand, both for set-up and actual playing. See it for yourself in the video below.

Continue reading “Hackaday Prize Entry: Adaptive Guitar”

Return To The Asus Tinker Board: Have Six Months Changed Anything?

The Asus Tinker Board, in all its glory

Back in February this year, we ordered a new single board computer, and reviewed it. The board in question was the Asus Tinker Board, a Raspberry Pi 3 competitor from the electronics giant in a very well-executed clone of the Raspberry Pi form factor.

Our review found its hardware to be one of the best of that crop of boards we had yet seen, but found serious fault with the poor state of its software support at the time. There was no website, the distro had to be downloaded from an obscure Asus download site, and there was no user community or support channel to speak of. We were then contacted by some of the folks from Asus who explained that the board had not yet been officially launched, and that the unit we’d secured had escaped the fold a little early. Continue reading “Return To The Asus Tinker Board: Have Six Months Changed Anything?”

Photo by Todd Bakken

Sector67 Hackerspace Rocked By Explosion At New Location

Madison, WI hackerspace Sector67 is in a period of transition as they move from their current rented location to a new property that will be their permanent home a half mile away. Last Wednesday (September 20, 2017) an unfortunate propane explosion in the new building led to the injury of Chris Meyer, the founder and director of the hackerspace.

The structure has been stabilized and renovation is continuing, but Chris was seriously burned and will be in the hospital for at least a month with a much longer road to complete recovery. It is fortunate that nobody else was injured.

This accident comes at a time when Sector67 essentially has two spaces to maintain; the existing space is still running, but many of the members are focused on the construction of the new space. The building needs significant work before the move can take place. Currently the roof is being raised so that the building can go from one awkward-height story to two normal stories, doubling the size. An expiring lease and imminent demolition of the current location by developers means the clock is still ticking on the move, and this explosion means Sector67 will have to work even harder, and without the presence and constant effort of the person who has been leading the project.

A GoFundMe campaign for Sector67 has been started and is well on its way towards helping Chris and Sector67.