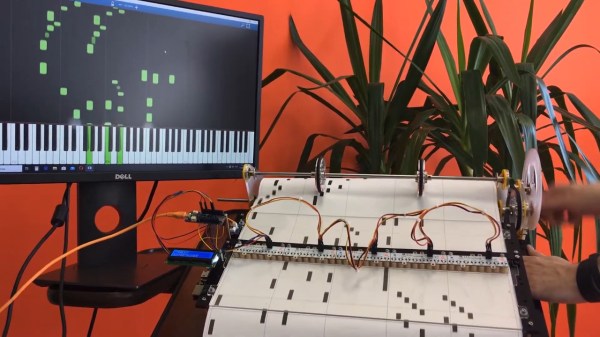
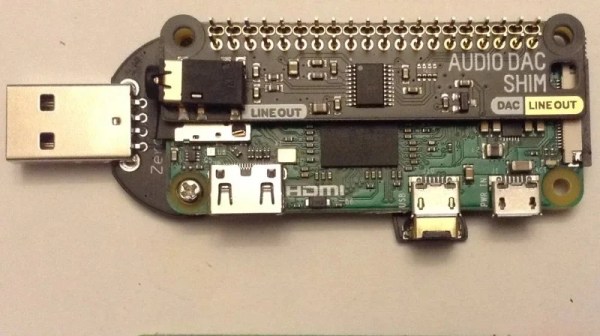
A Gameport Joystick To USB-MIDI Converter

These days, live music performance often involves electronic synthesizers and computers rather than traditional instruments played by hand. To aid in his own performances, [alekappa] built a special interface to take signals from a joystick and convert them to MIDI messages carried over USB.

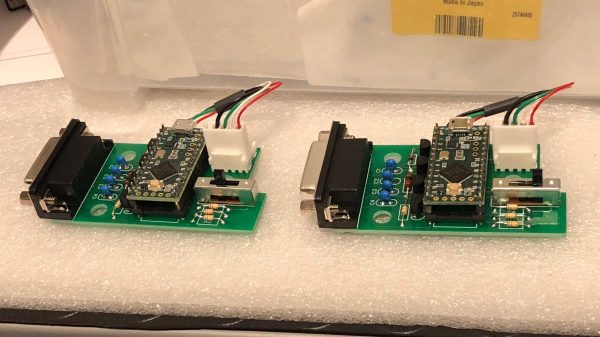
The build is simple and straightforward, using a Teensy LC to interface with a simple gameport joystick. With a smattering of simple components, it’s easy to read the outputs of the joystick with only a little debounce code needed to ensure the joystick’s buttons are read accurately. Similarly, analog axes are read using the analog-to-digital converters onboard the microcontroller.

This data is then converted into control changes, note triggers and velocity levels and sent out over the Teensy LC’s USB interface. A mode switch enables changes to the system’s behaviour to be quickly made. The device is wrapped up in a convenient housing nabbed from an old Gameport-to-USB converter from many years ago.

It’s a neat project and we’re sure the joystick allows [alekappa] to add a new dimension to his performances on stage. We’ve seen other great MIDI controllers, too, from the knitted keyboard to the impressive Harmonicade. If you’ve got your own mad musical build under construction, don’t hesitate to drop us a line!

Less Rock, More Roll: A MIDI Barrel Piano

Strolling around a park, pedestrian zone, or tourist area in any bigger city is rarely complete without encountering the sound of a barrel organ — the perfect instrument if arm stamina and steady rotation speed are your kind of musical skills. Its less-encountered cousin, and predecessor of self-playing pianos, is the barrel piano, which follows the same playing principle: a hand-operated crank rotates a barrel, and either pins located on that barrel, or punched paper rolls encode the strings it should pluck in order to play its programmed song. [gabbapeople] thought optocouplers would be the perfect alternative here, and built a MIDI barrel piano with them.

Keeping the classic, hand-operated wheel-cranking, a 3D-printed gear mechanism rolls a paper sheet over a plexiglas fixture, but instead of having holes punched into it, [gabbapeople]’s piano has simple markings printed on them. Those markings are read by a set of Octoliner modules mounted next to each other, connected to an Arduino. The Octoliner itself has eight pairs of IR LEDs and phototransistors arranged in a row, and is normally used to build line-following robots, so reading note markings is certainly a clever alternative use for it.

Each LED/transistor pair represents a dedicated note, and to prevent false positives from neighboring lines, [gabbapeople] 3D printed little collars to isolate each of the pairs. Once the signals are read by the Arduino, they’re turned into MIDI messages to send via USB to a computer running any type of software synthesizer. And if your hands do get tired, you can also crank it with a power drill, as shown in the video after the break, along with a few playback demonstrations.

It’s always fun to see a modern twist added to old-school instruments, especially the ones that aren’t your typical MIDI controllers, like a harp, a full-scale church organ, or of course the magnificently named hurdy-gurdy. And for more of [gabbapeople]’s work, check out his split-flip weather display.

Continue reading “Less Rock, More Roll: A MIDI Barrel Piano”

Raspberry Pi Plays A MIDI Tune Wherever You May Roam

MIDI controller keyboards are great because they let you control any synthesizer you plug them into. The only downside: you need a synthesizer to turn MIDI notes into actual sounds, slightly complicating some summer night campfire serenading. Not for [Geordie] though, who decided to build the nanoPi, a portable, MIDI instrument housing a Raspberry Pi.

Using a Korg nanoKEY2 USB MIDI controller as base for the device, [Geordie] took it apart and added a Raspberry Pi Zero W, a power bank to, well, power it, and a USB hub to connect a likewise added USB audio interface, as well as the controller itself. As the nanoKEY2 has a naturally slim shape, none of this would ever fit in it, so he designed and 3D printed a frame to extend its height. Rather than wiring everything up internally, he decided to route the power and data cable to the outside and connect them back to the device itself, allowing him to use both the power bank and the controller itself separately if needed.

On the software side, the Pi is running your common open source software synthesizer, Fluidsynth. To control Fluidsynth itself — for example to change the instrument — [Geordie] actually uses the Termius SSH client on his phone, allowing him also to shut down the Pi that way. While Fluidsynth’s built-in MIDI router could alternatively remap the nanoKEY2’s additional buttons, it appears the functionality is limited to messages of the same type, so the buttons’ Control Change messages couldn’t be remapped to the required Program Change messages. Well, there’s always the option to fit some extra buttons if needed. Or maybe you could do something clever in software.

As you may have noticed, the nanoPi doesn’t include any speaker — and considering its size, that’s probably for the best. So while it’s not a fully standalone instrument, it’s a nice, compact device to use with your headphones anywhere you go. And thanks to its flexible wiring, you could also attach any other USB MIDI controller to it, such as this little woodwind one, or the one that plays every pop song ever.

Continue reading “Raspberry Pi Plays A MIDI Tune Wherever You May Roam”

Adding MIDI To An Old Casio Keyboard

Not content to rule the world of digital watches, Casio also dominated the home musical keyboard market in decades past. If you wanted an instrument to make noises that sounded approximately nothing like what they were supposed to be, you couldn’t go past a Casio. [Marwan] had just such a keyboard, and wanted to use it with their PC, but the low-end instrumented lacked MIDI. Of course, such functionality is but a simple hack away.

The hack involved opening up the instrument and wiring the original keyboard matrix to the digital inputs of an Arduino Uno. The keys are read as a simple multiplexed array, and with a little work, [Marwan] had the scheme figured out. With the Arduino now capable of detecting keypresses, [Marwan] whipped up some code to turn this into relevant MIDI data. Then, it was simply a case of reprogramming the Arduino Uno’s ATMega 16U2 USB interface chip to act as a USB-MIDI device, and the hack was complete.

Now, featuring a USB-MIDI interface, it’s easy to use the keyboard to play virtual instruments on any modern PC DAW. As it’s a popular standard, it should work with most tablets and smartphones too, if you’re that way inclined. Of course, if you’re more into modular synthesizers, you might want to think about working with CV instead!

An Easy Way To MIDI Sync Your Eurorack Build

Eurorack synthesizer builds are known for a lot of things; simplicity isn’t necessarily one of them. However, not everything on a modular synthesizer build has to be inordinately complicated, a mess of wires, or difficult to understand. [little-scale] has built a neat and tidy module that might just find a place in your setup – the Chromatic Drum Gate Sync. The handy little device is based on a Teensy, and uses its USB MIDI libraries to make synchronizing hardware a snap.

The device has 12 channels, each responding to a single MIDI note. A note on message is used to set a gate high, and a note off message to set it low again. This allows very fine grained control of gates in a modular setup. The device can also output a variety of sync signals controlled by the USB MIDI clock – useful for keeping your modular rack in time with other digitally controlled synths.

It’s a build that espouses [little-scale]’s usual aesthetic – clean and tidy, with a focus on compactness. All the required details to build your own are available on Github.

We’ve seen the collision of [little-scale] and Teensy hardware before – with this rig playing 8 SEGA soundchips in unison.

Pocket Woodwind MIDI Controller Helps You Carry A Tune

It’s easy to become obsessed with music, especially once you start playing. You want to make music everywhere you go, which is completely impractical. Don’t believe me? See how long you can get away with whistling on the subway or drumming your hands on any number of bus surfaces before your fellow passengers revolt. There’s a better way, and that way is portable USB MIDI controllers.

[Johan] wanted a pocket-sized woodwind MIDI controller, but all the existing ones he found were too big and bulky to carry around. With little more than a Teensy and a pressure sensor, he created TeensieWI.  It uses the built-in cap sense library to read input from the copper tape keys, generate MIDI messages, and send them over USB or DIN. Another pair of conductive pads on the back allow for octave changes. [Johan] later added a PSP joystick to do pitch bends, modulation, and glide. This is a simple build that creates a versatile instrument.

You don’t actually blow air into the mouthpiece—just let it escape from the sides of your mouth instead. That might take some getting used to if you’ve developed an embouchure. The values are determined by a pressure sensor that uses piezoresistivity to figure out how hard you’re blowing. There’s a default breath response value that can be configured in the settings.

TeensiWI should be easy to replicate or remix into any suitable chassis, though the UV-reactive acrylic looks pretty awesome. [Johan]’s documentation on IO is top-notch and includes a user guide with a fingering chart. For all you take-my-money types out there, [Johan] sells ’em ready to rock on Tindie. Check out the short demo clips after the break.

We saw a woodwind MIDI controller a few years ago that was eventually outfitted with an on-board synthesizer. Want to build a MIDI controller ? , like this beautiful build that uses hard drive platters as jog wheels.

Continue reading “Pocket Woodwind MIDI Controller Helps You Carry A Tune”

Cheap DIY MIDI To USB Adapter

[Joonas] became frustrated with cheap but crappy MIDI to USB converters, and the better commercial ones were beyond his budget. He used a Teensy LC to build one for himself and it did the job quite well. But he needed several converters, and using the Teensy LC was going to cost him a lot more than he was willing to spend. With some tinkering, he was able to build one using an Adafruit Pro Trinket which has onboard hardware UART (but no USB). This lack of USB support was a deal killer for him, so after hunting some more he settled on a clone of the Sparkfun Pro Micro. Based on the ATmega32U4, these clones were just right for his application, and the cheapest to boot. He reckons it cost him about $5 to build each of his cheap USB MIDI adapters which receive notes and pedal data from the keyboard’s MIDI OUT and transmit them to a computer

Besides the Pro Micro clone, the only other parts he used are a generic opto-coupler, a couple of resistors and a MIDI connector. After testing his simple circuit on a bread board, he managed to squeeze it all inside an old USB dongle housing, stuffing it in dead-bug style.

The heavy lifting is all done in the firmware, for which [Joonas] used LUFA — the Lightweight USB Framework for AVR’s. He wrote his own code to handle MIDI (UART) to USB MIDI messages conversion. The interesting part is his use of a 32.15 kbps baud rate even though the MIDI specification requires 31.25 kbps. He found that a slightly higher baud rate fixes a problem in the AVR USART implementation which tends to miss consecutive bytes due to the START edge not being detected. Besides this, his code is limited in functionality to only handle a few messages, mainly for playing a piano, and does not have full-fledged MIDI capabilities.

We’ve featured several of [Joonas]’s hacks here over the years, the most recent being the Beaglebone Pin-Toggling Torture Test and from earlier, How to Turn A PC On With a Knock And An ATTiny.