In case you haven’t heard, the best hardware conference in the world was last weekend. The Hackaday Superconference was three days of hardware hacking, soldering irons, and an epic hardware badge. Throw in two stages for talk, two workshop areas, the amazing hallwaycon and the best, most chill attendees you can imagine, and you have the ultimate hardware conference.
Already we’ve gone over the gory details of what this badge does, and now it’s time to talk about the perils of building large numbers of an electronic conference badge. This is the hardware demoscene, artisanal manufacturing, badgelife, and an exploration of exactly how far you can push a development schedule to get these badges out the door and into the hands of eager badge hackers and con attendees.
The good news is that we succeeded, and did so in time to put a completed badge in the hand of everyone who attended the conference (and we do have a few available if you didn’t make it to the con). Join me after the break to learn what it took to make it all happen and see the time lapse of the final kitting process.
Some Important Thank Yous:
![]() This badge was conceived and designed by [Mike Harrison] of mikeselectricstuff fame. This badge includes a camera, bright OLED display, accelerometer, microSD card support for storing all those pictures and videos, and enough pin headers for some serious hardware hacking. Not only did he donate his time and experience, but did an amazingly thorough job of documenting the entire project on Hackaday.io. Thank you so much [Mike]. We hope you will take the time to send him some well wishes on the badge design!
This badge was conceived and designed by [Mike Harrison] of mikeselectricstuff fame. This badge includes a camera, bright OLED display, accelerometer, microSD card support for storing all those pictures and videos, and enough pin headers for some serious hardware hacking. Not only did he donate his time and experience, but did an amazingly thorough job of documenting the entire project on Hackaday.io. Thank you so much [Mike]. We hope you will take the time to send him some well wishes on the badge design!
We also want to thank Microchip for donating the main microcontroller and SRAM chips, as well as Macrofab for donating some of their time and expertise as our contract manufacturer on the project.
Constantly Putting Out Fires
Shipping electronic components around the planet is actually fairly horrible. This entire project went together very smoothly, but as with any hardware development project, there will be bumps in the road. What kind of bumps? Very annoying ones that could have completely derailed this project.
In our first teardown of building this year’s badge, I explained the dangers of single sourcing components from one random guy on eBay. We’ve sorted that out, but of course, there were more problems that cropped up. Remember, we weren’t changing the date of the Supercon, so these badges needed to be ready by a certain date. This gets complicated when you are making 500 of something, and sometimes means going to extreme measures.
The plan was to order the PICs for the main processor through MicrochipDirect because you can have firmware flashed before they are shipped. Unfortunately the lead time for programming these chips was several weeks, so we fell back on our backup plan: just ordering the chips and have the contract manufacturer burn the bootloader with a pre-programmed PICKit 3.
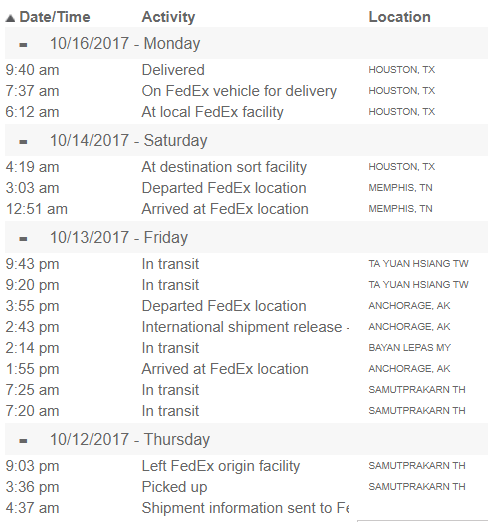
Here’s where things fell apart. On a Friday, three weeks before the Supercon, I got an email from Macrofab. The SRAMs arrived from Microchip, but the PICs were nowhere to be found. This caused great consternation as everything else was ready to go on the assembly line. The tracking number for the order told me the chips were somewhere between Thailand and Houston, Texas.
I called Microchip Direct, and they told me they would contact FedEx to figure out what was going on. But we needed a solution now. As a backstop to the is we ordered 500 pin-compatible PIC32 chips from from a distributor, shipped overnight to Macrofab. This is the third or fourth time I said, ‘whoops, we spent a few thousand dollars’ during the production of this badge.
Monday morning rolled around, and the PICs magically appeared at Macrofab. I called to cancel the order I placed Friday afternoon and everything was fine. The fire was extinguished.
For fun I also checked the FedEx tracking for the package full of PICs, and found these microcontrollers went from Thailand to Alaska to Malaysia to Alaska to Taiwan to the FedEx Mother Brain in Memphis and finally to Houston. There is a reason you pay your logistics guy well.
Badges Rolling Off the Line
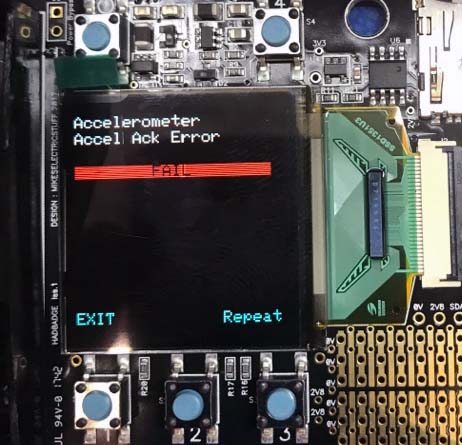
As Macrofab began sending badges through the ovens, it seemed for a moment that everything was alright and this would actually happen. Then we got an email. Badges were failing their self-test.
 If you check out the official project repo for this badge, [Mike Harrison] did an excellent job on the firmware development for this badge. There’s a splash screen, video recording, and most relevant for Macrofab, a hardware self-test. It’s a boon for the assembly line at Macrofab — the only thing the assemblers need to do is connect the PICKit 3 programmer (no computer necessary), hit upload, and wait for the word ‘PASS’ to appear on the screen.
Unfortunately, the first dozen badges off the line never showed ‘PASS’ during the self-test. The accelerometer was failing. [Mike] quickly wrote an additional I2C utility for the self-test which found the accelerometer was at address 3A 60, when it should have been at 32 60. That’s an off-by-one error if you’re keeping score at home.
This ended up being just another outcome of buying parts with a short lead time. The badge prototypes used an almost identical part as the production version. The only difference, as far as we can tell so far, is that the part we told Macrofab to order has an I2C address of 3A 60. No problem, that’s just updating a single line of code in the bootloader and test firmware. Macrofab swapped out for the new firmware on their programmers and everything magically worked.
Piddlin’ Crap
If you’ve never done any sort of artisanal manufacturing before, you really don’t realize how much time it takes to do one thing five hundred times. If you need to do a task once — take the trash out, or wait for a machine to finish, for instance — it really doesn’t matter if it takes one minute or three minutes. You can always make up those extra two minutes somewhere. If you need to do a task five hundred times, a one-minute task turns into a bit more than eight hours, or a full workday. A three-minute task done five hundred times is three workdays. This is a big difference.
Building a conference badge is filled with these one- to three-minute tasks. You need to depanelize the boards. You need to solder in a battery holder. You need to install the lanyard. You need to copy an SD card. You need to kit the badges. All of these, singularly and independently, are not a big deal. Put together, you might be looking at a man-month of work. You’ll want some friends or coworkers for these small tasks I’m now calling ‘piddlin’ crap’.
SD Cards
Logos, sample images, a few demo videos, and a backup copy of the stock firmware are all stored on an SD card. This is a fantastic way to plan for software development that’ll happen at the the con since the bootloader can flash hex files from the card to the microprocessor. But it does mean someone has to program those SD cards. How do you clone five hundred microSD cards?
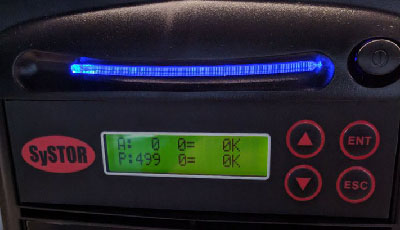
We ended up going with one of these things. It’s a 1 to 15 SD card duplicator, basically a tiny tower stuffed with four, four-bay SD card slots, a control panel, and an FPGA. Put the SD card to be cloned in the upper left-hand slot, fill the other slots with blank cards, and press a button.
We were pleasantly surprised with how fast it was to clone the microSD cards for each badge. We had tested the cloner a few weeks before, and came up with a 14-minute run time to clone 15 cards. Add in two minutes for swapping out each card, and that’s a full work day of cloning SD cards. This is a fairly advanced SD card cloner, though, and this experiment was copying each and every block on the card. Since we’re only copying a few megabytes worth of graphics and videos, the actual cloning of the master SD card was much faster.
Code Complete
As you would expect, firmware development for the 2017 Supercon badge was happening right up until the last possible minute. We discovered on Tuesday morning that the sleep function wasn’t working. The power pin was floating as the microcontroller entered sleep and too much noise from the switching power regulation turned it back on.
[Mike] fixed this in software by using PWM on the switcher’s enable line to bleed off enough stored power to shut it all the way down. There was also a wrongly mapped pin in the bootloader menu that was fixed. These changes meant we needed to reflash all of the badges — but we were going to have to do that with the the final firmware version anyway. On Wednesday night, [Mike Harrison] turned the badge into an oscilloscope just hours before we had to start kitting.
Kitting
Very few tasks can be parallelized. You can’t design a badge in parallel, and I don’t even know what that would look like. Is it one person designing the power supply, one person putting pull-ups for the I2C bus, and another doing the mechanical design, throwing everything together, and hoping a working circuit appears at the end? It wouldn’t work.
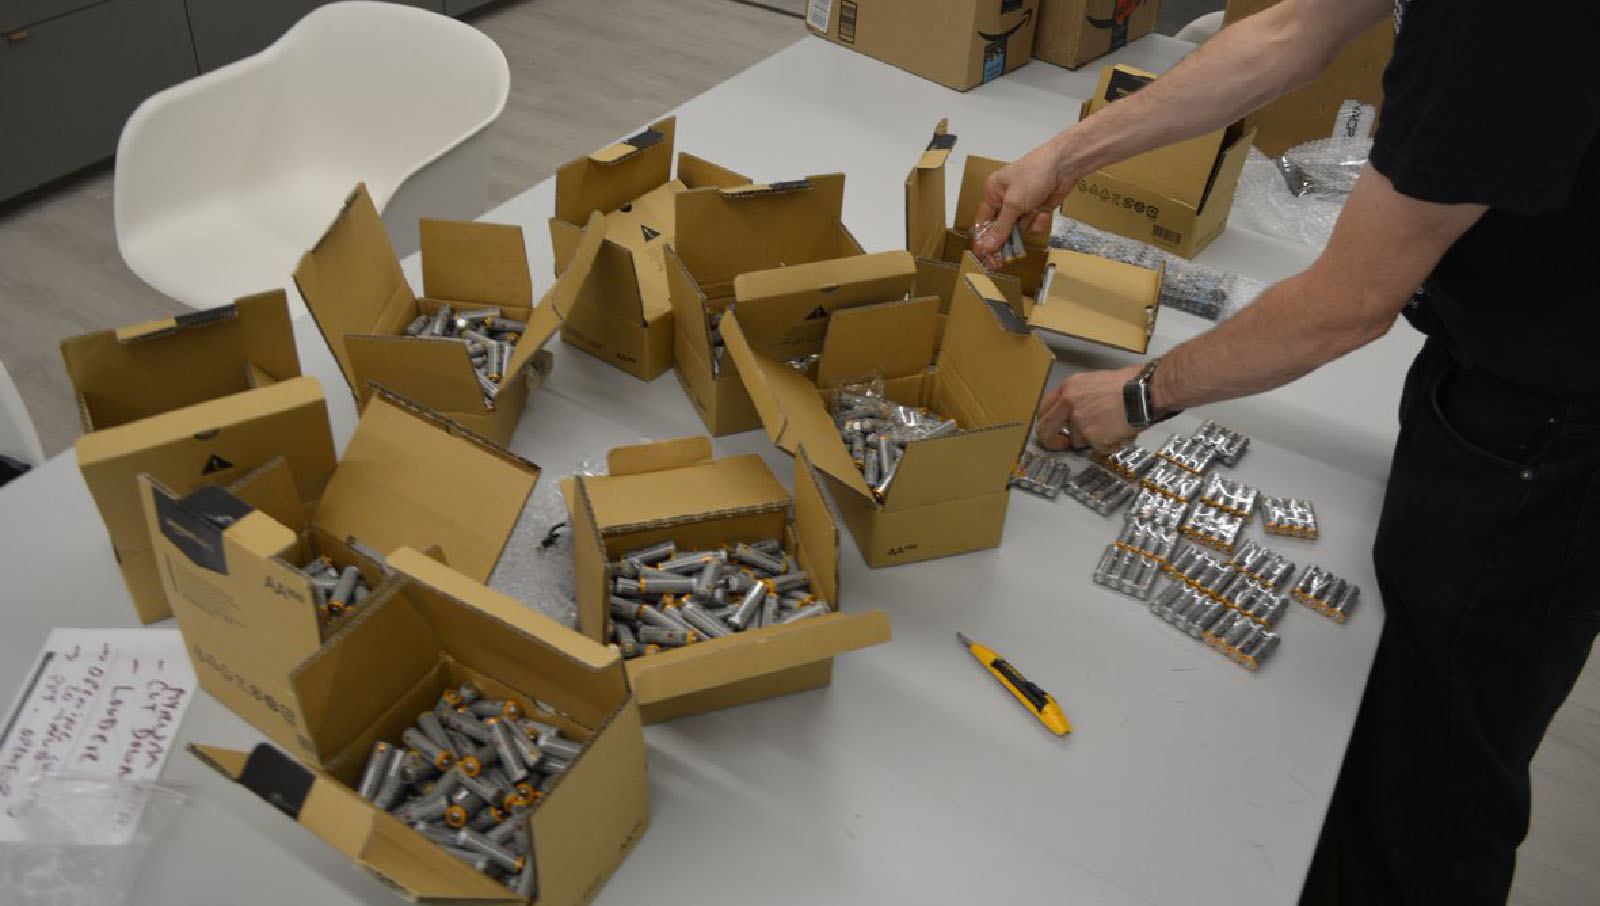
Kitting is one of the very few parallelizable tasks in building this badge. This started with 1000 AA batteries that needed to be liberated from their 4-packs of plastic shrink wrap and 10 cardboard boxes. Line up 200 batteries at at time in rows of 20, use a box cutter to score the plastic, and you can unwrap 8 at a time in about one second using both hands.
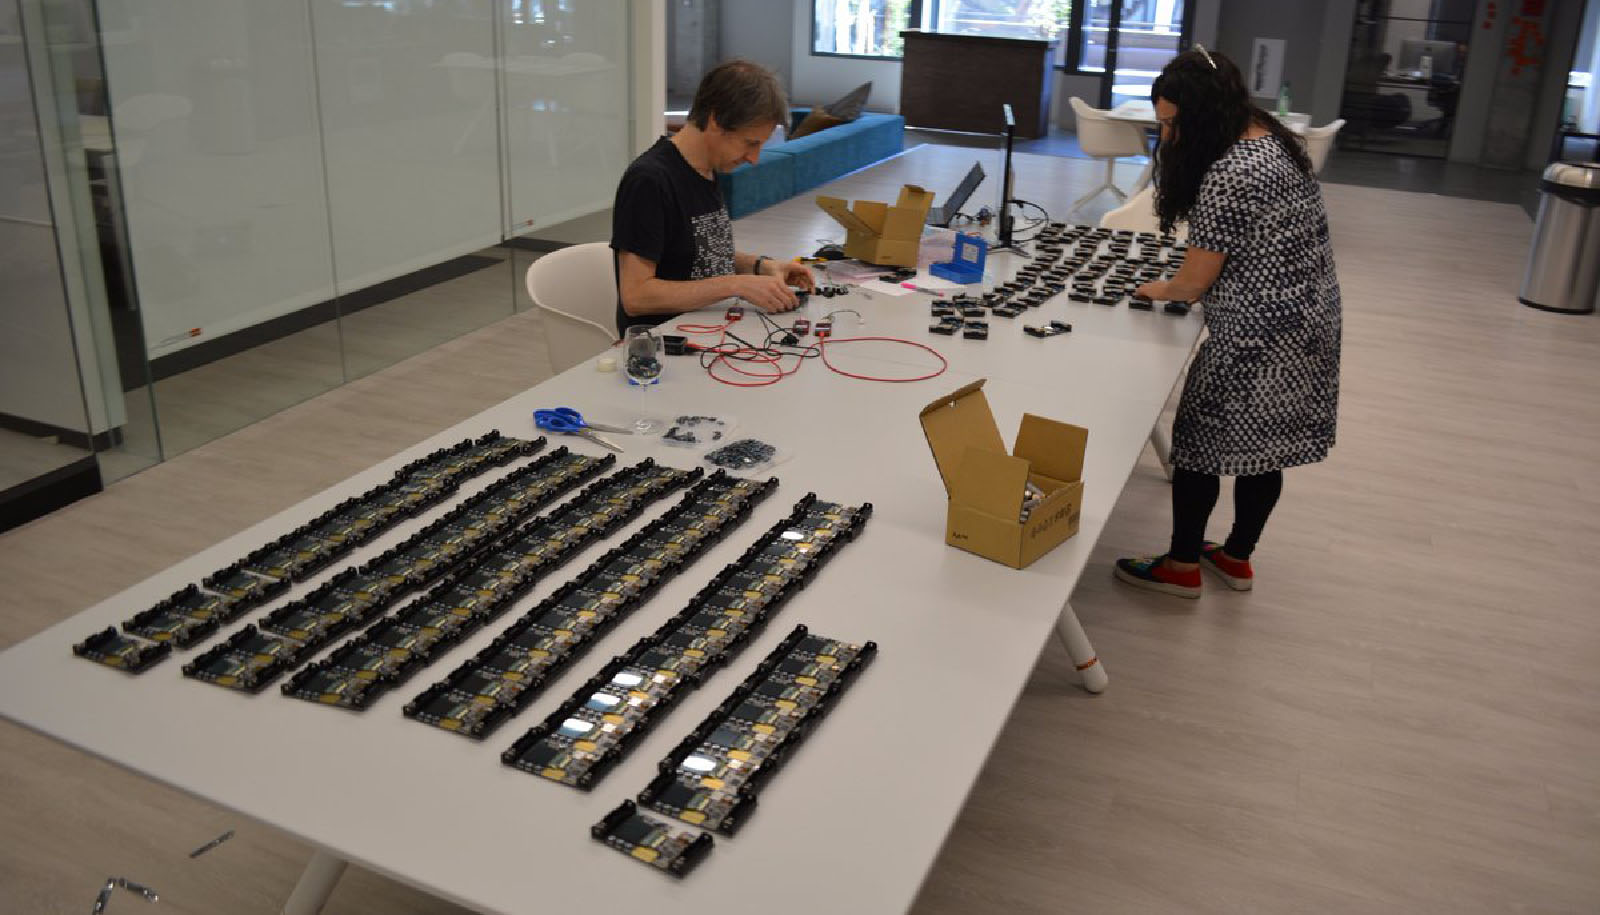
Macrofab shipped the badges each sealed in an antistatic bag, placing four together and wrapping in bubble wrap. We unboxed these, unwrapped them, cut open the bags and placed each on the table. SD cards were inserted, then batteries, before sliding them to [Mike] who was using four programmers at once, along with binder clips to hold down the badge power button during the ~10 seconds of programming. Don’t worry, we made a video of this which starts after we had already done about 160 badges. This is not [Mike’s] first rodeo and his guidance is all that made this feasible — one second of wasted time per unit adds up to almost 10 minutes of extra work.
The Takeaway
In theory, designing and manufacturing a badge is easy. You need only open up a copy of Eagle or KiCad, push some wires around, and send the board off to a contract manufacturer. In practice, even the ‘easy’ way of doing things is incredibly hard. Supply chain management is a skill, and being able to plan a design is as important as doing the actual design of the design. Waterfall calendar graphs are your friend.
Nevertheless, we got our badge finished and out the door. Yes, there were a few problems along the way, but that’s only two or three more gray hairs on our head.
If you want to get your hands on one of these sweet badges, head over to Tindie before they’re all gone.


No, it’s really really funny that some people are so offended by a mere font that they’d take it as an insult worthy of accusing someone being an asshole for using.
Thanks for the feedback! I see you’re an officer in both the Font Police and the Fun Police. Can you send us your contact info, just so we can run this by you before sending next year’s badge off to manufacturing? We don’t want to break any Typeface regulations or have any fun whatsoever.
Again, thanks for the feedback. It’s been a big help. Looking forward to hearing back from you.
The bootloader button issue was that I found late on that a few SD cards have a pullup one on of their pins, which is shared by one of the button lones. I had fixed this on the main app code by some Io pin bodgery but forgot to put the fix in the bootloader.
The accelerometer thing was that I started with a part that happened to.be in stock for the protos, then changed to a slightly cheaper version for production but forgot to fit the new type to my proto. The difference wasn’t just the i2c address, the registers were also different. Fortunately I’d ordered the new one so when the message came in from Macrofab, I had one to fit, and an hour and a slightly melted expansion connector later I had a fix. Mike S was still using the ither proto for the puzzles so I left a compile-time switch for accelerometer type.
And then there’s the issue of newer SD cards being way slower than older 128&256M ones when accessing via SPI, and half of the ones we fitted being even slower than the others, hence sluggish startup splashscreen, which we only noticed on Thursday afternoon, too late to do anything about.
Waiting for superconference 2032 when one develops a badge that opens a portal to another universe.
Th-that’s a great *burp* idea Morty.
Don’t get me wrong, from a technical point of view this is interesting stuff, but 4 articles about one single badge? The funny thing about it is that I never realized that there is such a huge market for these things, a PCB dangling around your neck, the electronics are completely exposed to the elements, some designs have sharp edges, I just don’t get it.
Could somebody explain why these badge-like items are so hot?!
“Huge market” is probably in the hundreds, and it includes mostly other people who are interested making creative, small-run hardware.
We could probably write a couple more articles! Small-scale manufacturing is not a small topic.
A lot of futurists have predicted such. Addresses the uniqueness people want in their products, while making things like counterfeiting and piracy harder. Makes hash of the reseller market though.
Agreed…an awful lot of “badge” articles lately.
Thanks @Benchy, this is a gratifying read for someone who deals with this kind of firefighting for a living!
PS,
Kudos to Mr Harrison for thinking of details like hardware self test. Manufacture tests tend to be the most neglected aspect of product development and can be as big of an engineering effort as the product itself.
So many recognizable problems and ideas :) (for those that don’t recognize the nickname, i was partly responsible for the SHA2017 badge here in the Netherlands with about 4400 badges).
Our hardwaretester in the firmware was a lifesaver in vetting out all the small problems (better unboxing experience for visitors) and even more: finding all badges with the fake usb-serial chips. Without it we would never have identified all badges that needed rework. Try finding 2000 fake chips by a magnifying glass!
The sourcing of parts was also fun fun fun. We redesigned for a cheap and readily available touch-controller. Until we started to order and it turned out to be EOL and becoming expensive and unfindable fast…
Kitting is an awesome proces to experiment, plan and parallelize with. I’ve had the pleasure to organise our ‘sweatshops’ where 20~30 volunteers enjoyed themselves packing thousands of kits. It’s awesome to get it right in one go, but i shudder to think what would have happened if we didn’t do all the testruns and planning sessions beforehand. Every hour we invested helped the proces enormously.
The bootloader button issue was that I found late on that a few SD cards have a pullup one on of their pins, which is shared by one of the button lones. I had fixed this on the main app code by some Io pin bodgery but forgot to put the fix in the bootloader.
The accelerometer thing was that I started with a part that happened to.be in stock for the protos, then changed to a slightly cheaper version for production but forgot to fit the new type to my proto. The difference wasn’t just the i2c address, the registers were also different. Fortunately I’d ordered the new one so when the message came in from Macrofab, I had one to fit, and an hour and a slightly melted expansion connector later I had a fix. Mike S was still using the ither proto for the puzzles so I left a compile-time switch for accelerometer type.
And then there’s the issue of newer SD cards being way slower than older 128&256M ones when accessing via SPI, and half of the ones we fitted being even slower than the others, hence sluggish startup splashscreen, which we only noticed on Thursday afternoon, too late to do anything about.
2017 badge leaves 2016 badge in the dust, logistics/complexity-wise. Story of 2016 badge here. https://medium.com/supplyframe-hardware/the-fabbing-of-the-badge-ce5241e8e77f
Fabulous stuff! Thanks for sharing the high-tech world of badges.
There are also badges for vintage computer conferences. Here’s the one from VCFMW last September http://www.sunrise-ev.com/6502.htm. This is the 40th anniversary of the Apple II, Commodore PET, and Atari VCS home computers; so naturally it used a 6502 and all vintage parts and technologies. :-)
Nice!
I’m tempted…
There’s a lot of historical precedent to the perils of making con badges :)
My first proto for the 2013 OHS in Boston was a bodge of copper wires thanks to a couple of rookie footprint errors. The soldering Grandmasters in Shenzen ensured that we could check out the electrical sanity of the badge before the next spin. And it didn’t help that typhoon Kong-Rei rained down on our party just as the boxes full of badges were about to leave Hong Kong for Boston. We got badges finished and ready 12 hours before doors opened.
https://photos.app.goo.gl/GtIsbkPypWtv6ZnK2
>$1500 15 port SD card cloner
or 3x $3 7 port USB hubs + 21x $.5 SD card readers + laptop with 30 line bash script
choices choices …
I did suggest that, but sometimes it’s more cost effective to pay for a known-working solution than spend time messing about. You can always sell the kit afterwards so think of it as a rental. From my experience of PC based SD readers with just one card I suspect it would take some work to get it reliable with loads ( and you wouldn’t have the “ready” LED on each socket to reduce operator errors)
I suspect that that would not be faster than copying 3 at a time.
average computer has at least 3 usb root controllers (even older ones like Lenovo X230 – separate for left ports, right port, and third one for the $10 dock), + Mike already mentioned those were shit slow SD cards, probably 1MB/s kind, so you could copy ~20 cards per hub full speed x 3 hubs = could blast 60 cards in one shot with $150 laptop.
SD card readers are practically disposable at $.5, you could have one person putting cards into readers, and second one loading all the hubs, flashing all at once, and “reloading”.
And even if flashing takes 10 minutes per load, you could buy x2 the hubs ($10 more!!1) and have two people load one hub/readers setup while the other one is writing, swapping leads only when all cards are verified.
whether you can help me hack as personal