I was in Pasadena CA for the Hackaday Superconference, and got to spend some quality time at the Supplyframe Design Lab. Resident Engineer Dan Hienzsch said I could have a few hours, and asked me what I wanted to make. The constraints were that it had to be small enough to fit into checked luggage, but had to be cool enough to warrant taking up Dan’s time, with bonus points for me learning some new skills. I have a decent wood shop at home, and while my 3D printer farm isn’t as pro as the Design Lab’s, I know the ropes. This left one obvious choice: something Jolly Wrencher on the industrial Tormach three-axis CNC metal mill.
 A CNC mill is an awesome tool, but it’s not an omniscient metal-eating robot that you can just hand a design file to. If you thought that having a CNC mill would turn you into a no-experience-needed metal-cutting monster, you’d be sorely mistaken.
Of course the machine is able to cut arbitrary shapes with a precision that would be extremely demanding if done by hand, but the craft of the operator is no less a factor than with a manual mill in making sure that things don’t go sideways. Dan’s good judgment, experience, and input was needed every step of the way. Honestly, I was surprised by how similar the whole procedure was to manual milling. So if you want to know what it’s like to sit on the shoulder of a serious CNC mill operator, read on!
Planning: CAD and CAM
I said “Dan, Jolly Wrencher in Aluminum!” and when I came in the next morning, he had already been secretly working behind my back. The SVG file that he had of the Wrencher was actually composed of tiny line segments rather than smooth Bezier curves. Attempting to match all of the resulting infinitesimal sharp corners would drive the CAD software (Fusion 360) batty. So instead, Dan traced over the original image with entirely new, smooth curves and came up with something indistinguishable from the original to my eye, but much easier for the computer to handle.
With the desired outline set, we had to pick our tooling. Here, there is a trade-off between being true to the input file and getting the piece made in a short time. If Dan chose too large a cutting head on the mill, the fine details would be impossible to cut out — in particular the points of the wrenches have interior corners, and the sharpness of these is limited by the bit’s diameter. Doing the whole piece with the finest head would look better, but it would take forever. Thus the usual strategy is to make a rough pass to hog out the bulk of the aluminum, and then make finer passes with the smaller tool. But how big is big, and how small is small? And are two passes enough, or should we go to three?
I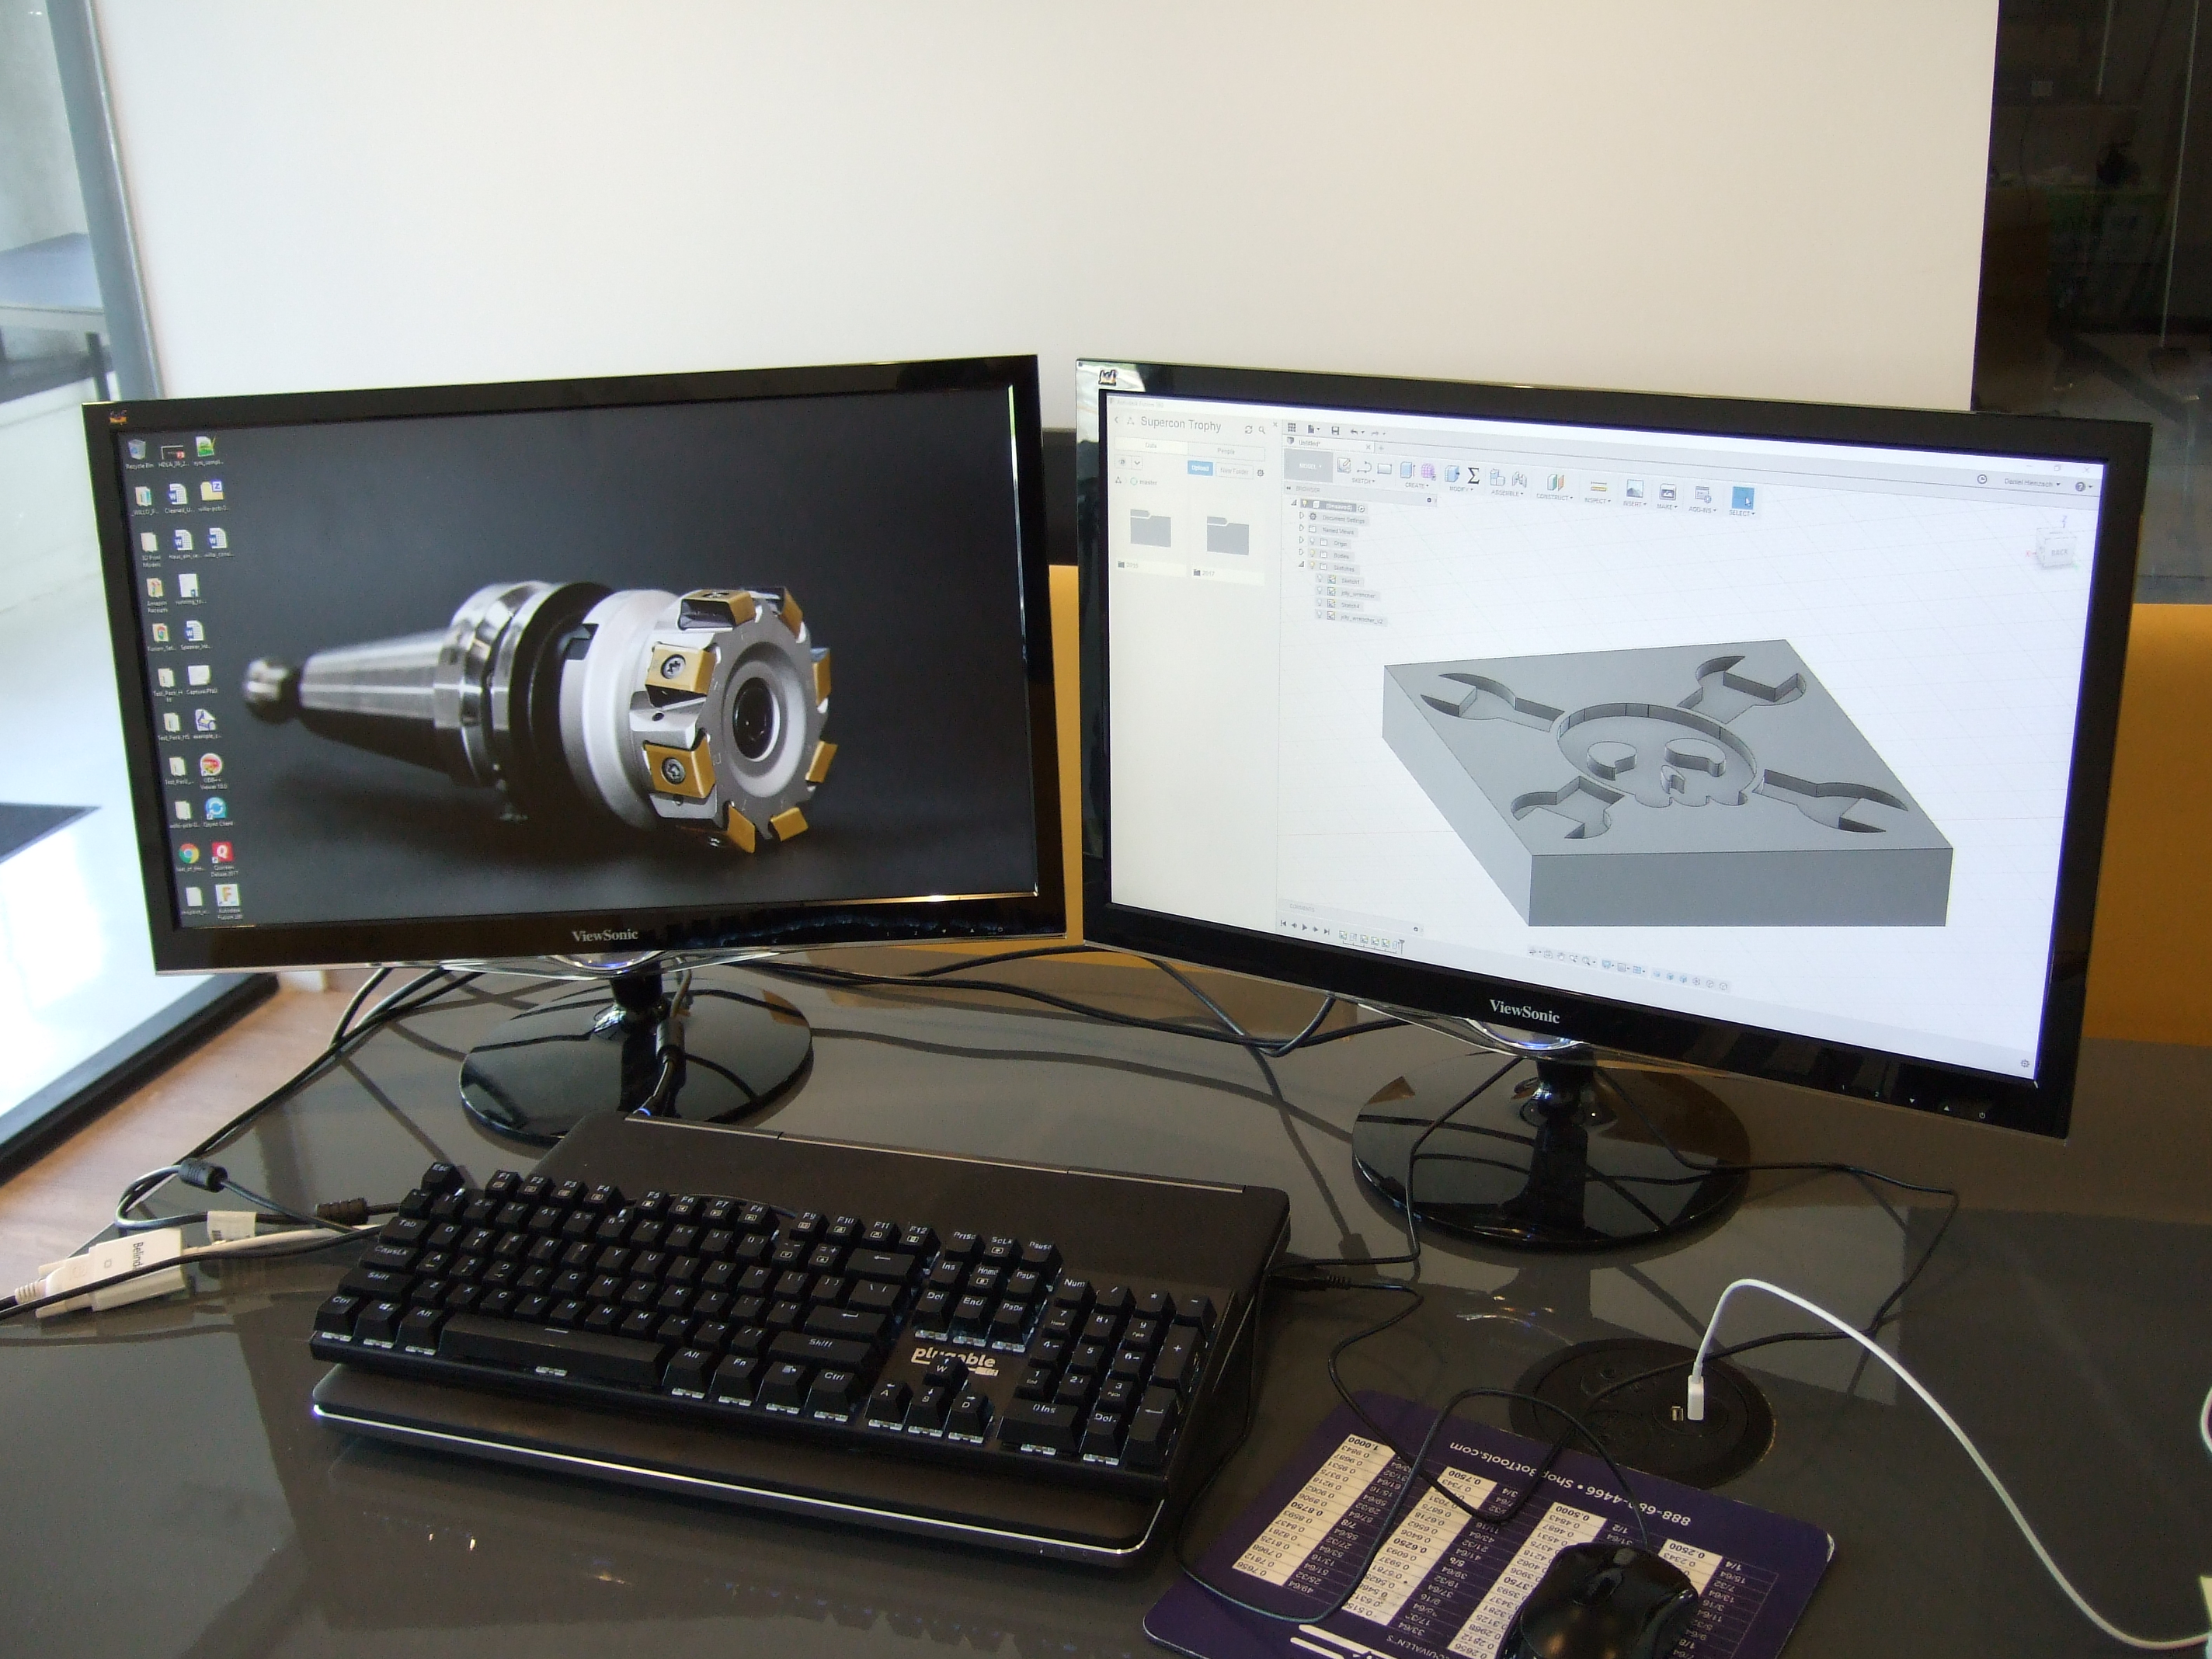 n the end, this is a judgement call. Switching out the toolheads is very quick on the Tormach, but it doesn’t do it automatically. That meant that we had to be around at just the right time to swap them out. In that sense, fewer tool changes are better than more. Dan picked the first-stage mill to just fit between the Wrencher’s eyes and the edge of the skull, but didn’t sweat the small details in the tips of the wrenches. A second pass with a finer tool would handle them. A final pass with a chamfering bit was added just for show: because I like the look of curving chamfered edges, and could never do this so nicely by hand.
The CAM software also wanted to know an overwhelming number of details about the actual cutting, but most of these had good previous values due to Dan’s experience cutting aluminum with these particular toolheads. Still, he cavalierly set the feed rate about double what it probably should be, and said we’d be “riding the jog wheel” to get it right.
Even before we’d flipped the machine’s big red on switch, Dan had already made a number of judgement calls that depend on his knowledge of the software, the machine, the tools, and the material that we’re cutting. A newbie, like myself, would have already lost the game, CNC be damned.
Man and Machine
We uploaded the CAM files and started up the Tormach’s warm-up and self-lubrication procedures. Dan made sure that it was sending out a fine mist of cutting fluid, and then we started looking for scrap aluminum bar. The skull was planned to be about 4″ (call it 10 cm) square, and the shop had some slightly larger bar stock that just needed cutting. Good lubrication and a clean and sharp metal blade on the chop saw made quick work of a hefty bar of aluminum, but this was essentially just like you’d do it at home with some cutting fluid and a hack saw. Only faster.
Bar stock isn’t necessarily square, and the surfaces don’t look good anyway, so once the mill had warmed up, Dan put in the fly cutter head and we trued up the stock. Though he was using the CNC mill to make the cuts, this was an almost entirely manual procedure. First, he cut a reference edge by going progressively deeper until he took off all the original metal. Then he flipped it around and repeated the procedure. With two parallel edges, and good precision square blocks, he cut the remaining faces to be square. In all cases, it was a process of lowering the fly cutter slowly until it just hit the (guestimated) high point on the face, and working down pass by pass until everything is shiny. How much to take off? How fast to feed? Operator experience. CNC doesn’t help you here.


In the end, our block measured 4.001″ by 3.985″ — not bad, but a slightly wonky first cut with the chop saw resulted in us needing to take off too much on one edge to get it clean. It’s a paperweight anyway, so all that matters is getting the Wrencher centered. Enter operator experience again. Dan had set up the CAM file with the machine’s zero point in the dead center of the Wrencher’s head. This means that as long as we could point the CNC machine to the center of our aluminum stock, we wouldn’t have to worry about that nagging 0.015″ (0.4 mm) that one side is shorter than the other — everything will work out symmetric by design.
The Tormach has a 3D distance probe tip, which is probably the coolest thing I’ve seen. You chuck it in the machine and it measures in the X, Y, and Z axes. This made finding the exact width and height of the piece in all dimensions a piece of cake, and allowed Dan to tell the machine where the top surface of the center of our piece was. Up until this point, everything was 100% manual, but now that the machine is oriented, the CNC can help out.
Riding the Jog Wheel
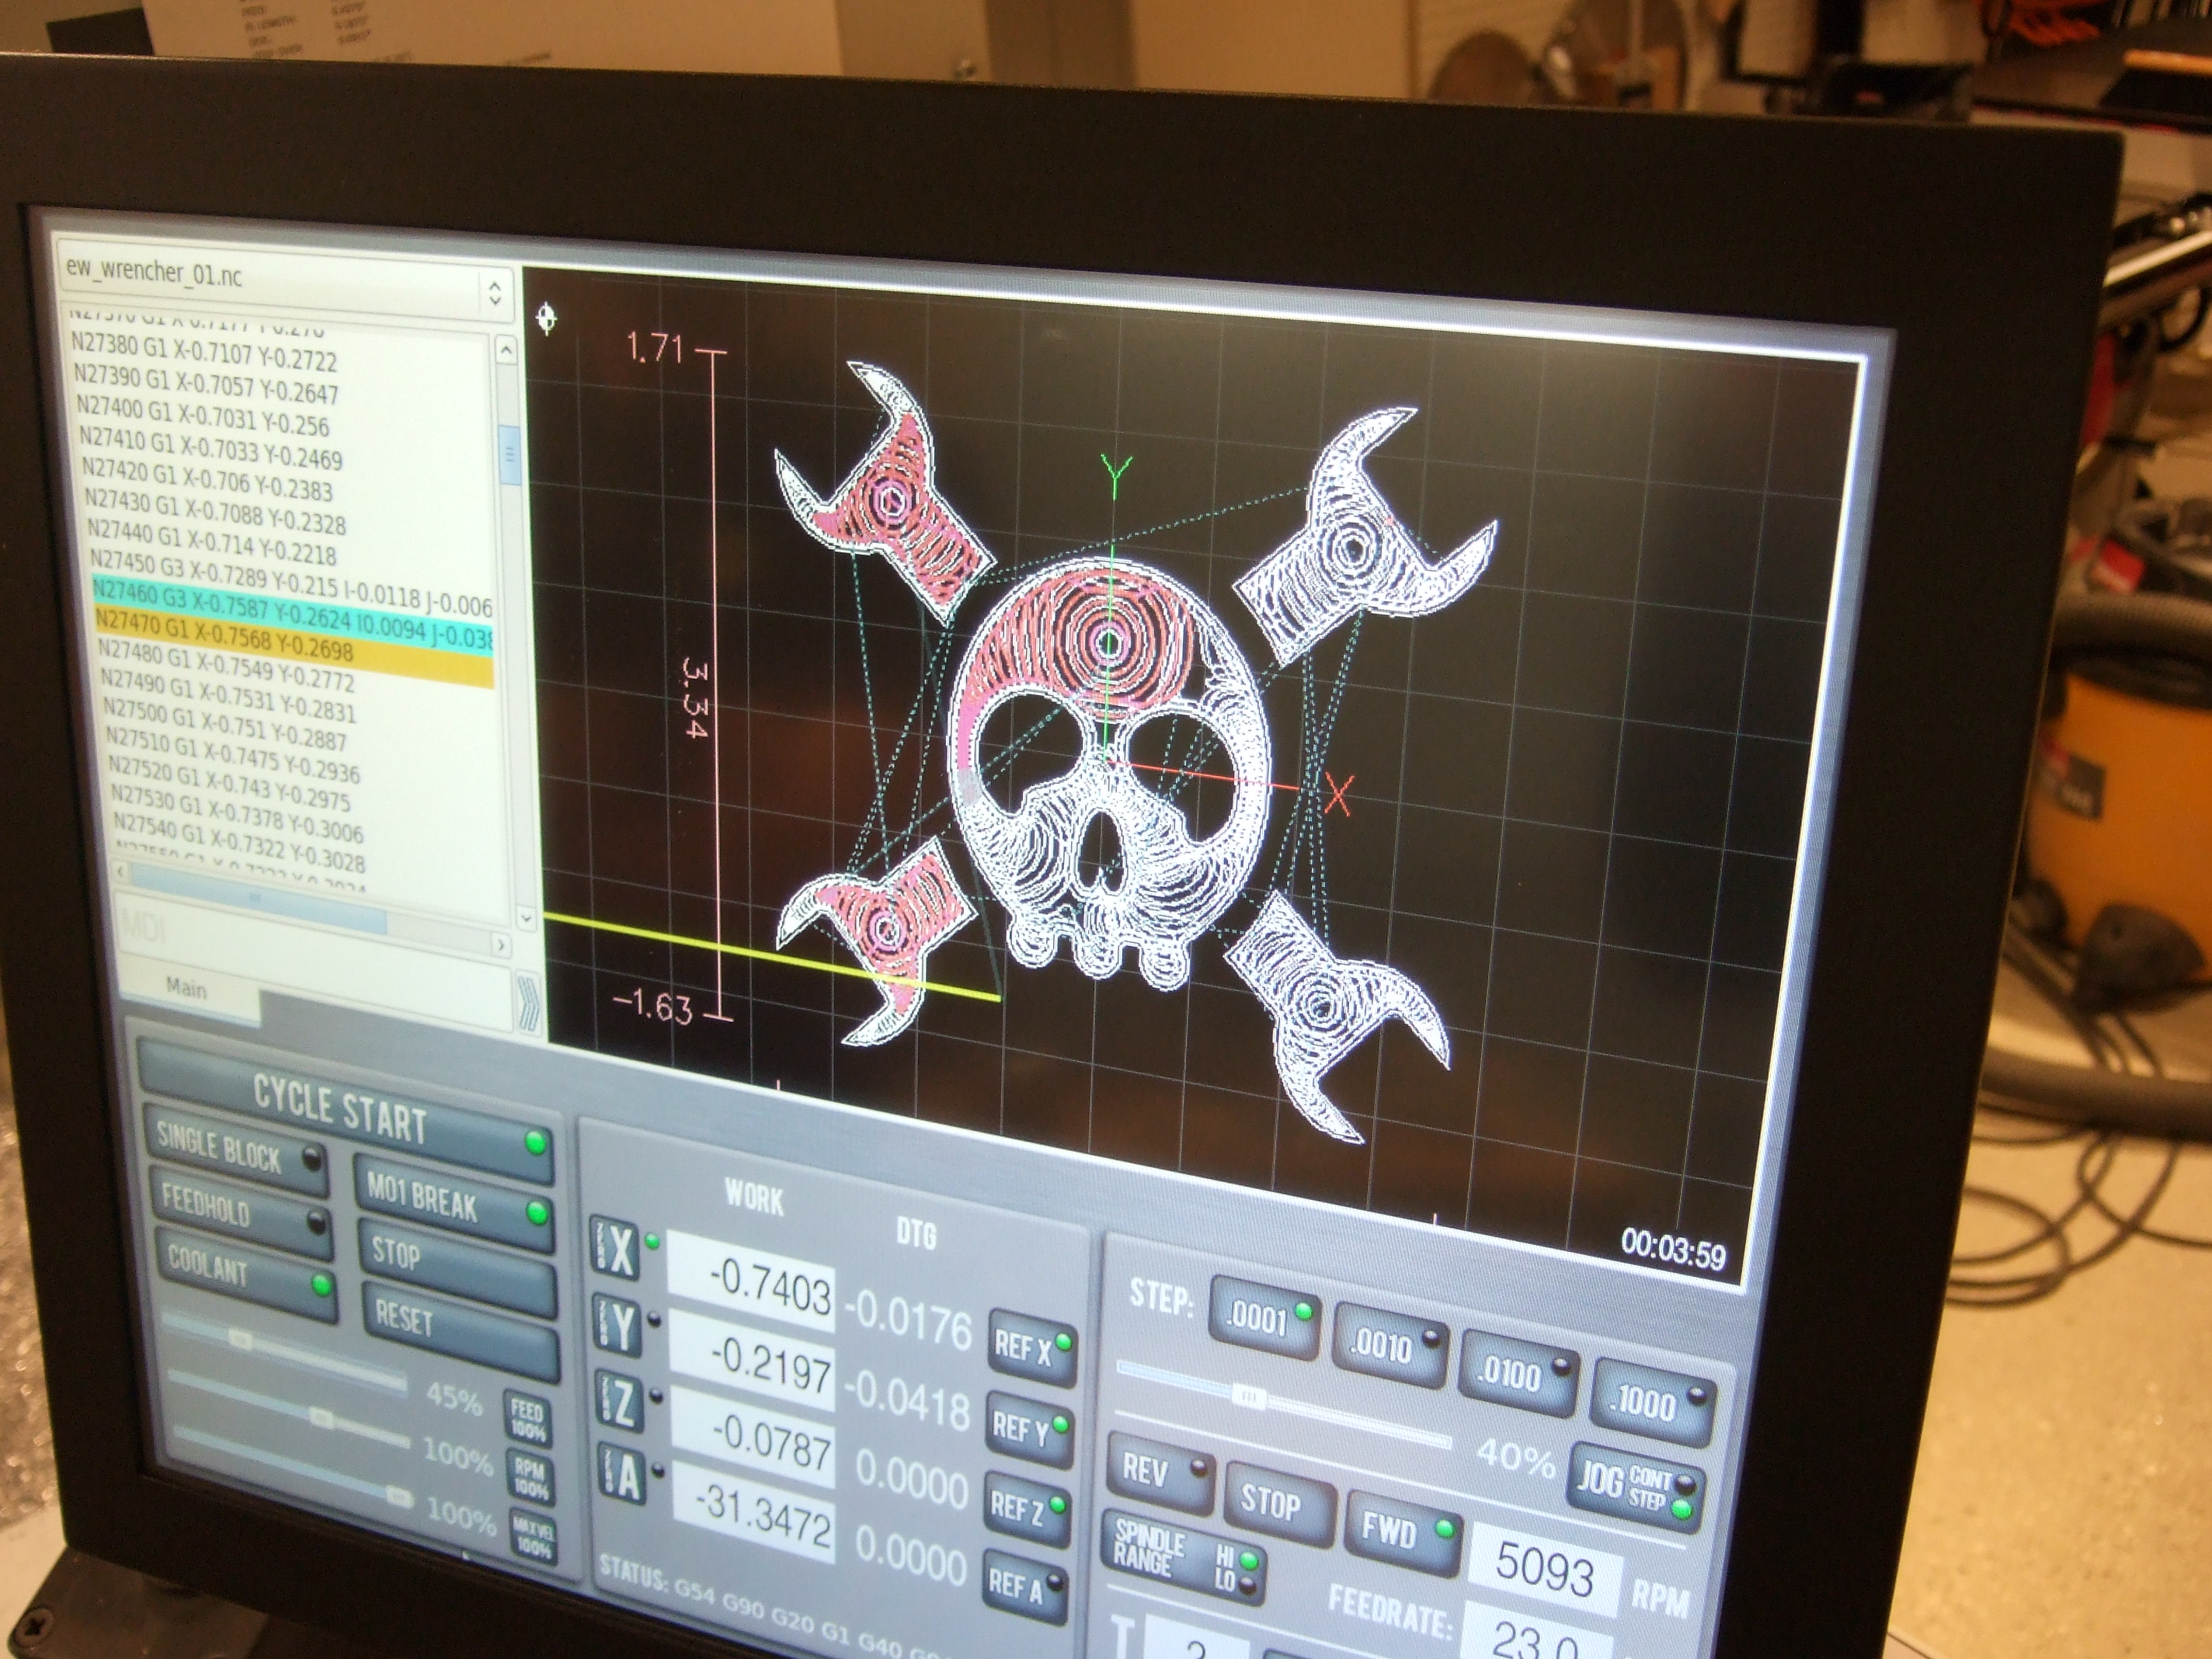 Swapping in the first cutting tool, did he just press play? Well, kinda. The Tormach has individual speed controls for cutting speed and travel speed. The first order of business was to double-check our zero setting by moving the mill down to the work piece at about 10% travel speed and with the cutting feed speed set to 0%. This let us verify that the mill stopped exactly where it should. If he had made a mistake, it could have run the mill into the metal at a dangerous depth or an insane feed speed, breaking bits or worse. Sanity checks like this are key.
He then raised up the cutting feed speed slowly; remember that he had set the feed speed too high intentionally during the CAM stage. We watched the mill spiral down to the correct cutting depth, and then start off on its pattern. He slowly cranked up the feed until it was moving at a decent pace. How much material should it take off per second? Just like with a manual mill, it’s a matter of experience. He listened to the machine, watched the chips flying off, and checked the quality of the cut throughout. Fully automatic CNC? The opposite.
The roughing pass was done in a jiffy, and we changed out the tool for the detail mill. Again, we repeated the same procedure of slowly edging the tool down to the surface of the aluminum. Did it stop where it was supposed to? Is the toolhead the length that the machine thinks it is? Affirmative to both, but it’s a good double-check. Dan then slowly jogged the machine up to operating speed again.


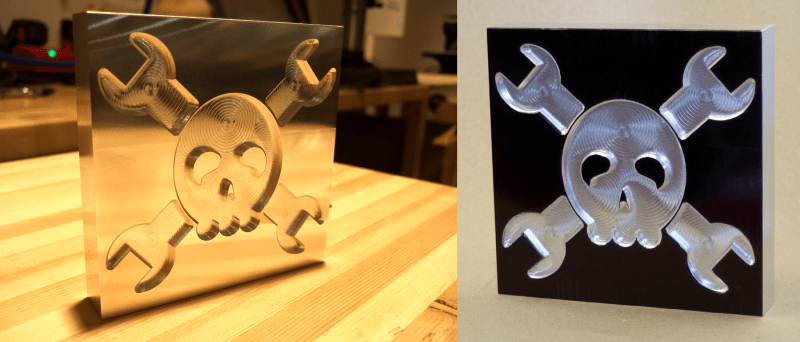
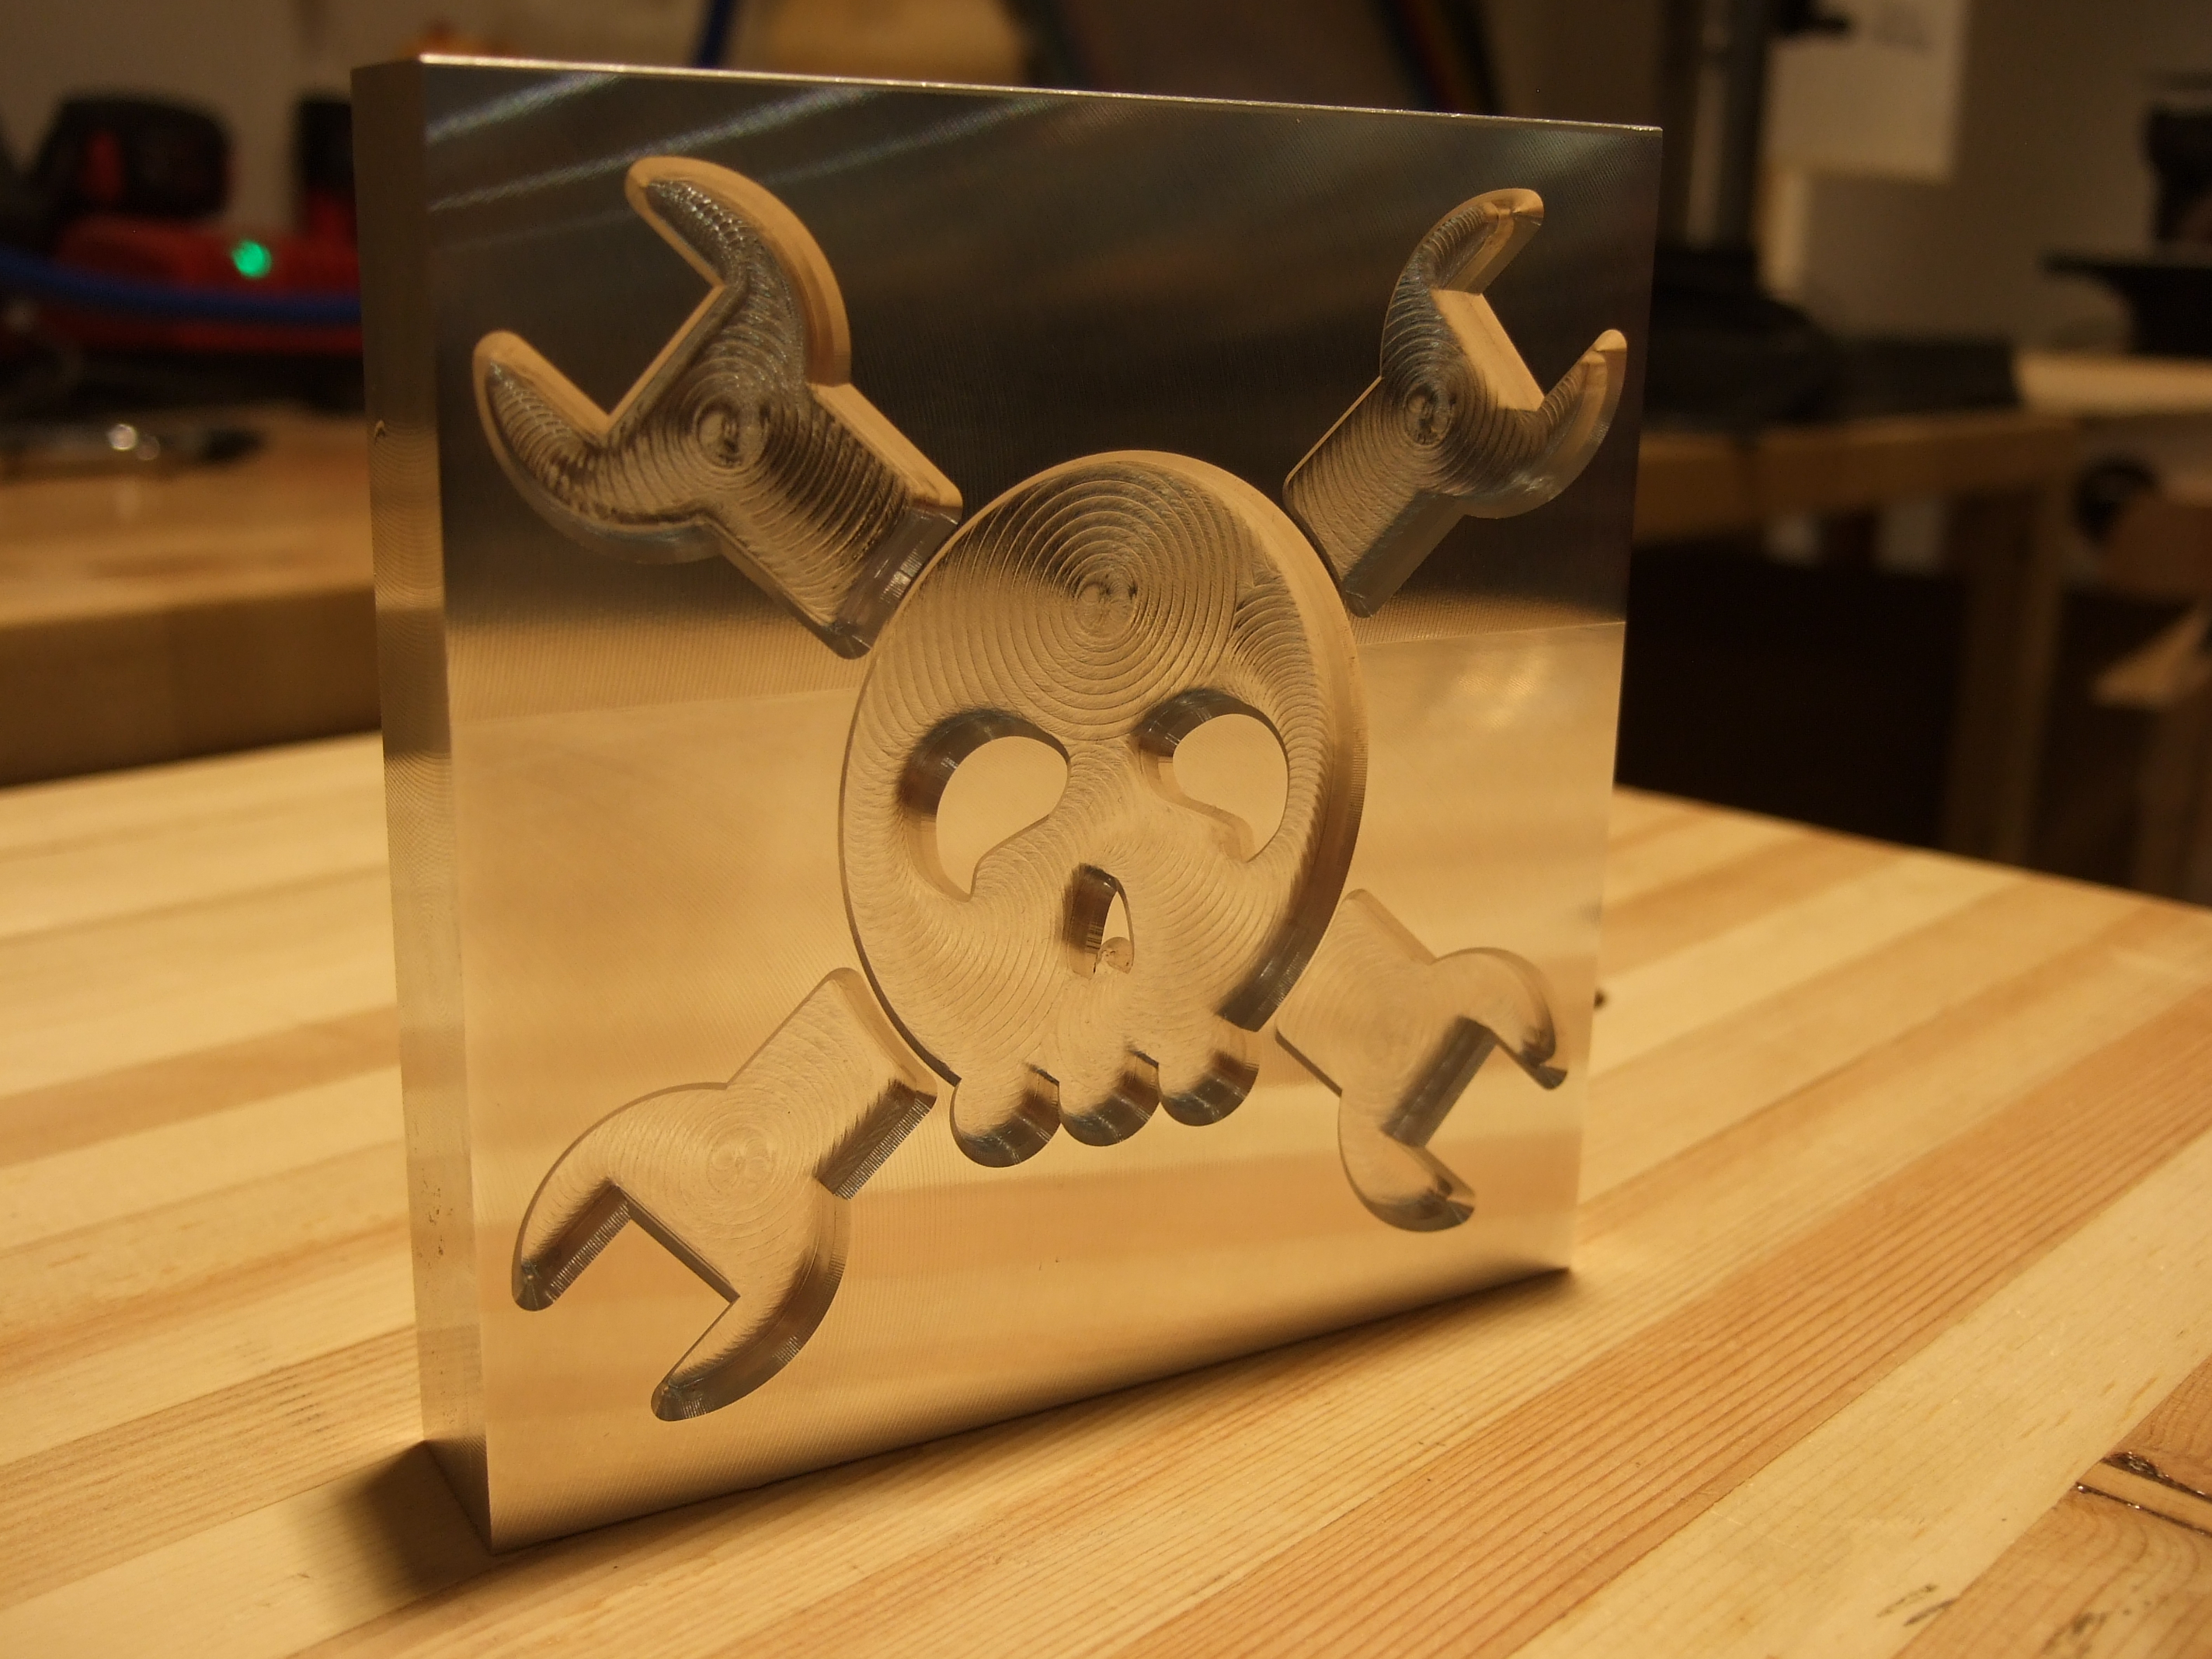
Watching the mill do its work is mesmerizing, as any of you with a 3D printer know, and I ended up watching aluminum chips fly while I could have been outside drinking coffee. But these fifteen minutes of full automation were over too soon. One more tool change, to the chamfering bit, and another couple of minutes of machine time and the Jolly Paperweight was finished. The swirlies from the center of the mill’s flutes make it look almost like a sugar skull. It was glorious!
Epilogue
Of course, the Aluminum Wrencher was a quick-and-dirty, one-off project. If we were producing these in multiples, we would write down the ideal feed speeds and maybe skip the manual jog-wheeling for the next iterations. But all in all, fairly heavy operator involvement and judgement was involved for 60% of the time. Planning the work, squaring up the stock, and even guiding the machine through the steps that it already “knew” required an operator who is familiar with machining from a manual perspective, and who could think through the next steps while planning the present.
 While traditional metalworkers might wake up in the middle of the night sweating bullets about the robots taking work out of their hands, and maybe that’s right in mass production, it’s certainly not the case that someone who’s never had metalworking experience can just walk up to one of these CNC wonders, hand it an image, and press play. After watching Dan and the Tormach cut me a Wrencher, I’d say that learning the ropes on a manual mill isn’t sufficient to become a master of the CNC, but it’s absolutely necessary.
But I’m just a CNC-milling noob. What do you folks say? How much of your bag-of-manual-metalworking tricks transfers over the world of CNC?
Thanks a ton to Dan and everyone at the Design Lab for your hospitality!


I used to operate a large CNC machining center. For the first few runs on a project, there is a lot of work, but after the kinks get worked out, it is basically just load and unload.
For repeat projects maybe and even then it’s not exactly fully automated and tooling dulls or breaks or material can shift, etc. New projects are almost always a host of new issues and revisions though.
potrace or CR8tracer or Vector Magic should at least let you start with real vector files if you really only have poor quality SVG or raster files. Starting with poor quality to begin with isn’t a time effective way to approach a project or get good results.
Decent machines these days measure the tools and compensate for wear. If you aren’t holding super tight tolerances that require a manual measuring step they will do pretty much everything and just tell you it needs an insert replaced.
Commercial production machines are able to do that. Your average Chinese CNC mill will not. So correct with respect to decent machines. It has to be a decent machine though.
Even then, these are not light out, can deal with anything that could possibly happen for days or even a day or so at once machines. They might not need many operators but they still need somebody to handle one to several machines. Despite being six and seven figure machines in some cases.
It is possible to get a good (still fairly rough) first order idea of what the cutting speed needs to be by taking into account the material, cutter diameter, no. of flutes, cutter rpm – while starting slow is generally a good idea, some materials and cutters are optimised for maximal chip removed and so running them lower can lead to reduced cutter life or not cutting the material (instead doing more of a ‘push’). You still need a bit of tuning to get the best finish but it’s not entirely guess-work.
I have a spreadsheet that I found on the interwebs some time ago that simplified a lot of the calculations for me but alas I’ve since forgotten where I found it. :-(
Good point! For instance, the fly cutter used to face the piece needs to run at full speed.
It can’t cut very deep, though, so to prevent breaking the tip, you have to shave off just a bit. And because you’re starting off with a piece of unknown size and squareness, there’s (surprise!) manual work involved in lowering the Z down until it just touches, etc.
In a super-industrial setting, this must be further automated. (I hear you, @mbs.) But for one-off, two-offs, my guess it that the operator really matters.
A Tormach isn’t exactly a Haas automated production machine either though.
or you use a touch probe, and/or a tool height setter, pop it on top of the stock, and let the z move til it finds the height setter.
my homebrew g0704 conversion can do that, the tormach probably can too.
There are tons of speed/feed calculators online. None is adequate for defining a specific use case, but they will all get you closer than you can get by just guessing (and, in my experience, even people with lots of experience still don’t get as close as even mediocre feed/speed calculators.) What does work is taking notes on specific jobs and using those notes for similar jobs, because that keeps things like machine flexibility, type and amount of mist/flood lubricant, and the specific toolbit being used as near-constants.
FWIW I use https://zero-divide.net/index.php?page=fswizard as my first-approximation f/s calculator.
I use G-Wizard and it’s been awesome for us. Longer tool life, better parts, shorter run times.
+1
I’ve also used FSWizard which claims G-Wizard is run by a bunch of wimps and claims to give higher feeds/speeds. My experience was they were pretty similar, and usually at the very least, gives you a good idea of where to start.
I honestly also can’t believe he’d set it to 2x what he thinks, then jog wheel it. What happens when you forget to jog wheel? Much better to set to 75% of what you think, then ramp up IMO. Then the only disaster you have is it took longer to finish than it could have!
Enjoyed the read, puffed me up a little. I’m an engineer and I use CNC for my protos so this is the story for me every time I run something. It’s a great skill to have, and I love being able to work with this kind of machinery.
There is a learning curve and CNC is definitely nothing like 3d printing, however machining knowledge comes pretty quickly with practice and research online. It is a ton of fun to learn, a nice relief from staring at a computer.
I would guess that it is harder for a great manual machinist to learn CNC than for someone who is really good with a computer but is machining illiterate. Most of the pain is in learning CAD and CAM software.
No, a great manual machinist is miles ahead of someone “good with computers”. And, since CAM is made with them in mind, it takes a machinist to teach the computer guy what all the little boxes mean.
What I was trying to say is that learning machining is fun if you don’t know much about it already. If you’re computer illiterate, learning to use a computer and CAD and CAM will be incredibly frustrating and no fun at all.
Of course if you’re a manual machinist and also able to pick up CAD and CAM quickly, you will be miles ahead. I took a Tormach training class years ago and there were several guys with machining experience who couldn’t do even basic stuff on a computer and they were miserable.
I think if you are afraid of computers, then this is true. I avoided CNC for a long time (despite being a professional software engineer), preferring manual machining. When I finally used CAM software though, I realized it wasn’t that different. You still had to tell the machine to do the same operations, you just didn’t turn the cranks, and it can move multiple cranks at once, controlled speeds…allowing it to make complex shapes. Point is, the manual background made CAM feel like second nature.
For me the software was the easy part. It has taken years to get where I am to day with machining. I’ve actually taken a step back and gone with fully manual machines in my home shop. Mostly to learn but its also quite enjoyable to turn the wheels and make something by hand. At work I have a large CNC Router. I’ve also done 3d printing, back when you pretty much had to build your own machine. I learned so much building the 3d printer that it got me interested in machining again and I started watching videos on youtube, which lead to buying a mini lathe. Fast forward 5 years and I have a massive Monarch 16CY lathe and Deckel KF12 milling machine.
Work holding is one of the trickiest parts of machining. It’s not difficult when your making a large rectangular item like in this article. But when you have tiny thin wall items it gets tricky. You often have to make a fixture and break out the super glue.
Cnc machining DOES need experience gained through manual work….I was lucky enough to have served an apprenticeship in an injection mould making environment. In the ’80s. CNC was new…..but I learned all the machines (manual. Turning, grinding, milling also EDM). My workplace had CNC mills & lathes. Early models yes, but I found my niche. Without the experience of doing things manually, i would never appreciate what can be achieved with CNC.
Nice paperweight!
You can actually automate quite a lot more the next time around.
For starters, stop squaring the work first. There are situations where it matters, but not for a paperweight.
A more common CNC approach would be this:
Assume you can saw to an accuracy of 0.100″
Clamp the workpiece high in the vise jaws with parallels or step jaws.
Machine the top and sides. If you like, program a facing pass with the flycutter for the top of the piece. This is more to make it prettier on this piece but it’s also a faster way to surface the top than a smaller endmill. The sides don’t need it as they’ll have the long edge of the endmill.
Flip the piece. Now it can be clamped on the precision sides of the machined top. Use your flycutter to just mill off the part that’s left.
Now you have all sides machined and no tedious manual squaring step to start.
Next, the whole pick a really fast feed and ride the jog wheel thing made me wince. I can’t help it, Feeds and Speeds are how I make my living at CNCCookbook. The vast majority of CNC’ers use Feeds and Speeds Calculators because that’s what works best and they’re fast and easy.
Thing is, you can’t hear good feeds and speeds. At best, you can sort of hear really bad feeds and speeds, and even then, not all of those. You can’t hear when rubbing is starting to kill your tool life, for example.
If you could hear good feeds and speeds, you could buy machnist “ear training” CD’s. Boeing would give their machinists a hearing test where they played good and bad feeds and speeds and asked the applicants to tell which is which.
None of that happens in practice.
But hey, you had fun, no cutters were injured in the filming of this movie, and best of all, you got a way cool paperweight.
Rock on, because CNC Is awesome!
I honestly can’t disagree about what is the right way to handle feeds and speeds, but I also have to point out that a large majority of my manual work is done completely by sight, sound and touch. For one-off parts it’s often not in my best interest of time (I’ll openly admit to being lazy as well) to hammer out the proper F&S.
Granted, I’m also not working professionally and I’m also not using my CNC (a paltry desktop unit I refer to as the Barbie Mill) to make a run of parts. I guess my point here is that you can’t rule out using your senses to determine a good cut as it does have its place.
The reason it can’t be boiled down to a simple training CD is it varies so much by machine, material, cutter, etc… Where I often work with the same material, same machine and the same cutters I can determine how I’m doing with some fair reliability just through my senses. I’ve spent enough time testing the limits I know how it should sound. If you were to throw me in a different shop on a machine that’s foreign to me.. I’ll fall on the F&S calculations in a hurry.
Keep in mind though that nowadays tools are actually designed specifically with manual or CNC use in mind. CNC tools have a very long lifetime with high cutting speeds but low tolerance for wrong feeds&speeds. Manual tools have a decent lifetime with somewhat slower cutting speeds but also better resistance to feeds&speeds settings outside the optimal.
(apart from the differences between different cutters to begin with. The cheap Chinese ones and the genuine Sandviks might not look that different. But as always, you get what you pay for)
This was a fascinating article. Thank you for taking the time to share your experience with other CNC milling newbies.
A well-told story. And the term “CNC” used for actual CNC stuff!
He’s so right, lots of manual work. A CNC machine does not relieve you of being a machinist, it’s just a reliable assistant.
I recently switched career from IT, to become a CNC machinist/programmer. Currently doing my internship and then I’ll get the papers, and hopefully long-term employment. This is the conclusion of a year of manual machining and a year of CNC, so take these items as indicative and not exhaustive. If you have questions, ASK!
On a manual machine you have a lot of feel for what you are doing through the handle wheels. On CNC it is all fly-by-wire and force-feedback comes through sound and vibrations in the machine. They usually have a load meter, and as long as you keep within the operating parameters of your carbide, machine rigidity, power budget and stock material properties you tend to be OK.
Work-holding solutions get more complex because the forces are greater, but the same principles apply. Putting non-square stock in a vise means you only have three points of contact and you’re likely to ruin your day. If you don’t have the patience for that, consider welding instead. You don’t put hard stock in hard jaws. Cutting forces should be planned to push the stock into the fixture instead of pulling it out.
PPE is still important. You’re doing real, manly things and have real, manly responsibility. Keep your working environment tidy, don’t hammer with your hands, and be aware of your surroundings. The air gun is not a toy. Machined parts can be burning hot and start fires if you left plastic swarf in the tray.
Material knowledge remains the same. Don’t spec 316 when 303 is enough. If you’re making more than single quantities, you need to measure correctly and be within tolerance. A digital caliper means you don’t misread a dial, and misreading is as bad as measuring wrong.
I could go on and on…
No no no. Didn’t you read the article? To be a CNC operator you need: operator experience, some operator experience, experience and good judgement by experience. How can it be anymore clear exhaustive?
I am not an operator. I’m a machinist. Skilled labor. :b
I envy you.
Lol. You could possibly find a paid internship at some company if your country doesn’t pay benefits for education.
Aren’t no ladies so touchy they need the distinction spelled out for them in this field.
Not sure touchiness or lack of touchiness is the specific issue here.
Because women can’t do real manly things or carry real manly responsibility? Is that what you are saying, Internet? Because then you should stop being so misogynistic. I’ve met plenty of women in the metal shop at my current employer who can give most of us men a lesson or 2 in “having balls and kicking ass”.
I don’t think you interpreted my point correctly at all. Why exactly is it that women have to have balls to kick ass?
Your criteria of doing things or carrying responsibility stems from the association with that being a gendered thing and while your argument in support of women being able to “give most of us men” a lesson is helpful, it still portrays a masculine gendered skew as the penultimate starting point or even specific end goal here. So not sure you understood what I was trying to say but also unclear about the origin of some of the points you are trying to covey here either.
Hey Bob! Dan, here, who worked with Elliot on making the Wrencher above. Thanks for the notes!
Just wanted to clarify something that I don’t think Elliot knew about because he didn’t have the opportunity to observe it, that falls directly in line with your comment.
The “high feed rate” was determined by calculating the feeds and speeds with CNCCookBook for both aggressive and conservative settings, then setting the feed rate in CAM to the aggressive value. When running the toolpath, I could find the best surface finish I was looking vs. efficiency of the cut, by start at the conservative value and moving the pendant towards the aggressive, to find the right balance. I was using an endmill I’d never tried before so wasn’t sure where that balance would be. Setting the feed rate to something like machine max and then just noodling around with the pendant trying to find something that works, doesn’t work.
As far as listening, agreed, all I can really tell is if something is *remarkably* wrong… not degrees of efficiency or degrees of quality; really just chatter and squealing, or with larger bits running more aggressively if you’re asking too much of the motor’s torque curve. I do think it’s important to listen though, because of what sound will tell you about other things, such as fixturing rigidity.
Awesome!
I think the main thing I have to say is I am jealous. I need a cool paperweight. In fact, I’m thinking drink coasters would be fun.
This was a fun article and project.
Thanks for weighing in, Dan.
Yup, for one-off parts a CNC can be very time consuming. I’ve been working on a project recently where I’ll spend 1-2 hours generating the toolpaths using FeatureCAM, dry-running the g-code, setting up the work piece, etc for a program that will take 10-20 minutes to execute (and only because I have to take light cuts as it’s a Sherline CNC machine). Granted, I could cut down on that time considerably by changing to a newer or different CAM package as the old version of FeatureCAM I’m using has a tendency to fall into some really time consuming quirks when generating the tool path.
If it weren’t for doing a lot of curved surfaces and radii that don’t match the cutter diameter, doing the work manually would arguably be much more time effective.
I’ve been soldering electronic components since I was a kid. As an adult ham and homeowner I found reasons to solder copper pipe both for antennas and actual water pressure bearing plumbing. It turned out that skill translated over nicely. I thought I had this metal fusing thing down and so obtained a welder. Holy crap, that was nothing like soldering! What a learning curve!
I took the 3d printing shake-out course at the local hackerspace. Then I came in a few times and printed things on my own. I took the laser cutter course and then used that a ton! The CNC is just another cartesian bot right? It certainly LOOKS simple enough. I thought it was time to work with some new materials such as wood and aluminum. I took the hackerspace CNC course. Holy crap again! It left my head spinning! So many variables and so much potential for doing damage!
I’ll get back to those things some day… just as soon as I figure out what step comes between a tri-cycle and a racing motorcycle!
Yeah, I’ve borrowed cheap 3020 chinese cnc “training” mill from friend (who didn’t even worked out how to use it), done one small path, broke motor on second one (thankfully replacement motor was cheap). Looks like it’s not as easy as it seems.
Yes / No / Depends…. From a hobbiest standpoint the author is quite right. Commercial/production point of view much less so.
Manual machining is a developed skill. CNC programming/setup is a similar but different skill. The better you are the less work it ‘seems’ to take. With CNC some of that comes from understanding and using the software tools at hand. Mfg recommended speeds and feeds are a great start, but knowing they represent ideal conditions and are aggressive is a must. Tool, part and machine rigidity all reduce those ideals. I would guess most hobby CNC would use the bottom 1/4 of recommended S/F most of the time. CAM software and default speeds and feeds it has (or your custom S/F’s) as well as machining strategies also change behavior.
As for setups, production turning tries to achieve bar to finished part in 1 step. Milling is usually cut a blank, machine op1, machine op2 then it is finished.
A lot of good planning and setup (from experience) can make the 1st pc come out great. And the 1000th part as well. All with as little part handling as possible.
cnc machines are like accordions. not the normal mariachi accordions, i’m talking about those screwy russian bayans with 150 keys on both sides.
if you buy an accordion, it doesn’t make you a musician. in fact, you only become an adept musician after thousands of hours of practice, guidance, and insight.
none of you will ever make sense of a CNC without at least cranking handles a little bit on a manual machine. otherwise, the important numbers and details don’t mean anything.
I enjoyed reading this article. I use my cnc shark to do a lot a craft and custom work. A lot of my work starts off as mere pictures and after spending sometimes days cleaning up vectors and a couple of runs to get that crisp look, the reward comes seeing the finished product. I love It !
Whether you are considering starting a machining business or looking to have components for your next project produced, you need to decide whether you are going for CNC machining or manual machining.
I’m a skilled CNC lathe machinist, on machinery with live tooling, so I have some background on metalworking (it’s something like 20+years from the day I started making chips for living).
I’m moving my first steps on a DIY milling machine to make molds for a Precious Plastic workspace I set up here, in central Italy (if interested, I.G. precious_plastic_romagna), and I can’t agree more.
I’m however on the opposite side, I know how to work metals, but I have only a small background about 3D design and CAM.
I just started making g-code with the CAM, I’m used to write it manually for simpler parts, but obviously it isn’t possible for 3D molds.