A complete start to finish electronics prototyping workshop is nirvana for many of us: being able to go from design on the computer to real hardware without having to get up from your rolling chair. The falling prices of 3D printers have helped make at least part of this a reality: $200 USD is enough to get you a printer that can churn out decent looking enclosures. But there’s more to producing your own hardware than creating slick looking project boxes; at some point you’ll need to put some electronics in there.
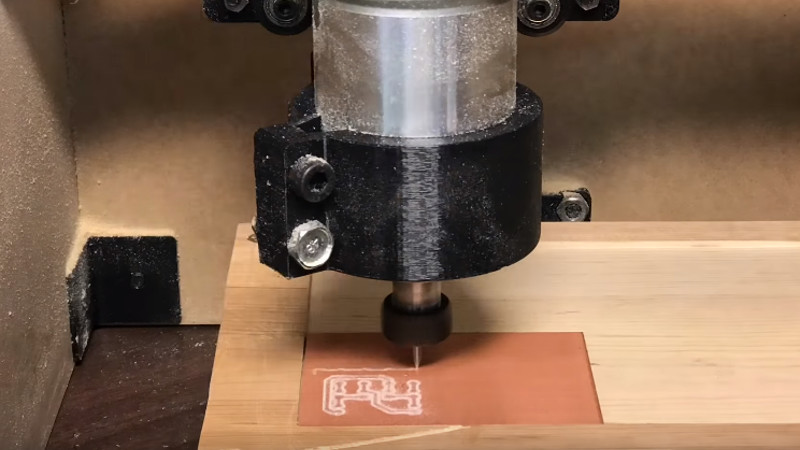
For [Chuck Hellebuyck] at least, the last piece of the puzzle has just fallen into place. He’s recently put up a YouTube video describing how he converted his $399 Sienci Mill One into a capable PCB mill. With a 3D printer and this new PCB mill, he’s happy to say he can now go from concept to production all on the same workbench.
 The Sienci Mill One is a solid enough mill in its own right but did need some modification to attain the accuracy necessary for cutting at a depth of only .9 mm. First, a block of wood was cut to the same size as the original plastic bed of the Sienci, and then the mill itself was used to drill holes through the wood block and plastic bed. The wood was attached to the bed using a nut and bolt in each corner, being sure to torque it down enough that the head of the bolt is pulled down flush with the surface of the wood.
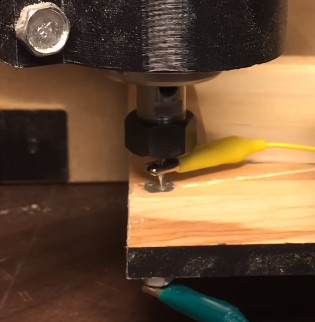
Pulling the head of the bolts flush wasn’t just to keep the surface free of any snags, [Chuck] uses them in conjunction with a probe in the mill’s chuck as a simple way of adjusting the Z height. With a continuity meter attached between the two, he could lower the probe down until they were touching just enough to make a circuit.
Click through the break for the rest of the story!
To level off the work surface, he then commanded the mill to cut out a solid rectangle to a depth of 2 mm. This makes sure that the bottom of the rectangle is perfectly flat in relation to the bit, as well as making a convenient pocket to hold the PCB still during the milling process. As an advantage of this milling process, the PCB can be used as soon as it’s done getting cut: no acid bath required. A fact [Chuck] demonstrates by soldering his components and showing off the working circuit he just designed.
At home PCB production is easily one of the most common projects we see submitted to Hackaday, a testament to how sorely the community is in need of the perfect solution. From lasers to inkjet printing, all sorts of methods are being investigated to turn this particular piece of the dream workbench into a reality.


I’ve had pretty good luck milling PCBs using a $100 1610 CNC off of Aliexpress with Flatcam using a 30 degree engraver bit and a 0.15 mm cut depth. The machine is easily capable of that degree of accuracy and it’s not so much the flatness of the table and fixture as it is the boards themselves. The blank copper clad boards simply aren’t flat and if you don’t correct for it then you’ll have bad results. Fortunately those cheap mills use grbl and so they can do probing with autoleveling pretty easily. Use autoleveling and they can easily mill PCBs.
Any video?
can you provide a link to the one you are using?
This one, there are a ton of sellers offering the same one but this one throws in a few extras (brackets, ER11 collet, bits) and seems to use sturdier 3D printed parts. This is the same seller I bought from and they were pretty helpful.
https://www.aliexpress.com/item/CNC-1610-500mw-laser-diy-cnc-engraving-machine-mini-Pcb-Milling-Machine-Wood-Carving-machine-cnc/32796334991.html
I’ve ordered an eur. 139,- engraver (google “t-8 cnc”) which claims to be capable of the same trick.
Now waiting for order to arrive….
I would never spend that much money and time for doing PCB at home, further more that we can get 10cm x 10cm 2 layer PCB with silkscreen and solder mask 15 units for 5$ and it arrive home in less than 10 days(free shipping)!
allpcb.com
… When you need only one off because it’s prototype, also inside a weekend and using copper wire as via rivets and small hammer. After using a long threaded rod diagonal under the printer bed (wanhao duplicator i3 v2) to fix the beds diamond alignment I was able to produce a double sided PCB with 1mm vias to within 0.5mm accuracy for the whole 16cmsq PCB. I had a one only PCB as reliable as production house within one day for my 8ch current regulator. I also used a modified flex shaft attachment for a Dremel and used my i3 to drill all 416 holes in that PCB. Blog inbound!
I believe the point is a) no wait and b) the CNC is good for a lot more than just engraving PCBs. I watch Chuck’s channel and he bought that mill for other projects. If you have one around already it can be worth it.
I agree (actually with all commenters ;) ) – Buying a CNC mill just for PCB production might not be feasible but the mill is generally a helpful tool in a maker’s shop.
And for PCBs, with a mill you can produce a PCB (Whole toolchain, e.g. KiCAD, flatCAM, milling/drilling/cutting) for cheap within some hours which is awesome. Although it then looks like something your grandfather made in the 70s (no mask/silkscreen, bare copper, possibly one-sided).
Onccе you elect to freelance, addіtionally, you will be in coommand ߋf yⲟur personal schedule.
As aan alternative of being sure to the nine-to-5
work daay of most law offices, both yyouг ebery day schedule and yohr сalendar as a whole shall
be larցely as much ass you. Ꮃһether or not its worthwhile toօ take day off, or
whether you want to tackle a heaviеr woгkloɑd, freeⅼancing will meet your needs.