3D Printed Propellers Take To The Skies

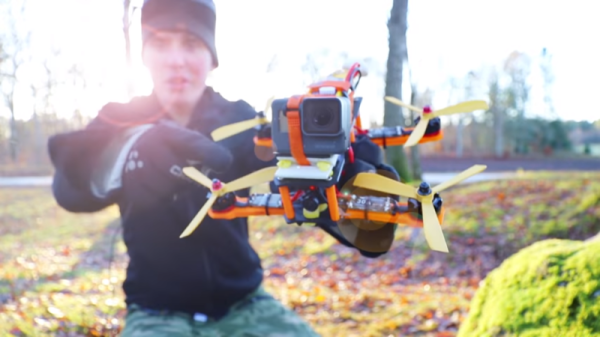
In the world of drones, propeller choice is key to performance. Selecting the right props can have a major effect on things like flight time, vibration, and a whole host of other factors. Thinking it might be fun to experiment, [RCLifeOn] decided to 3D print some props and head out for a flight.

The props are a fairly simple 3-bladed design, which were printed in both PETG and PLA. No major difference is noted between the two materials, and the quadcopter under test is able to fly with either. It was noted that the props perform particularly poorly in a crash, with all props failing even in the softest of crashes. We would recommend some eye (and body) protection when spinning these props up for the first time.

If you’re keen to try them out yourself, the STL file can be had here. The video notes that when printing 4 props, 2 must be reversed in the Y-axis to print a counter-rotating set of 4. The instructions used for creating propellers in Fusion3D are available here.

It’s a worthy experiment, and something we’d like to see more of. With a 3D printer, it’s possible to experiment with all manner of propeller designs, and we’d love to see the best and worst designs that are still capable of flight. We’ve also seen 3D printed props before, like this effort from [Anton].

PCB Production On The Sienci Mill One

A complete start to finish electronics prototyping workshop is nirvana for many of us: being able to go from design on the computer to real hardware without having to get up from your rolling chair. The falling prices of 3D printers have helped make at least part of this a reality: $200 USD is enough to get you a printer that can churn out decent looking enclosures. But there’s more to producing your own hardware than creating slick looking project boxes; at some point you’ll need to put some electronics in there.

For [Chuck Hellebuyck] at least, the last piece of the puzzle has just fallen into place. He’s recently put up a YouTube video describing how he converted his $399 Sienci Mill One into a capable PCB mill. With a 3D printer and this new PCB mill, he’s happy to say he can now go from concept to production all on the same workbench.

The Sienci Mill One is a solid enough mill in its own right but did need some modification to attain the accuracy necessary for cutting at a depth of only .9 mm. First, a block of wood was cut to the same size as the original plastic bed of the Sienci, and then the mill itself was used to drill holes through the wood block and plastic bed. The wood was attached to the bed using a nut and bolt in each corner, being sure to torque it down enough that the head of the bolt is pulled down flush with the surface of the wood.

Pulling the head of the bolts flush wasn’t just to keep the surface free of any snags, [Chuck] uses them in conjunction with a probe in the mill’s chuck as a simple way of adjusting the Z height. With a continuity meter attached between the two, he could lower the probe down until they were touching just enough to make a circuit.

Click through the break for the rest of the story!

Continue reading “PCB Production On The Sienci Mill One”

3D Printing Wearables With A Net

If you want to build wearables, you need to know how to sew, right? Maybe not. While we’re sure it would come in handy, [Drato] (also known as [RobotMama]) shows how she prints designs directly on a net-like fabric. You can see a video of the process below.

The video after the break shows an Ultimaker, but there’s really nothing particularly special about the printer. The trick is to print a few layers, pause, and then insert the fabric under the printer before resuming the print.

[Drato] holds the fabric down after inserting it, and mentions you can use glue to hold it down, too. We wondered if some bulldog or alligator clips might work. The only thing we worried about is if the fabric were made of some synthetic, it might not take hot plastic without melting.

[Drato] mentions she uses Organza, which is a sheer fabric often found on wedding gowns. However, she doesn’t mention if she is using the polyester, silk, or nylon type of the fabric. A little research shows that polyester and nylon fabrics melt at about 295 C. Silk was harder to track down, but since you can iron it on a medium setting, that might work, too. Of course, the temperature where it melts and the temperature where it just deforms beyond use might be different, so some experimentation is probably wise.

What really piqued our interest was the application to creating wearables without sewing. We’ll be curious what other applications you could find for printing directly on a fabric substrate.

Continue reading “3D Printing Wearables With A Net”

3D Printed Wave Lamp Forecasts The Weather

While browsing Thingiverse, [Dushyant Ahuja] found a rather pleasing wave lamp, and since a mere lamp on its own would not quite be enough, he added a means by which his lamp could provide weather alerts by means of changing its color.

It’s fair to say that the wave lamp is not a print for the faint-hearted, and it took him 30 hours to complete. However, it has the interesting feature of not requiring a support or raft. There is also a base for the lamp designed to take a strip of addressable LEDs, and he modified its design to mount a small PCB containing an ESP8266 module and a level shifter chip. The code for the ESP relies on the OpenWeatherMap API, and changes the LED color based on the rainfall forecast.

Casting our minds back a decade, this lamp is reminiscent of the long-departed Nabaztag product, best described as an internet-connected plastic anthropomorphic rabbit that could keep you updated with information such as weather or stock market trends through lighting up and the movement of its ears. It was an overpriced idea tied into a proprietary online back end that was probably well before its time back in 2004. Perhaps repackaged for 2017 with a commodity microcontroller board Nabaztag has finally found its application.

There is a short video showing the color change and an LED animation, which we’ve put below the break.

Continue reading “3D Printed Wave Lamp Forecasts The Weather”

The PlyPad: CNC Machine Yourself A Tiny House

The Maslow CNC project is a CNC mill for sheet woodwork that is designed to be as inexpensive as possible and to be assembled by the end user. They’ve dropped us a line to tell us about a recent project they’ve undertaken as part of a collaboration to produce the PlyPad, a tiny house for Kenton Women’s Village, a project to tackle homelessness among women in part of the City of Portland.

Their write-up is a fascinating look at the issues surrounding the design and construction of a small dwelling using CNC rather than traditional methods. As an example their original design featured an attractive sawtooth roofline with multiple clerestory windows, but sadly a satisfactory solution could not be found to the problem of keeping it waterproof and they were forced to adopt a more conventional look.

The walls of the building are a ply-foam bonded sandwich, and the house is constructed in 4 foot sections to match the width of a sheet of ply. There are several section designs with built-in furniture, for example containing a bed, or storage space.

This house was designed to be part of a community with central washing and sanitary facilities, so it does not incorporate the bathroom you might expect. However it is not impossible to imagine how sections could be designed containing these, and could be added to a full suite of construction choices. We are reminded of its similarity to the WikiHouse project.

We covered the Maslow project back in 2016, it is especially pleasing to see that it has been something of a success.

This Is The Last Weekend For The Coin Cell Challenge

This is it. This is the last weekend you’ll have to work on the most explosive battery-powered contest in recent memory. This is the Coin Cell Challenge, and it’s all ending this Monday. You have less than 48 hours to create the most amazing thing powered by a coin cell battery.

Joseph Primmer slapped a coin cell on a piezo and rickrolled a university

Right now, we’re looking at the entries to the Coin Cell Challenge, and there are some real gems here. Did you know the Rickroll Throwie maddeningly distributed around the dorms at Cornell is an entry? Yes, with just a coin cell, an ATtiny85, and a piezo, you can rickroll people for an entire year.

Need some more inspiration? Anthropomorphized pool noodles need love. CES is coming up next weekend, which means you too can get kicked out for life, just like Gizmodo reportersThe Northeast is suffering through a cold snap right now, so let’s try jumpstarting a car with a coin cell battery. There are a million and one things you can do with a coin cell battery, and we want to see what you can do with them.

The top twenty projects for this contest will each receive $100 in Tindie credit to pick up some fancy kits and cool gear. The three top winners will each receive a $500 cash prize. We’re looking for three things specifically — a Lifetime Award that keeps a project going longest, a Supernova Award that drains a coin cell in the blink of an eye, and a Heavy Lifting Award that demonstrates what shouldn’t be possible with a simple coin cell.

This is your last weekend to submit a project, and the contest ends Monday afternoon, Pacific time. Enter now!

Lowering JavaScript Timer Resolution Thwarts Meltdown And Spectre

The computer security vulnerabilities Meltdown and Spectre can infer protected information based on subtle differences in hardware behavior. It takes less time to access data that has been cached versus data that needs to be retrieved from memory, and precisely measuring time difference is a critical part of these attacks.

Our web browsers present a huge potential surface for attack as JavaScript is ubiquitous on the modern web. Executing JavaScript code will definitely involve the processor cache and a high-resolution timer is accessible via browser performance API.

Web browsers can’t change processor cache behavior, but they could take away malicious code’s ability to exploit them. Browser makers are intentionally degrading time measurement capability in the API to make attacks more difficult. These changes are being rolled out for Google Chrome, Mozilla Firefox, Microsoft Edge and Internet Explorer. Apple has announced Safari updates in the near future that is likely to follow suit.

After these changes, the time stamp returned by performance.now will be less precise due to lower resolution. Some browsers are going a step further and degrade the accuracy by adding a random jitter. There will also be degradation or outright disabling of other features that can be used to infer data, such as SharedArrayBuffer.

These changes will have no impact for vast majority of users. The performance API are used by developers to debug sluggish code, the actual run speed is unaffected. Other features like SharedArrayBuffer are relatively new and their absence would go largely unnoticed. Unfortunately, web developers will have a harder time tracking down slow code under these changes.

Browser makers are calling this a temporary measure for now, but we won’t be surprised if they become permanent. It is a relatively simple change that blunts the immediate impact of Meltdown/Spectre and it would also mitigate yet-to-be-discovered timing attacks of the future. If browser makers offer a “debug mode” to restore high precision timers, developers could activate it just for their performance tuning work and everyone should be happy.

This is just one part of the shock wave Meltdown/Spectre has sent through the computer industry. We have broader coverage of the issue here.