Industrial designer [Eric Strebel] has access to big, walk-in spray booths, but bigger isn’t always better. For small jobs, it’s overkill, and he wanted his own spray booth anyway. If you’re ready to upgrade from that ratty old cardboard box in the garage, look no further than [Eric]’s spray booth how-to after the break.
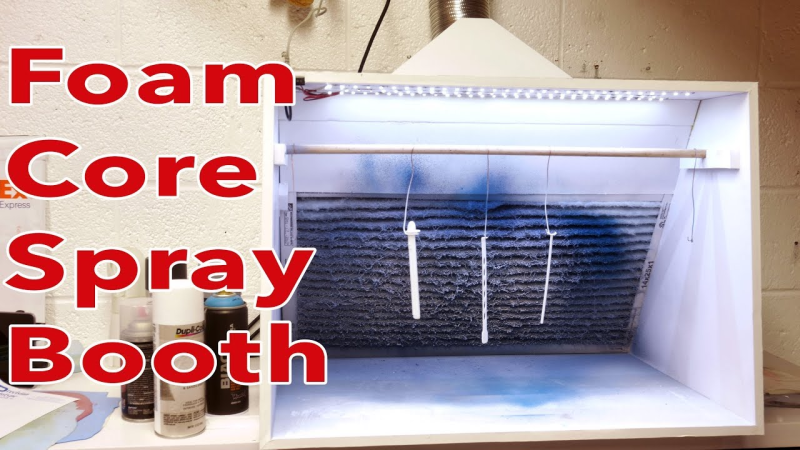
If you don’t already know, [Eric] is something of a foam core legend. He has several videos about model building techniques that produce really slick results, so it’s no surprise to see these skills transfer to a larger build. The booth is built from a single 40″ x 60″ sheet of 1/2″ foam core board, a furnace filter, and a vent fan modified to fit his shop’s system. The whole thing cost less than $200, most of which goes toward the fan.
[Eric] modified an existing spray booth plan to fit his needs and added some really nice touches along the way. All the edges are beveled and the unfinished faces are taped, so at first glance it looks like it’s made out of painted wood or melamine board. The furnace filter slides out one side for easy replacement and is braced with foam scraps so it won’t fall forward. The best part of this booth is the LED strips—they make for way better working conditions than the dim recesses of a cardboard box.
If you’d rather build a walk-in spray booth, why not make your own sliding barn doors, too?


Cardboard box? Surely you jest. I’m still using the LID for a cardboard box. The whole box would be an upgrade for me.
This is a cool project, though I admit when I read the price at first I thought there was an extra 0 tacked on there accidentally….
Cardboard box? Surely you jest.
OK then:
MP: Cardboard box?
TJ: Aye.
MP: You were lucky. We lived for three months in a brown paper bag in a septic tank. We used to have to get up at six o’clock in the morning, clean the bag, eat a crust of stale bread, go to work down mill for fourteen hours a day week in-week out. When we got home, our Dad would thrash us to sleep with his belt!
Bah, luxury!
(etc)
You know, you tell these kids that today….they woudn’t believe you!
My dad used to come home from work after a 36 hour work day and shoot me dead with a gun.
Right. I had to get up in the morning at ten o’clock at night half an hour before I went to bed, drink a cup of sulphuric acid, work twenty-nine hours a day down mill, and pay mill owner for permission to come to work, and when we got home, our Dad and our mother would kill us and dance about on our graves singing Hallelujah.
Very nice project.
But what I wonder, is how about explosion and fire safety ?
As you suck the spray paint mixture, which is normally flammable directly (filtered) into an standard exhaust fan.
Imo there is a fire risk when the fan would cause a spark, due to the motor or static build up.
Too much air for too few flammable gaz.
It’s not that easy to achieve stoichiometric ratio.
Life is dangerous, kiddo.
Are you able to leave your house?
A properly grounded motor/housing shouldn’t build up static charge. If it’s that big a concern, then a good alternative would be positive pressure from another vent.
I’m no expert but from experience I can say that holding a lighter at the end of an aerosol can with flammable contents does result in fire, but an explosion? Negative.
I know someone that had to put out a fire in the filters in a spray booth. By the time paint gets to the filters, it’s dust, which burns really well. Explosion-proof motor is a good idea. Changing the filters regularly is another good idea.
Is the meat in the can necessary to glue the LEDs on? :D
The fan seems pricey. Is that just what small diameter high-CFM fans cost?
I would have put some plastic over the LEDs to prevent overspray from coating the LEDs. (Occasional direct spray)
MDF or scrap plywood and using a old furnace blower fan from the scrap with a flapper valve to regulate flow could get this project down to the cost of the filter, the ductwork, and the LEDs.
Hmmm, furnace blower motors are not explosion proof, so set up the ducting to take advantage of the venturi effect so that no overspray will contact the motor or fan. Less risk and cleaner fan and motor over time. Use a ducting setup that has a straight portion fitted with a sharply angled “Y” arm into which the fan will blow. Sharper the “Y” the better the Venturi.