Why Are We Only Just Now Hearing About LED Beaded Curtains

Beaded curtains are a pretty banal piece of home decor, unlikely to excite most interior design enthusiasts. Throw on some addressable LEDs, though, and you’ve got something eye-catching at the very least, as [Becky] demonstrates.

Joining the LED strands at the bottom made running the wiring easy but made walking through the blinds hard.

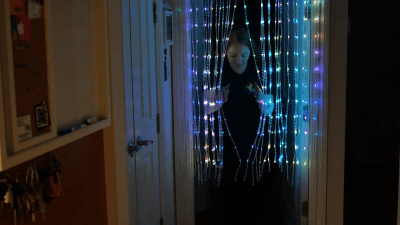
The project started with an existing beaded curtain as a base. A series of addressable LED strands were then carefully sewn to the beads using knots tied in plain sewing thread. The strands were configured as a single strand as far as the data lines were concerned, to make animation easy. Power was supplied to both ends of the strand to ensure nice and even brightness across the strands.

The brains of the system is a PixelBlaze controller, which makes it easy to wirelessly control the behavior of the strings. It’s the perfect tool for quickly whipping up fancy animations and pretty effects without hand-assembling a bunch of code yourself.

There was only a few problems with the project. [Becky] found a pretty passable LED beaded curtain from China midway through the project, which reduced her enthusiasm to finish the build. There were also issues walking through the curtain due to the wiring scheme she chose, where the bottom of one strand was connected to its neighbor.

Regardless, it’s a fun blinky build that brings some color to an otherwise drab doorway. It’s hard to complain about that! Video after the break.

Continue reading “Why Are We Only Just Now Hearing About LED Beaded Curtains”

A 3D printed roller coaster model with light strips modelling the trains

How To Make A Model Roller Coaster Without Any Moving Parts

Roller coasters are not only great fun to ride, they’re also fascinating pieces of engineering. Building your own full-size coaster is sadly beyond most people’s means, so the average enthusiast will have to settle for simulation or modelling of their own designs. [Jon Mendenhall] is one of those who specialize in building model roller coasters and simulating their motion in intricate detail. His latest project is a scale model of VelociCoaster, a Jurassic Park-themed ride in Universal’s Islands of Adventure, that simulates the coaster’s ride without using any moving parts.

[Jon] achieves this by re-creating the trains’ motion using LED strips. A total of 3000 LEDs are spread along more than nine meters of track and make a mesmerizing light show of several trains whizzing along the track, accelerating and slowing down exactly like the real thing.

A 3D CAD model of a roller coasterIn his video, [Jon] explains the process of generating an accurate 3D model of the track starting from nothing more than an overhead view of the park as well as photos taken from various angles. The surrounding terrain and buildings are also included in his 3D model, as are the 128 supports that hold the track in place. The terrain and building were made from plywood and foam using a CNC machine, while the track and supports were 3D printed.

A Teensy microcontroller runs the whole show, with the LED strips split into five separate sections to allow a high enough frame rate for smooth animations. An infrared remote is used to start and stop the ride, as well as to adjust the speed; the model supports running the trains at a physically accurate speed, but because this looks rather dull, the regular setting is about three times as fast.

Looking for more roller coaster models? [Jon] made a similarly impressive model with a powered train before, and we’ve seen several models that actually coast along their tracks.

Continue reading “How To Make A Model Roller Coaster Without Any Moving Parts”

Tutorial Teaches You To Use Neopixels With Micropython

Addressable LEDs are wonderful things, with products like Neopixels making it easy to create all kinds of vibrant, blinking glowables. However, for those without a lot of electronics experience, using these devices can seem a bit daunting. [Bhavesh Kakwani] is here to help, with his tutorial on getting started with Neopixels using the MicroPython environment. 

The tutorial flows on from [Bhavesh’s] Blink example for MicroPython, and is aimed at beginners who are learning for the first time. It explains the theory behind RGB color mixing that allows one to generate all manner of colors with WS2812B-based LED strings, and how to code for the Raspberry Pi Pico to make these LEDs do one’s bidding.

The guide even covers the use of the Wokwi simulation tool. This is a great way for beginners to test their projects before having to play with actual hardware. This is useful for beginners, because it’s a great way to catch mistakes – is there a software problem, or did they push the soldering iron through the microcontroller? It’s also a technique that pays dividends when working on more complicated projects.

Whether you’re entirely new to the embedded world, or just want to learn the intricacies of talking to addressable LEDs and make sense of color mixing theory, this tutorial will serve you well. Before you know it, you’ll be building glowing projects with the best of them!


Control Lighting Effects Without Programming

Working in a theater or night club often requires a specialized set of technical skills that you might not instantly think about. Sure, the audio system needs to be set up and managed but the lighting system is often actively managed as well. For simple setups, this is usually not too difficult to learn. With more complicated systems you will need to get elbow-deep into some software. With [trackme518]’s latest tool, though, you will only need to be able to edit video.

Sure, this sounds like just trading one piece of software for another, but it’s more likely that professionals working in lighting will already know how to edit video rather than know programming or complicated proprietary lighting software. All you have to do to control a set of lights is to create a video, or use an existing one, and the lighting system will mimic the video on its own. If you do know programming, though, it’s written in Processing Java so changes aren’t too difficult to make.

The software (available on the project’s GitHub page) will also work outside of a professional environment, as well. It’s set up to work with DMX systems as well as LED strips so you could use it to run a large LED display board using only an input video as control. You could even use it to run the display on your guitar.

Photo courtesy of Rob Sinclair (Gribiche) [CC BY-SA 2.0 (https://creativecommons.org/licenses/by-sa/2.0)]

Make Your Own Flexible Panel Lights

In this day and age, production values are everything. Even bottom-rung content creators are packing 4K smartphones and DSLRs these days, so if you want to compete, you’re gonna need the hardware. Lighting is the key to creating good video, so you might find a set of flexible panel lights handy. Thankfully, [DIY Perks] is here to show you how to build your own. (Video embedded below.)

The key to building a good video light rig is getting the right CRI, or Color Rendering Index. With low CRI lights, colors will come out looking unnatural or with odd casts in your videos. [DIY Perks] has gone to the effort of hunting down a supplier of high-quality LED strips in a range of different color temperatures that have a high CRI value, making them great for serious video work.

To build the flexible panel, the LED strips are glued onto a fake leather backing pad, which is then given a steel wire skeleton to enable it to be bent into various shapes. Leather loops are built into each corner of the panel as well, allowing the light to be fitted to a stand using a flexible aluminium bracket. The LEDs are slightly under-volted to help them last longer and enable them to run from a laptop power supply.

The build is one that focuses on light quality and usability, rather than just throwing a bunch of bright LEDs at the problem and calling it good. The results are great, with the panel showing a significant improvement on [DIY Perks]’s earlier builds.
Continue reading “Make Your Own Flexible Panel Lights”

LED-ifying A Guitar

Say you have a guitar, an expensive guitar – one of only three like it. And say this guitar sounds great, but it’s missing something. It needs something, but something that won’t ruin the finish. Over at Sparkfun, [Englandsaurus] was asked to come up with a really cool looking mod to a three-of-a-kind guitar – covering the body with LED strips to create light patterns on the guitar.

In order not to damage or modify the guitar [Englandsaurus] sandwiched the body between two plexiglass sheets, connected together by 3D printed clips. The clips have a dual purpose – they hold the plexiglass pieces to the guitar and also act as conduits for a pair of fiber optic tubes that run around the edge of the body. In order that the color goes all the way around the guitar’s edge without a break in the light, the fiber optic cables are offset. At each clip light is fed into them. One cable runs between two clips, skipping one in between, and the second cable runs between the skipped clips. This allows light to flow around the guitar’s body.

At nearly 500W at full-white, these LEDs draw a lot of power, however, at full brightness they’re overpoweringly bright, so [Englandsaurus] used some WonderFlex, a moldable, diffuse plastic sheet, to cover them. Even with this, the LEDs aren’t run at full brightness. The fiber optic cables, though, need full brightness due to their covering.

Around 1600 LEDs went in to this mod and the guitar itself hasn’t been modified.  Everything is removable, and the guitar would go back to its original self if the strips were taken off. Take a look at Strumbot, another project where the original guitar wasn’t modified, or a really cool scrap metal guitar.

Continue reading “LED-ifying A Guitar”

LED Strips Are So Hot Right Now

Sometimes there will appear a figure that flies in the face of reason, and challenges everything you think you know about a subject. Just such a moment came from [Chris Taylor] at Milton Keynes Makerspace when he characterised a set of LED strips, and the figure in question was that he found an LED strip creates the same amount of heat as its equivalent incandescent bulb.

We can hear your coffee hitting the monitor and your reaching for the keyboard to place a suitably pithy comment, because yes, that’s a pretty unbelievable statement. But it’s no less true, albeit that the key to it lies in its details. If you have a 100 W incandescent bulb, 88% of the energy is radiated as light and infra-red, leaving 12 W heating the bulb itself. To get the same light output from an LED meanwhile we’d only need 17 W, of which 11.9 W would be left to heat the LED. Which means that an LED strip can get as hot as an incandescent bulb with equivalent light output, and he’s run some tests to prove it.

If you’ve worked with LEDs, you’ll know that they get hot. But to learn that they have the potential to get as hot as their incandescent equivalents is something of a eye-opener, and should demonstrate the need for adequate thermal mitigation. It’s easy to take them for granted, and we’ve taken a look before at some of their safety pitfalls.

Disclosure: [Jenny List] is a member of MK Makerspace.