
If you’ve ever worked on a small PCB, you know how much of a hassle it can be to hold on to the thing. It’s almost as if they weren’t designed to be held in the grubby mitts of a human. As designs have become miniaturized over time, PCBs are often so fragile and festooned with components that tossing them into the alligator clips of the classic soldering “third hand” can damage them. The proper tool for this job is a dedicated PCB vise, which is like a normal bench vise except it doesn’t crank down very hard and usually has plastic pads on the jaws to protect the board.
Only problem with a PCB vise is, like many cool tools and gadgets out there, not everybody owns one. Unless you’re doing regular PCB fabrication, you might not take the plunge and buy one either. So what’s a hacker on a budget to do when they’ve got fiddly little PCBs that need attention?
Luckily for us, we live in a world where you can press a button and have a magical robot on your desktop build things for you. Online model repositories like Thingiverse and YouMagine are full of designs for printable PCB vises, all you have to do is pick one. After looking through a number of them I eventually decided on a model designed by [Delph27] on Thingiverse, which I think has a couple of compelling features and more than deserves the few meters of filament it will take to add to your bench.
Of course the best part of all of this is that you can customize and improve the designs you download, which is what I’m about to do with this PCB vise!
Desirable Traits
 So there are a lot of printable PCB vises out there; enough that picking one to take a close look at was actually pretty difficult. But there were some things that I really liked about this particular design which for me made it stand out among the others.
For one, you don’t need any additional hardware. Many of the printable vises I found required smooth rods, bolts, nuts, etc. If you’re going to buy smooth rods and bolts to build the thing, you might as well just buy a proper PCB vise. I know there’s going to be different opinions on this one, but personally I tend to gravitate to designs that can be used with a minimum amount of additional hardware.
The other factor I liked is how easy of a print it is. The design is very forgiving, and doesn’t require a fine tuned printer to produce a workable vise. Models which have complex features such as printed threads obviously need a much better tuned printer, which is fine if you’re a 3D printing fanatic, but that certainly doesn’t describe everyone.
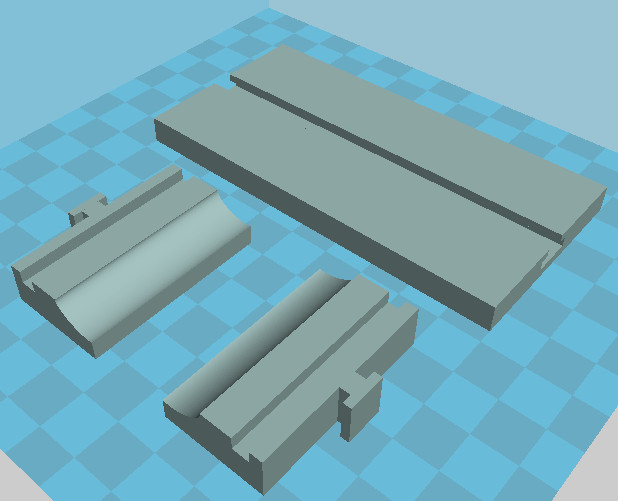
First Impressions
As expected, this is a very easy print. I’m not a big fan of all the parts being in one “plate” like this as it increases the chances of failure, but it worked well enough for something this simple. I’d recommend using .2 mm layer height on this one as the curvature on the jaws looks pretty nasty if you go much higher, and the overhang in the central channel is already tricky enough. The base may give you some trouble if you don’t have a heated bed, as large objects with right angles are notoriously prone to warping at the edges.
The channel in the base is wide enough that no cleanup was necessary, just pop the pieces off of the bed and put them together. On the other hand, the wide channel makes it so the jaws themselves are rather loose. This doesn’t seem to hurt functionality once you’ve got it put together, but there were a couple of times the jaws popped out of the base which was annoying.
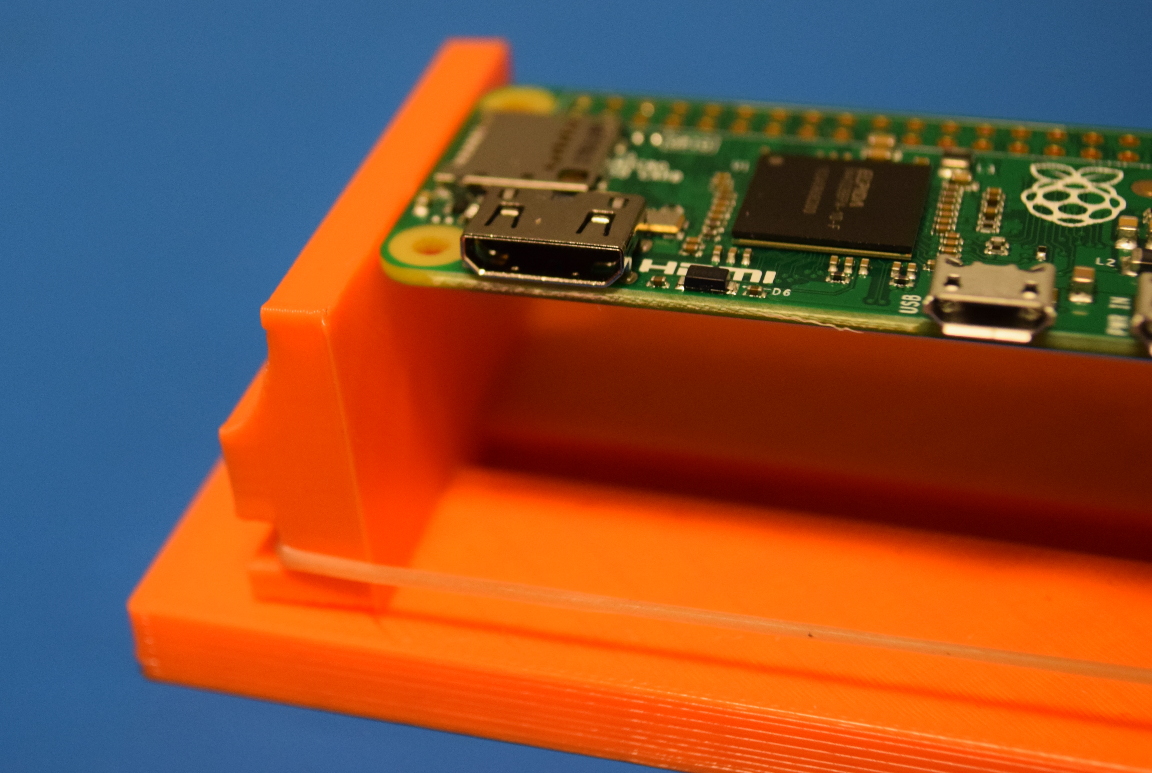
Functionally the vise works, and the rubber band actuation is great when you find the proper sized one, but I was a bit disappointed by the jaws. The face of the jaw is printed flat on the bed, which means it has a fairly smooth finish (more or less so, depending on your build surface). With such a smooth finish it’s just a bit too easy for the PCB to slip down in the vise, which defeats the purpose somewhat.
Improvements
As [Delph27] released this design under the Creative Commons license, we are free to remix and improve the model however we see fit. So I made a couple of changes based on my impressions after using the original model which I think are worth mentioning.
The edges of the base are rounded so they are less likely to curl up during printing, and I also made large cutouts down both sides to reduce the print time and amount of material required. I also redesigned the channel down the center to print a little cleaner, as the original had a pretty harsh overhang that not all printers would necessarily be able to handle.
The jaws are identical except for the addition of a little notch at the top where you can rest the edge of the PCB. This has greatly improved the grip of the vise, and I can put more pressure on the board without worrying about it popping out.


These parts are interchangeable with the originals, so for example you can print the new notched jaws and use them with the original base. My revision of the design can be found on Thingiverse as a “remix” of the original.
Final Thoughts
Whether you go with the original or my tweaked version, I think this little gadget is a must-have. It prints quickly, doesn’t take much filament, and if you can find a rubber band lying around on the floor you’ve got all the “vitamins” you need to complete the build. I won’t claim it’s the best printable PCB vise available, there are some pretty slick looking designs out in the wild, but this must certainly be the most practical.
“Printed It” is Hackaday Column where we take a look at useful tools and gadgets you can make with a desktop 3D printer. We’d love to hear your feedback about this column in the comments, and if you have a design you think would be a good candidate for a future installment, let us know.


Another suggestion is put a fillet one the outer corners that the rubber band sits. Then you wouldnt have a sharp edge cutting in to the bands
Did the cutouts really save any time or material? Ive found most of the time it uses more material since now you are making multiple outlines of that shape and the time to make that is more than the infill would have taken.
So time is probably a wash, though it’s going to depend on things like your infill vs perimeter speeds. As you say, it could even take longer in some cases.
But slicer definitely shows less material used for the version of the base with the cutouts, which is notable because the cutout base is actually about 5 mm larger in X & Y.
I’ve always wondered about this too. Cutouts only save filament when they’re big enough that the extra spent on the perimeters is offset by the space inside. So for 10% infill and 1.5 mm perimeters, you’d need gaps at least 1.5 mm * 2 * 10 = 30 mm wide.
Still, if the slots are oriented correctly, they can be stronger than random infill.
Etc. These are interesting tradeoffs.
Remember you also save the ‘floor’ and ‘ceiling’ of the cutout.
On a fairly flat object like this, that can be as much as, or more material than the infill inside.
Vise, not vice ;) Makes it sound like it’s an addiction to rubber bands PCBs.
Ugh, OK that was a pretty bad one. Thanks
Whoops, that one has bitten me before. Thanks for mentioning.
Judging by some people’s work areas & scrap bins, it very well could be an addiction.
Er, well it depends what country you are in. In Britain its the same spelling for both meanings (vice with a c). Not sure if this ever causes confusion or not.
It confused me until you settled things for me, thanks!
Depends where you are…
https://en.oxforddictionaries.com/definition/vice
I printed one of these:
https://www.thingiverse.com/thing:2064269
With these easier-to-print sliding jaw parts:
https://www.thingiverse.com/thing:2123529
And it’s awesome
I created my own a few years ago. Back then lots of people had small printbeds which limited the size of this vise.
https://www.tindie.com/products/11151/
Wrong link. Oops. Lucky it wasnt anything too dodgy in my paste bin.
Correct link here https://www.thingiverse.com/thing:980482
This is an interesting idea, the rubber band. I can see doing the same thing, with parts at hand. Projects should be like that, conveying an idea that others can use, not just a map for others to follow exactly.
Michael
Tom, what did you use to modify the STL files? I attempted to use Fusion 360 but it does not allow me to use the Model environment with meshes.
I’ve downloaded STLs from Thingiverse, imported them into Blender, and modified the meshes just fine. For some unknown reason, Cura didn’t like the STLs that I then exported back out from Blender, so I just exported OBJs instead. Cura took those and I printed out the result just fine.
Thanks for the reply. It’s hard to go back once you use parametric CAD. I was hoping there was some secret magic plug in for Fusion 360 to let me play with the STLs in the modeling environment.
I’m not Tom, but FWIW… OpenSCAD lets you import STLs and then have your way with them.
Are there any rubber bands that won’t dry out in a couple months? You could wind your own springs but the wire seems like one of those “rotting in storage for eternity” purchases.
Silicone rubber bands won’t, but they’re not quite as elastic as the regular ones.
Honestly, I keep finding oddball uses for my rolls of spring steel. Obviously, yes, every now and again I need an actual spring, but I’ve also used the stuff to make lightweight brackets, knockoff versions of those Hercules Hook things, clamps for dryer hose, and electrical fishing line.
I’m hardly though the $13 spool, but it’s already money well spent.
Wondering if lubricating them will make a difference?
DON’T lubricate them. Oil will destroy rubber bands.
People who fly model aircraft powered by rubber bands lubricate them with glycerine, not oil. I have never had a model aeroplane last long enough to comment whether this works :-)
Funny, this was my first design after I built my first 3D printer: https://www.thingiverse.com/thing:38447
Is it just my screen or the word ‘warping’ is itself warped
This works quite nicely as is but I think i’m going to need to make a few more jaws for thicker pcb’s.
As printed on my Afinia H400, I hardly even need a rubber band. Useful part to have on my shelf. Thanks!
Im not sure how many of you follow OX tools, but this guy took Tom’s solid works model of a classic collectible vise and adapted it to a printer. https://www.thingiverse.com/thing:1572431
Tom’s build was fantastic to watch as well if you have the time.
https://www.youtube.com/watch?v=8c2JK2GvY7Y&list=PLeIuq8LxgnrGM1ALcjjssnhf7IXBlQ0Pa&index=5
It does look like pc tower stand