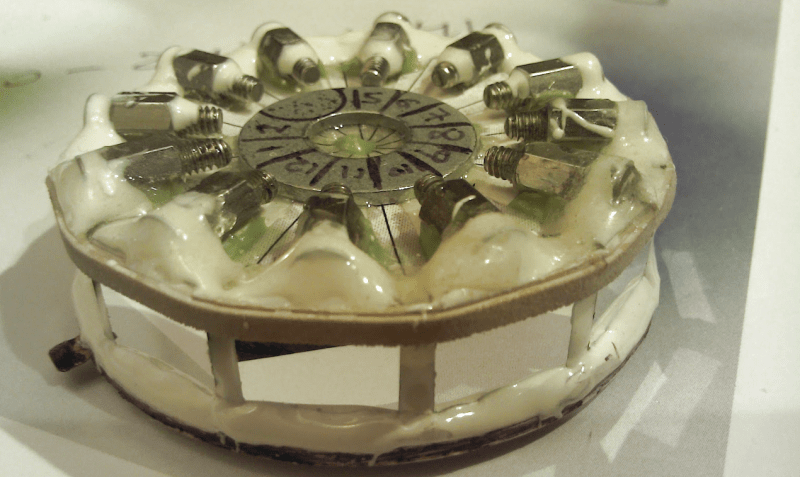
Laser projectors like those popular in clubs or laser shows often use mirror galvanometers to reflect the laser and draw in 2D. Without galvos, and on a tight budget, [Vitaliy Mosesov] decided that instead of downgrading the quality, he would seek an entirely different solution: a spinning mirror drum.
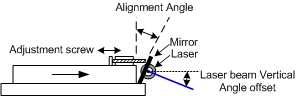
He fires a laser at a rotating drum with twelve mirror faces, each at a different adjustable vertical angle. The laser will hit a higher or lower point on the projection surface depending on which mirror it’s reflecting off – this creates resolution in the Y direction.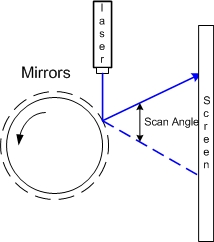
Timing the pulsing of the laser so that it reflects off the mirror at a certain horizontal angle provides the X resolution.
As you can already tell, speed and timing is critical for this to work. So much so that [Vitaliy] decided he wanted to overclock his Arduino – from 16 MHz to 24.576 MHz. Since this changes the baud rate, an AVR ISP II was used for programming after the modification, and the ‘duino’s hardware serial initialization had to be hacked too.
For the laser itself, [Vitaliy] designed some nifty driver circuitry, which can respond quickly to the required >50 kHz modulation, supply high current, and filter out voltage transients on the power supply (semiconductor lasers have no protection from current spikes).
On the motor side of things, closed loop control is essential. A photo-interrupter was added to the drum for exact speed detection, as well as a differentiator to clean up the signal. Oh, and did we mention the motor is from a floppy disk drive?
We’ve actually seen builds like this before, including a dot-matrix version with multiple lasers and one made apparently out of Meccano and hot-glue that can project a Jolly Wrencher. But this build, with its multiple, adjustable mirrors, is a beauty. Check it out in action below.


Now wondering if it may be possible to print the scanning pattern onto a disk.
Maybe take an old hdd platter and imprint precisely angled indentations so that as the platter is spun it moves in both the x and y axis and of the hdd motor is used then it’s just a case of turning the laser on and off and taking the timing from the motor driver.
That basic idea has been tested successfully, do a search for “Holographic Airborne Rotating Lidar Instrument Experiment (HARLIE)”
Red, green, and blue lasers to get full RGB pictures???
meanwhile 8 years ago… http://codinglab.blogspot.be/2010/09/diy-laser-projector.html
Meanwhile 80 years ago, NTSC and PAL, if you want to play that game. It is a nice hack, and probably new to many people, even if the concept isn’t dead new…
https://en.wikipedia.org/wiki/John_Logie_Baird and https://en.wikipedia.org/wiki/Mechanical_television in 1925 :-)
https://en.wikipedia.org/wiki/Mechanical_television – 1925, mentions mirror drums :-)
Surprised no one uses those projection TV MEMS.
I’m not; I can’t find the specs on how to drive them anywhere! The only scraps of info I have came from one of Ben Krasnow’s videos…
Driving a DLP chip is tricky. Take a look at a DLP board, the DMD is but one ‘IC’, there are some large drive ICs that have to hook up to it. I don’t think that is a trivial job. Also, a DMD mirror has no partial states, its either on or off, they way they render a pixel is at least 3 views of a colour + pulse modulated dwell time on the DMD. The longer the dwell the brighter the pixel, then, at the end they just flip the bit and dump the light into a light absorbing area in the lightbox. That said, TI did experiment with it for spatial light modulation… http://www.ti.com/lit/wp/dlpa037/dlpa037.pdf
Reminds me of the old Televisors.
I wonder…
If you put a photocell adjacent to the laser, could you map the bounce angle vs incoming light and read the object you’re projecting onto?
IF you could close that sensor loop, you could just stand in front of a white board, and draw with your finger where you want the laser light to put letters.
some LIDAR scanners do basically this — using a single laser, detector, and a spinning mirror to scan the laser across (usually) a single line, measuring time of flight to get distance.
Washimton?
2013?
I think the mirrors are out of alignment!
So the vertical resolution is the number of mirrors and the horizontal resolution is how fast you can pulse the laser?
Would more mirrors mean you’d need to tweak your rotational speed and laser pulse rate to make up for the smaller area of each mirror?
This seems like it might be a good candidate for RGB laser experiments. I think as long as the lasers are in the same vertical plane, they can draw over the same area based on when the laser is fired though the overall area the picture could be drawn on would be smaller than what any individual laser could draw on.
If you use more mirrors, you will need to either increase the diameter of the wheel, or use smaller mirrors (and less sweep length). Or, you can use smaller mirrors and a lens to get the bigger sweep length again. If you make a large wheel with 325 tiny mirrors and a wide angle lens, you could project PAL.
I guess it wouldn’t work anymore to use separate mirrors. A better way to go would be to use a really precise CNC machine to cut faces on a round piece of aluminium, at 325 different angles, then use vapour deposition to deposit aluminium. But the faces should be really precise and buffed to a shine. I have no clue how to reach that precision with diy stuff.
maybe doing vertical and horizontal deflection separately would make the machining enough easier?
Yes and no…if you look at the horizontal scan speed of even just plain old PAL, you’ll find that unless your horizontal deflection mirror has a butload of facets (hard to find and expensive to make), it has to spin stupidly fast…
Thanks for the new term, sweep length. I was trying to imagine how a smaller mirror would affect things. I’ll have to see if things like the speed of drum rotation, and position of the laser factor into that.
I was also thinking about the use of multiple lasers to increase vertical resolution. But then I think you would need a way to align the beams in such a way so the apertures of the multiple lasers stay aligned at any distance. That seems to me like a pretty difficult problem to solve.
Nicely engineered mirrors with motor one can find in every laser printer
However, those are all in line. In this project each mirror has a different angle in relation to the axis of rotation.
It’s super cool to see an Arduino overclocked like that, but at that point, why not just use a Cortex-M0 board?
FTA, “Why? No real reason” – fair enough!
But these AVR cores are ancient – unless you’re relying on “plug-and-play” Arduino libraries, I don’t see what benefit you get from them over a Cortex-M chip.
The core might run faster, but the interrupt latency is higher on ARM.
Cool.
Perhaps a Teensy 3.5 might be a little faster.
3D print a stack of rotors with angled faces to mount the mirrors. Stack lasers for more vertical resolution. Use red, green, and blue lasers with the mirrors angled to scan the same area to mix for full color.
Old thermal imagers worked the opposite of this. They scanned the image field over a single point detector that created the image. This was before they learned to make microbolometer arrays.