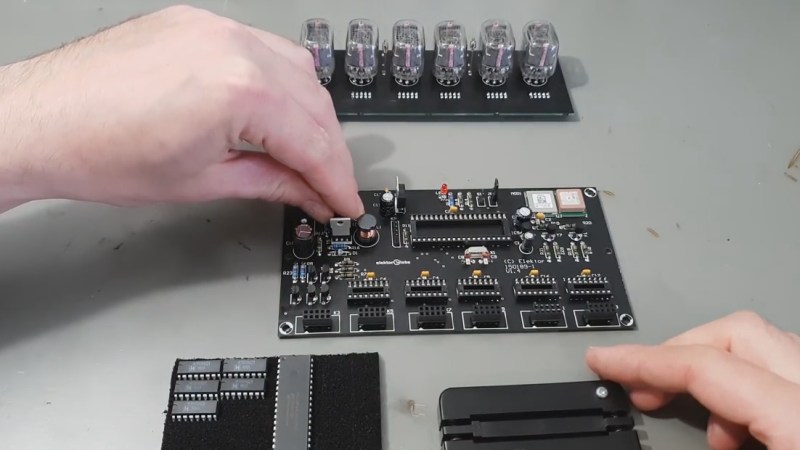
Watching someone assemble a kit is a great way to see some tools you may have not encountered before and maybe learn some new tricks. During [Marco Reps’] recent build of a GPS synchronized Nixie clock kit we spied a couple of handy tools that you can 3D print for your own bench.
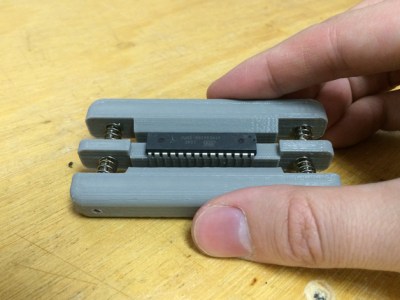 Fresh from the factory Dual Inline Package (DIP) chips come with their legs splayed every so slightly apart — enough to not fit into the carefully designed footprints on a circuit board. You may be used to imprecisely bending them by hand on the surface of the bench. [Marco] is more refined and shows off a neat little spring loaded tool that just takes a couple of squeezes to neatly bend both sides of the DIP, leaving every leg the perfect angle. Shown here is a 3D printed version called the IC Pin Straightener that you can throw together with springs and common fasteners.
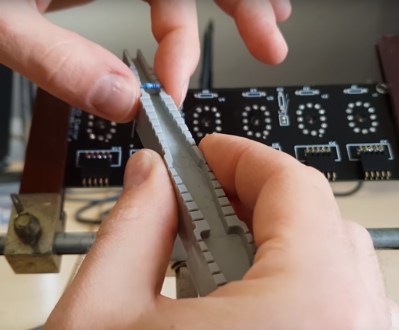 Another tool which caught our eye is the one he uses for bending the metal film resistor leads: the “Biegelehre” or lead bending tool. You can see that [Marco’s] tool has an angled trench to account for different resistor body widths, with stepped edges for standard PCB footprint spacing. We bet you frequently use the same resistor bodies so 3D printing is made easier by using a single tool for each width. If you really must copy what [Marco] is using, we did find this other model that more closely resembles his.
As for new tricks, there are a lot of small details worth appreciating in the kit assembly. [Marco] cleans up the boards using snips to cut away the support material and runs them over sandpaper on a flat surface. Not all Nixie tubes are perfectly uniform so there’s some manual adjustment there. And in general his soldering practices are among the best we’ve seen. As usual, there’s plenty of [Marco’s] unique brand of humor to enjoy along the way.
We have a warm spot in our heart for simple tools you can whip up on the ‘ole 3D printer. Check out the PCB vise, a set of ball and socket helping hands, and a collection of toolbag essentials.


I get it, you can 3d print everything. Still, the lead bending aid is 93 cents at Reichelt. Ninety-three Euro cents. I don’t know why you even bother re-creating that thing – it’s injection moulded and lasts you a lifetime.
The DIP straightener (like RW 8920) is on the more expensive side at around 7€…not sure what’s the missing keyword to order it from our friends in the people’s republic. Can’t be more than 2€ for four springs and a bit of cheap plastics, can it?
“why you even bother re-creating that thing”
For fun, chance to customize or improve it. You may as well be asking why diyers do any of the things they do.
The real question is, why don’t you already have one?
more like 0.2€ (with recycled plastic smell included for free)
‘Cause I don’t want to pay shipping and wait. I like using my printer.
“I don’t know why you even bother re-creating that thing” — Because it’s both cheaper and faster to just print it oneself than order one from some online-shop in another country?
Cheaper: no (printer, filament, licence, electricity, etc…)
Faster: no (time to design, check, print, etc…)
More rewarding and more show off: yes (friends, wife, HaD post)
Let’s face it: 3/4 of the 3D printed stuff here on HaD can be made with a file (not STL file). Only very few hacks have alegit use of 3D printed case/parts.
I do hope the 3D printed hype will calm down so we can gain in quality.
What license? You don’t need a license to 3D-print!
As for costs, it consumes something like 40-50 cents worth of filament. Add in the electricity, which costs probably 1-2 cents, and it’s still cheaper. You can’t add in the cost of the 3D-printer, since one might already have one instead of buying one just to print this one item.
Faster, yes, actually; it takes 15 minutes to whip one up in e.g. Fusion 360 and a couple of hours to print, versus several days to weeks for one to arrive in the mail when ordering online!
Be a hater all you like, but your arguments don’t stick.
And what cost do you need to add in for cleaning the earth of all those tiny plastic bits that were printed at home, where nobody cares too much about the environment?
I mean: maybe in a Chinese plastics factory, making sure that excess plastic doesn’t end up polluting the environment isn’t their highest priority. But for sure it is in European plastics factories. If only because the excess plastic is so much that it pays to recycle it.
For sure the priority in those factories is still higher than at your home. Right? What do you do with the excess bits of plastic, and the plastic-dust caused by finishing the printed piece? Do you have a cleanroom where the plastic bits and dust are contained, and do you recycle it? Nope. You just print, then cut and file off the unwanted bits, then vacuum the floor, and empty the vacuum cleaner in the garbage. Where it ends up being burned or buried in a landfill.
Now imagine how much excess plastic these millions of 3D prints cause each year.
PLA, for example, is fully biodegradable plastic. Toss it in the environment and it doesn’t take long for it to disappear all on its own!
It apparently comes to you entirely as a surprise that one can print with biodegradable plastics, ABS isn’t the only filament available. Personally, I use biodegradable filaments wherever I can.
please explain licence my friend
Every technology has a place and a time. Also no technology stands alone in a vacuum. So lets make the things that we want to make.
He probably assumes some paid CAD program is the only one worth using, which is false. In my experience, FreeCAD and OpenSCAD are very usable, the latter being great when you want to be able to customize something by editing a few numbers.
“please explain licence my friend”
I took it to mean poetic license. AKA, because he can… And, he can include initials, “etched in” so if stolen, shows it. Heck, put your DL # too in case the printer and shop tools are also in the same theft. Oh yeah… choice of colors. Dif ones for dif wattage parts?
Really… I so wonder how I live without any printer at all.
Yep. Cheaper and faster to print one, than to order one from an online shop.
Actually… Even cheaper and faster to print a new one, when you loose the old one. And cheaper and faster to print yet a newer one when you loose the new one as well.
And in the end, we will all drown in a plastic soup caused by people with a bad short-term memory and a 3D printer.
93 cents + 9 euros shipping nice
The best thing about 3D printing is that if you have the will and time to work on stuff, you can make incredibly specialised solutions to problems.
Yes, commercial solutions may exist for problems A, B and C, but there’s nothing there which can solve A+B+C. That’s where custom solutions come in and shine bright
Its not just limited to 3D printing too, its the same for all DIY thing.
I think a dip straightener using 2 608 bearings might be interesting. It may also be a smoother operation as the pins bend to max one pair at a time.
Handy helpers indeed. I quite like BreadBoardManiac’s take on same theme, though: https://wakutuku.com/shop/breadboardmaniac/bbm-wsg.html
One small tool that both straightens DIP leads and bend resistor leads, and also acts as guide to cutting and stripping lengths of jumper wire / breadboard hookup wire.
why aren’t ICs sold with the legs at the right angle? I’ve been wondering that since they were invented…:-)
Because the “proper” way to install an IC is to use an insertion tool. It has a handle and a piece in the bottom with two sides that you push down onto the IC. The legs still stick out a bit, but it holds them in while you put the chip into a board. You then push the eject button on the top and it pushes the chip back out of the tool. The legs spring back out and grip the holes in the PCB, and you don’t have to hold the chip in while you flip the board over and solder it. I have one somewhere. I never actually use it. Nobody does. Which is why I put “proper” in quotes. :)
exactly – nobody does that – so why are they made that way…..