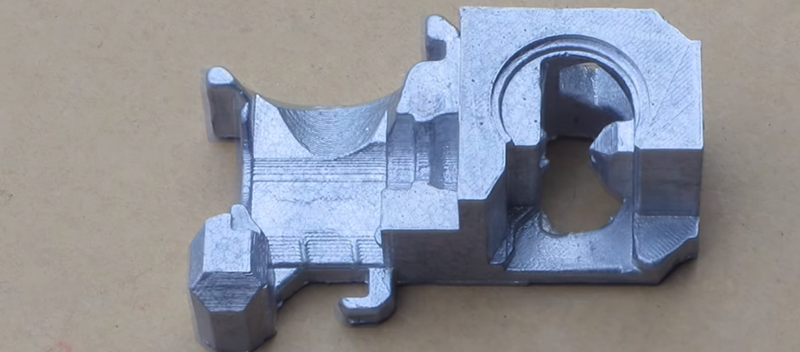
Creating 3D prints is great, but sometimes you need something more durable. [Myfordboy] printed a new 3D printer extruder in PLA and then used the lost PLA method to cast it in aluminum. You can see the results in the video below.
The same process has been used for many years with wax instead of PLA. The idea is to produce a model of what you want to make and surround it with a material called investment. Once the investment sets, heat melts the PLA (or wax) leaving a mold made of the investment material. Once you have the mold, you can place it in a frame and surround it with greensand. Another frame gets a half pipe placed and packed with greensand. The depression made by this pipe will provide a path for the metal to flow into the original mold. Another pipe will cut a feeder into the greensand over this pipe.
Sounds simple enough, but there are a few good tips in the video. For example, the way he used a food storage container to hold the investment and a sander to vibrate air bubbles out of it. Watching him place the feeder and well was very instructive, too.
If you don’t have a forge, but you have a microwave, you might want to read how to use the microwave. We’ve also seen other detailed lost PLA processes, you might want to check out.


wow, impressive
Why not 3Dprint all these casting ports and vents??? This does not make any sense. You can save yourself a lot of manual fiddling with sand…
He’s been asked that in YouTube. Mainly it’s because it’s easier for him, since he’s mainly/originally a machinist & metal caster. Therefore adding it by hand is easier for him then adding it digitally. He admits it could be easier for others to do it on the computer.
He’d need a bigger printer, and greensand is reusable a few times.
Thats another few hours of printing when you can just superglue on some bits in under a minute. The ports aren’t terribly specific so why waste time modeling and printing them?
I wonder if you could print with lowest infil,, pick it in sand or plaster and then just pour the aluminum over it … I think the aluminum would burn out the aluminum before it hardens?
I haven’t had very good results with sand/plaster mix. the detail is too poor.
“The same process has been used for m̵a̵n̵y̵ ̵y̵e̵a̵r̵s̵ millennia with wax instead of PLA.”
FTFY
Ahhh… but printing in wax is a little bit of a problem as it isn’t as available as 3D plastic printers.
Printing wax for casting purposes, does anybody here have experience with that? Or know of these machines?
Yup, there is a guy I’ve seen do it.
This is a good example of his work:
https://m.youtube.com/watch?v=FeTprFG__1M
He has a bunch more videos of him doing more lost wax casting via 3d printing
Solidscape printers are commonly used by jewelers and dental technicians. You can find older ones on ebay for $2-6k and they generally arent very difficult to get up and running again. They are dreadfully slow but produce very nice high resolution wax parts.
3dSystems has several printers that print wax in their multijet modelling lines but they are outside of the average hobbyists affordability and given the closed systems with very limited repair or part support after the first few years the used market isnt really worth most peoples time. Its a shame there are so many patents in the way of diy’ng those still.
Patents only restrict companies. If you are making something for your self patents don’t mean anything.
But most folks want ready made devices and kits. At that point patents become a problem.
Dont know where you live…..
35 U.S.C. 271
(a) Except as otherwise provided in this title, whoever without authority makes, uses, offers to sell, or sells any patented invention, within the United States, or imports into the United States any patented invention during the term of the patent therefor, infringes the patent
There is no personal use exemption in the United States. Flex your googlefu….youll find dozens of q&A’s and articles that explain that yours is a common misconception. Granted if you are DIY, and arent posting tutorials…and arent producing a product that a patent holder might suspect was being produced in a way that COULD require you to be infringing……well you get the point.
@Techartisan – True but if you aren’t posting what you built all over the internet and instead are just using it yourself in your own home who is going to catch you? Does that sound shady? Maybe but when the patent holders are only interested in selling to companies with big budgets and you are just a small time hobbyist it isn’t like you were ever going to buy their product anyway. If they want to target that market they should develop and market a home version.
Formlabs offers castable resin as one of their materials.
Great hack! Thanks
How much time should the print be in oven for complete burnout?
When it is burning out, you will see soot – there will be black around the vent/sprues. Once the plaster looks white and clean, you will know it’s done.
Pretty much the identical technique of my Lost PLA process, shared here over 5 years ago: https://hackaday.com/2013/05/10/update-lost-pla-metal-casting-the-movie/
So was the part printed at say “103%” to allow for shrinkage? Or was it a 100% print?
I usually print at 102% for aluminum castings.
are there any 3d printers that print directly in WAX?
Sanders modeller was perhaps the first, then Actua later remodelled into the thermojet, none are made anymore afaik, but they are in demand by casting companies.
Sanders became SolidScape (2000) which was bought by Stratasys (2011). They still operate under the Solidscape name. Good machines. Kinda slow as they have a single build jet and a single support jet but good printers.
Shapeways has service, but quite expensive if you need something bigger than ring.
You can buy filament for use with a standard fdm 3d printer. See my post above for a guy on YouTube demonstrating his use of it.
It seems there is a step missing? I have never done this, but don’t you use the investment mold to cast a … hmmm. You put a mold in the sand, but isn’t the sand the mold? Wait.
The sand is the support structure.
You are probably thinking of sand casting. In traditional sand casting, a positive pattern of the part is sculpted out of wood or other hard material, and sliced in half along a ‘parting line’. The top half is affixed to a flat board, and the gates and runners (which form the channels for the metal to flow) are added to the board as well. The mold is mounted in the flask (box), and the sand is packed tightly around it. The process is repeated for the other half of the mold. After packing, the mold is removed, leaving a cavity in the sand. If the part has interior hollow areas, baked sand “cores” are positioned in the cavities.
The two halves (called the “cope and drag”) are stacked, and a frame (“jacket”) is placed around the cope and drag to hold them together in alignment. The sprues and vents are cut into the sand of the cope to allow the metal to enter the gate system, and to allow hot gases to escape (avoiding bubbles). A heavy weight is placed on top of the cope to keep it from floating off of the drag; this weight has holes in it through which the metal is poured.
For someone not into this the terminology is confusing. Investment ?? The wooden frame is a flask and the reddish/brown sand is called green sand.
Here’s printable wax filament: https://www.machinablewax.com/product.php?product=52
It takes a lot of practice to print well, but gives great results in the end.
Investment Casting and Sand Casting are different processes and the article seems quite confused on the matter. You don’t stick your investment in the sand.
You have two options:
a) Sand casting: make a pattern (positive) out of wood/plastic/whatever, bury it in sand with a separation plane, pull the sand apart, pull the pattern out, put the sand (which is now your mould) together again, pour in metal. Smash the sand mould, retrieve the part.
b) Investment casting: make a pattern (positive) out of a melty+flammable material. Pour investment plaster over the pattern, wait for it to set, melt/burn out the pattern, pour in metal. Smash the plaster mould, retrieve the part.
Sand casting relies on there being a parting plane – you separate the mould into two or more parts without damaging it in order to retrieve your reusable pattern, then reassemble the mould. That puts some geometrical constraints on your part, e.g. draft angles, lack of overhangs, etc. The pattern is reusable though, which is good if you want many copies of the part.
Investment casting has no parting plane, so you can make shapes as complex as you like as long as the mould material (usually plaster) can get into all the relevant crevices etc, and there’s a reasonable path for the poured metal to take. However, for lack of a parting plane, both the pattern and the mould are sacrificed. You need a new pattern for every new object that you want to cast.
The need for new patterns in each investment cast is why 3D printing is great here. Previously, you needed to either hand-carve a new pattern from wax every time, or you needed yet another moulding stage to cast your patterns with. I think the typical process for production of multiple copies used to be something like this:
carved object -> silicon mould -> wax patterns -> plaster investment moulds -> metal parts.
Now, it’s just:
PLA pattern (sacrificial) -> plaster mould -> metal part.
or
PLA pattern (reusable) -> sand mould -> metal part.
An alternative to melting aluminum at around 1400 F is a Zinc allow which melts under 1,000 F. Stronger than aluminum and it makes a better bearing material. I is heavier though.