Robot Maps Rooms With Help From IPhone

The Unity engine has been around since Apple started using Intel chips, and has made quite a splash in the gaming world. Unity allows developers to create 2D and 3D games, but there are some other interesting applications of this gaming engine as well. For example, [matthewhallberg] used it to build a robot that can map rooms in 3D.

The impetus for this project was a robotics company that used a series of robots around their business. The robots navigate using computer vision, but couldn’t map the rooms from scratch. They hired [matthewhallberg] to tackle this problem, and this robot is a preliminary result. Using the Unity engine and an iPhone, the robot can perform in one of three modes. The first is a user-controlled mode, the second is object following, and the third is 3D mapping.

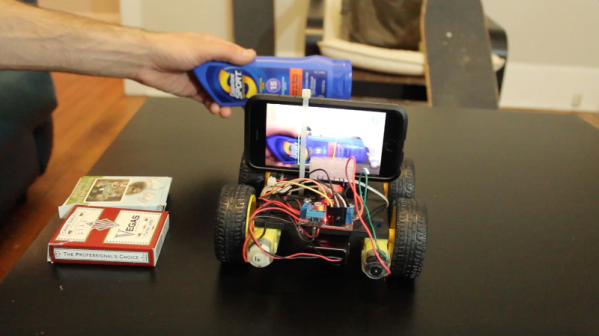
The robot seems fairly easy to construct and only carries and iPhone, a Node MCU, some motors, and a battery. Most of the computational work is done remotely, with the robot simply receiving its movement commands from another computer. There’s a lot going on here, software-wise, and a lot of toolkits and software packages to install and communicate with one another, but the video below does a good job of showing what you’ll need and how it all works together. If that’s all too much, there are other robots with a form of computer vision that can get you started into the world of computer vision and mapping.

Continue reading “Robot Maps Rooms With Help From IPhone”

IoT Solar Pool Heating

A backyard swimming pool can be a great place to take a refreshing dip on a summer’s day. It can also be a place to freeze your giblets off if the sun has been hiding for even a few hours. That can make pools an iffy proposition unless they’re heated, and that starts to get really expensive in terms of upfront costs and ongoing charges for fuel or power. Unless you put the sun and the IoT to work for pool-heating needs.

Preferences vary, of course, but [Martin Harizanov] and his family clearly like their swims on the warm side. With nobody using the pool when it was below 25°C (77°F), [Martin] picked up a few bits to harness the sun to warm the water. Loops of PVC lawn irrigation tubing were tossed onto a shed roof with a favorable solar aspect and connected to the pool with a length of garden hose. The black thin-wall tubing is perfect for capturing the sun’s energy, and 200 meters of the stuff can really heat things up fast. A small pump is controlled by a microcontroller — it’s not explicitly stated but we suspect it’s a Raspberry Pi — with a pair of temperature sensors to sample the water in the pool and in the heating loop. Metrics are gathered and logged by Emoncms, an open source energy monitoring app. [Martin] says he’s harvesting about 10 kW from the sun on a good day, and that the pool water in the heating loop has gotten up to a steamy 55°C (131°F) without any other energy inputs other than the pump.

Plenty of others have made the leap to solar for pool season extension, with designs from the simple to the more complex. And if you live where the sun doesn’t shine, there’s always a compost water heater.

3D Printed Variable Area Jet Nozzle

If you’ve ever seen the back end of a military jet, you’ve likely seen variable area nozzles. They’re used to adjust the exhaust flow out of the rear of a jet engine during supersonic flight and while the afterburner is engaged. Commercial aircraft, with the exception of the Concorde, don’t need such fancy hardware since a static exhaust nozzle works well enough for the types of flying they’ll be doing. For much the same reasons, RC aircraft don’t need variable area nozzles either, but it doesn’t keep builders from wanting them.

Which brings us to this utterly gorgeous design by [Marco Colucci]. Made up of 23 individual PETG parts, this variable area nozzle is able to reduce its diameter by 50% with just a twist of the rotating collar. When paired with a hobby servo, this mechanism will allow the operator to adjust the nozzle aperture with an extra channel on their RC transmitter. The nozzle hasn’t flown yet, but a test run is being planned with a 40mm Electric Ducted Fan (EDF) motor. But thanks to the parametric design, it shouldn’t be a problem to scale it up to larger motors.

But the big question: does it have an effect on the EDF’s performance? The answer is, of course, no. This doesn’t actually do anything. An EDF motor has no need for this sort of nozzle, and even if you tried to fit this on a scale jet engine, it would melt in seconds from the exhaust temperature. This is purely a decorative item, to give the plane a more accurate scale look. To that end, it looks fantastic and would definitely be impressive on the back of a large scale RC military fighter.

If anything, [Marco] says he expects performance to be worse with the nozzle fitted. Not only is it adding dead weight to the plane, but restricting the air coming out of the back of the fan isn’t going to do anything but reduce thrust. But on the bright side: if it’s flying slower, it will be easier to see how awesome your adjustable nozzles look.

This isn’t the first time somebody’s tried to make an electric RC plane look like it’s packing a proper turbine, but it certainly might be one of the slickest. Only way to top this is to build an actual jet engine for the thing.

Continue reading “3D Printed Variable Area Jet Nozzle”

Charging USB-C Devices Off Of LiPo Battery Packs

When it was introduced in the late 90s, USB was the greatest achievement in all of computing. Gone were the PS/2 connectors for keyboards and mice, ADB ports, parallel ports, game ports, and serial ports. This was a Tower of Babel that would unite all ports under one standard universal bus.

Then more ports were introduced; micro, mini, that weird one that was a mini USB with more connectors off to the side. Then we started using phone chargers as power supplies. The Tower of Babel had crumbled. Now, though, there is a future. USB-C is everything stuffed into one port, and it can supply 100 Watts of power.

Delivering power over a USB-C connector is an interesting engineering challenge, and for his Hackaday Prize entry, [Chris Hamilton] is taking up the task. He’s building a USB-C battery charger, allowing him to charge standard R/C battery packs over USB.

There are two major components of the charger. The first, a Cypress CCG2 USB Power Delivery negotiator, handles all the logic of sending a command to the USB power supply and telling it to open up the pipes. It’s an off-the-shelf part and the implementation is well documented in app notes. The second major component is the battery management circuit built on a TI BQ40z60RHB. This includes the charger control logic and the ability to balance up to four cells. Battery connectors are XT-30, so all your drone battery packs can now be charged by a MacBook.

Blinging Buttons For Pick And Place

With 3D-printing, cheap CNC machines, and the huge variety of hardware available these days, really slick-looking control panels are getting to be commonplace. We’re especially fond of those nice indicators with the chrome bezels, and the matching pushbuttons with LED backlighting; those can really make a statement on a panel.

Sadly for [Proto G], though, the LEDs in his indicator of choice were just boring old one-color units, so he swapped them out and made these addressable RGB indicators. The stock lamps are not cheap units, but they do have a certain look, and they’re big enough to allow room for a little modification. The original guts were removed with a Dremel to make way for a Neopixel board. [Proto G] wanted to bring the board’s pads out to screw terminals, so he had to adapt the 3.0-mm pitch blocks he had on hand to the 2.54-mm pitch on Neopixel board, but that actually came out neater than you’d think. With a little hot glue to stick it all back together, he now has fully-addressable indicators that can be daisy-chained together and only take up a single GPIO pin.

These indicators and the nice looking panel they’re on is part of a delta pick-and-place robot build [Proto G] has been working for a while. He’s had some interesting side projects too, like the clickiest digital clock in the world and easing ESP32 setup for end-users. While we like all his stuff, we can’t wait to write up the finished delta.

Continue reading “Blinging Buttons For Pick And Place”

Casting A 3D Printed Extruder Body In Aluminum

Creating 3D prints is great, but sometimes you need something more durable. [Myfordboy] printed a new 3D printer extruder in PLA and then used the lost PLA method to cast it in aluminum. You can see the results in the video below.

The same process has been used for many years with wax instead of PLA. The idea is to produce a model of what you want to make and surround it with a material called investment. Once the investment sets, heat melts the PLA (or wax) leaving a mold made of the investment material. Once you have the mold, you can place it in a frame and surround it with greensand. Another frame gets a half pipe placed and packed with greensand. The depression made by this pipe will provide a path for the metal to flow into the original mold. Another pipe will cut a feeder into the greensand over this pipe.

Continue reading “Casting A 3D Printed Extruder Body In Aluminum”

A Tale Of More Than One Amiga 1500

If you were an Amiga enthusiast back in the day, the chances are you had an Amiga 500, and lusted after a 2000 or maybe later a 3000. Later still perhaps you had a 600 or a 1200, and your object of desire became the 4000. The amusingly inept Commodore marketing department repackaged what was essentially the same 68000-based Amiga at the bottom end of the range through the platform’s entire lifetime under their ownership, with a few minor hardware upgrades in the form of chipset revisions that added a relatively small number of features.

We’ve probably listed above all the various Amigas you’ll be familiar with, with a few exceptions you either didn’t have or only saw in magazines. The original A1000, the chipset-upgraded A500+, the CDTV multimedia  platform, or the CD32 games console as examples. But there’s one we haven’t listed which you may never have seen unless you hail from the United Kingdom, and it’s an Amiga behind which lies a fascinating tale that has been unearthed by [RetroManCave].

In the late 1980s, Commodore sold the A500 all-in-one cased Amiga to consumers with marketing based heavily upon gaming, and the A2000 desktop Amiga to businesses with the promise of productivity software. Both machines had a 16-bit Motorola 68000 running at the same speed, with the A2000 having a lot of extra memory and a hard drive lurking within that case. The price difference between the two was inordinately high, creating a niche for an enterprising British company called Checkmate Computers to fill with their provocatively named A1500, a clever case for an A500 mainboard that gave it an expansion slot and space for that hard drive and memory.

This machine’s existence angered Commodore, to the extent that they vowed to eradicate the upstart by releasing their own UK-only A1500. The result, a comically badly concealed rebadge of an A2000 with two floppies and no hard drive, is something we remember seeing at the time, and dare we admit it, even lusting after. But the full story in the video below is well worth a watch for an engrossing insight into a little-known saga in one corner of the computing world during the 16-bt era. Towards the end it becomes a plug for the Checkmate Computers co-founder’s current Kickstarter project, but if that holds no interest for you then you are at least forewarned.

Of course, if you have either A1500 today, you might want an up-to-date graphics card for it.

Continue reading “A Tale Of More Than One Amiga 1500”