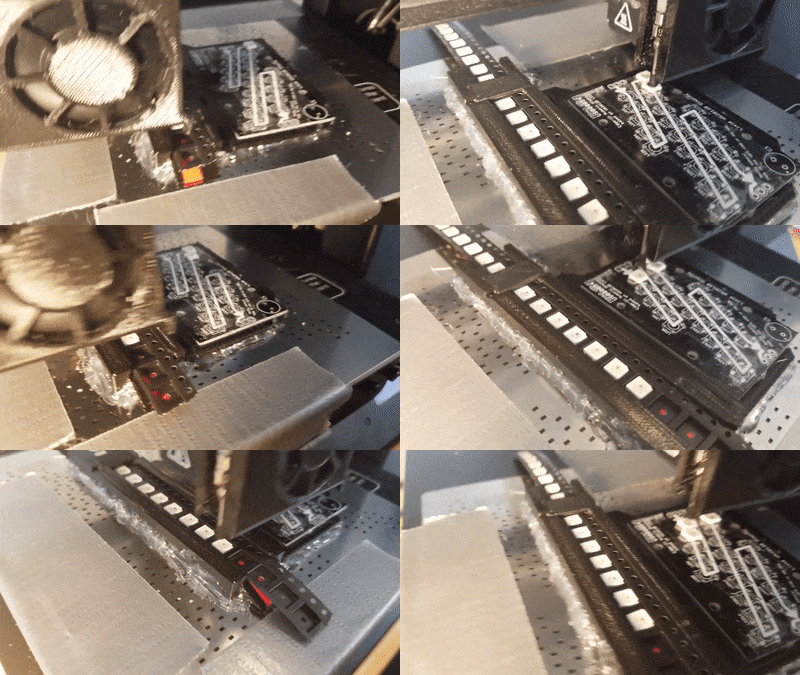
Would you believe that you can take a cheap 3D printer and easily convert it into a full function pick and place machine to help assemble your PCBs? No? Well good, because you can’t. A real pick and place needs all kinds of sensors and logic to identify parts, rotate them, make sure everything is aligned, etc, etc. There’s no way you could just bolt all that onto a cheap 3D printer, and let’s not even talk about the lack of closed loop control.
 But if you have a very specific use case, namely a PCB that only has a relatively large single part that doesn’t need to be rotated, [Connor Nishijima] might have a solution for you. He bought a $150 USD Monoprice Mini, and with the addition of a few printed parts, was able to build a machine that drastically cuts down the time it takes for him to build his LED boards. Best of all the modification doesn’t involve any permanent changes to the printer, he can just pop off the vacuum attachment when he wants to print something.
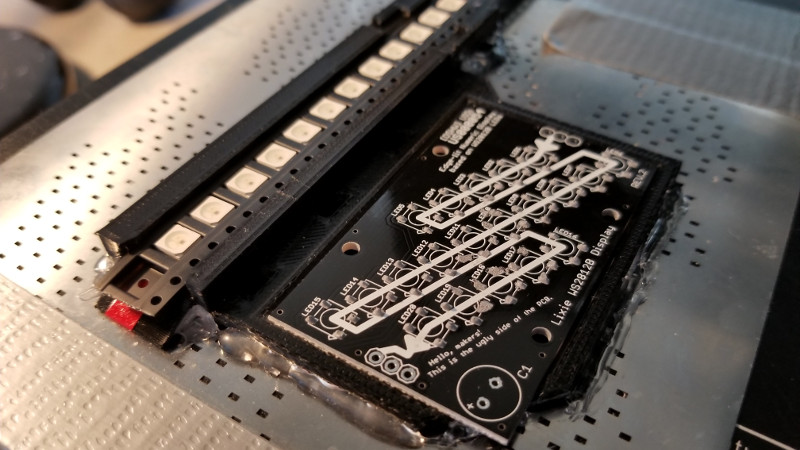
Beyond the 3D printed parts (which were made on the printer itself), the only thing you need to make the modification is the vacuum pump. [Connor] is using a hot air station that includes a vacuum pump for picking up SMD components, but he mentions that you’d probably better off just modifying an aquarium pump and using that. A printed holder snaps over the cooling fan of the Monoprice Mini to hold the vacuum pickup tool, and another printed piece holds the strip of LEDs and the PCB. It’s worth noting that the machine has no ability to control the vacuum pump, and doesn’t need to. The pickup tool is so weak that when the LED lands in the solder paste it sticks to the board well enough that the tool can’t lift it back off.
The real genius in this build comes from the manually written G-Code. You load it from the printer’s built in menu system as if it was a normal 3D print, and it instructs the printer to move the vacuum tool over the line of LEDs, pick one up, and drop it in place on the PCB. It then uses a small peg built into the vacuum tool holder to advance the line of LEDs before starting the cycle all over again. Incredibly, it does this whole complex dance 20 times for each PCB without ever having any kind of feedback or alignment check. It only works because [Connor] was willing to go through the trial and error of getting the calibration and G-Code down as close to perfect as can be expected for such a cheap machine.
This isn’t the first time we’ve seen the Monoprice Mini converted into something a bit more impressive than a cheapo 3D printer. Seems that for whatever the machine lacks in the printing department, it more than makes up for in hackability.


0 Decoupling caps? Really? Looks like a software guy plying hardware maker…
@Murray, Why would you want to decouple LEDs on a simple board like this?
Nice Hack!
It’s got a buffer electrolytic on there? Basically, as he says: the PCB is a glorified LED string.
I think your comment is needlessly derogatory. This is hackaday after all. Who cares if he’s a software guy. He hacked something together, which I think is great.
Nice simple pick an place hack. They’re active LEDs, and decoupling caps is the absolute basics. Not using them is like a C program with undefined pointers, using bytes to store floats. comms without checksums or acks, etc etc. Perhaps I could have been gentler. Sometimes one forgets that just because one has said something over and over for 20 years, it does not mean you have said it to that specific individual.
Tom, I’m sorry,. Nice job. You may have inspired me to mod my machine too. Go read more about hardware design Any switching device needs decoupling caps. It may work without them on your bench, but you are toying with the worst kind of fault, the intermittent one.
Just like a lot of hackers could improve thier electronics design , a lot more of us have to work on our interpersonal communication.
The datasheet for the devices does indeed show decoupling caps in the example circuit… without it their signal conditioning probably doesn’t work as reliably either since it has not decoupling cap to pull from to condition the signals finely….
the design says calls for them, but honestly, they are wonderfully stable without them. even the higher frequency apa102’s
Ahh.. I didn’t realize they were digital latch / LED.
Yes really, decoupling caps. Those WS2812/SK6812 RGB LEDs like having one :)
The genius simplicity of the tape advance mechanism is what I really love about this build.
Please join in stamping out this nonsense use of “use case”. “Use case” means to put something in a box. It is pretty basic.
In fact saying “very specific use of” makes more sense. Try ‘task’, or ‘example’ or ‘application’, or ‘step’, or……
EUCA End Use Case Abuse
“Use case” is a term of art: https://en.wikipedia.org/wiki/Use_case
Grow up. This board is about hardware/software/other hacks. NOT an English grammar board. ‘Use Case’ is perfectly fine.
–Simple– part rotation could be handled with a little solenoid fired off of the fan signal, and I don’t think you would even need supplemental circuitry. Just fire the solenoid to bump the pick head 90 degrees.
Love.it!
To all the people talking smack about this guy – go do something more useful with your time than needlessly pick apart his terminology or other methods. This is cool. End of story. Sure, its useful for only a single task. Sure, its not a complicated end result. But! Its awesome and ABSOLUTELY useful. The few ‘tricks’ he uses to move and align the LED and tray are super inventive and its wonderfully neat for a small time production line.
Nice job Connor.