Hackers love 3D printers. In fact, they might love them a little too much. We hope know we aren’t be the only ones who couldn’t turn down a good deal on an overseas printer (or two). But when you’re not pumping out plastic boats and other PLA dust collectors, what are you supposed to do with them?
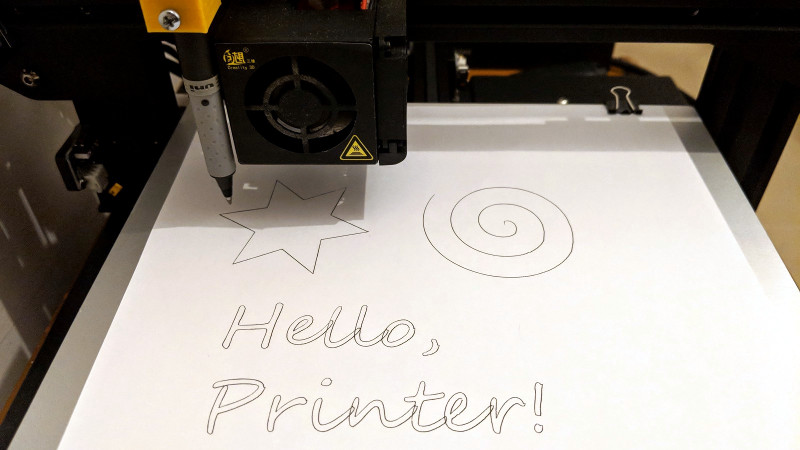
 Well if you’re like [Uri Shaked] you could hand them a pen and tell them to get writing. The holidays are coming up quick, and somebody’s gotta sign all these cards. In his detailed write-up, he shows how he was able to add a pen to his Creality CR-10 printer to turn it into a lean mean letter-writing machine without making any permanent changes to the printer.
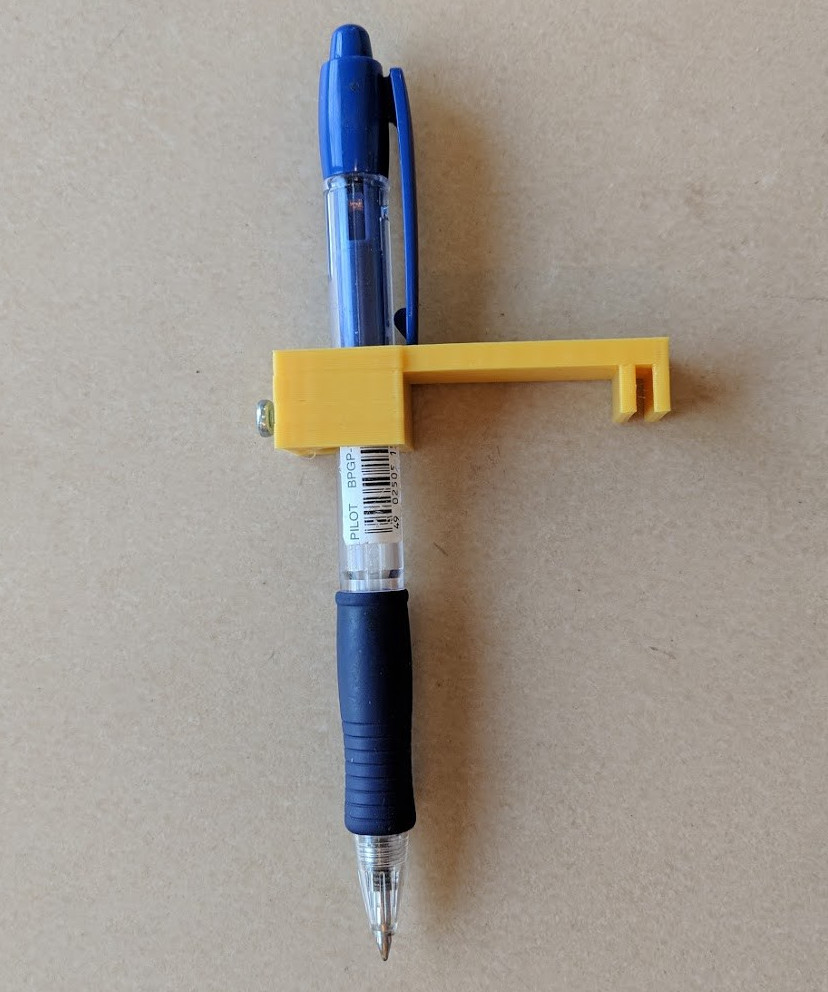
The physical aspect of this hack is about as simple as they come: just come up with some way to hold the pen a bit below the printer’s hotend. The positioning here is a bit critical, as you don’t want to crash the nozzle into the bed while writing out a missive. [Uri] got fancy and designed a little bracket that clamps onto the CR-10 and even has a M3 screw to hold the pen in place, but you could get away with zip ties if you just want to experiment a bit.
[Uri] goes into much greater detail on the software side of things, which is good, as it does take a bit of Inkscape trickery to get the printer to perform the specific dance moves required. He goes through step by step (with screen shots) explaining how to set up Orientation Points and configure the tool parameters for optimal performance. Even if you aren’t looking to put a 3D printer to work autographing your 8x10s before the next hackerspace meet, this is an excellent guide on producing GCode with Inkscape which can be helpful for tasks such as making PCBs.
The general process here is very similar to adding a laser module to your 3D printer, but with considerably lower risk of your eyeballs doing their best Death Star impression.


I’ve done this, only much more ghetto and not as fancy :p
https://www.youtube.com/watch?v=eXC73eWzP7E
i think i got parkinson’s just watching this video
I like how this system prevents the pen from crashing too hard into the bed.
I’ve done this.
https://youtu.be/5unK5kDxWVc
My way is a bit more work though as I have to remove the extruder/hotend. Maybe I’m doing it wrong. It’s not that bad though as on the Mendel90 the wiring is all unpluggable and the extruder/hotend assembly is held on with two wing nuts.
My way as in the way I did it, not my way as in MY way. credit goes to Smuk3D at Thingiverse: https://www.thingiverse.com/thing:910550
I wasn’t able to get the Path-to-Gcode extension to work properly when I tried it but maybe I’ll try this tutorial again. I’ve been using a third party inkscape g-code plugin. https://github.com/JelleB/inkscape-unicorn.
Another option that has worked for me is to use an online tool to extrude/convert an svg file to an stl. (there are several of these available, just google it). I make it’s height equal to my first-layer height set in my slicer settings. There is an option in Slic3r to make it raise the Z-axis whenever it travels across areas that it is not extruding. Then I just slice it. That works too.
The robots are going to have better handwriting than we do.
After I finished the XY stage for my printer I played with it as a plotter. I made a pen holder using a short linear guide. The guide allowed the pen to follow whatever surface was under it and it didn’t have to be level with the XY plane of the plotter.
https://vimeo.com/185135110
http://mark.rehorst.com/misc/corexy/10010002.jpg
Koohinoor art pens have a lot of ink and it’s pretty free-flowing, so it was able to keep up with the motion.
I’ll just leave this here (includes alternate inkscape-to-gcode method)
[youtube https://www.youtube.com/watch?v=yK_YGwMRR40&w=560&h=315%5D
Beautiful work! Using a 3-color pen is pretty clever.
When I did something similar, I found that I really wanted the pen to be a bit spring-loaded, but I was using felt-tips. Are you using the natural spring in the clicky pen?
Those 4 colour BIC pens have a bit of natural bounce to them due to the ink cartridge not being solid and having to bend to get out the tip. plus also the print bed is spring loaded. it’s all just a bit of fun really. if you look really close to the writing from my rig you will notice the pen slipping a bit. Perhaps that’s why Uri went with a single colour.
I just did an experiment with Cura, and if you set any STL to 0 infill, 0 top/bottom layers, and 1 wall, it will print only a single outline. You can also set the pen tip size to match the nozzle for very precise dimensions. As well, if you have it pause at the beginning of the second layer, you don’t have to worry about setting a perfect layer height.
…and it just struck me that if you use small layer heights and pause at the beginning of each, you can have a different pen colour/type for each one.
In the movie “Real Genius” there was a throwaway moment relevant to this: they were on their way down to Lazlo’s laboratory after finding the secret entrance in the back of the closet, and walked by a bunch of robotic machines all writing letters.
The story behind that is: a student at CalTech saw a Pasadena contest where you entered by sending in an entry form. In the early 1960’s, that meant either hand writing or typing it, but he had access to an early line printer, so he looked at how many people had entered the last contest, and printed out that many entries, and won most of the prizes.
Subsequently, entry contests specified ‘handwritten’, so Lazlo built a robot to ‘handwrite’ tens of thousands of entries (and at the end of the movie, the wisdom of that is shown.)
A friend of mine made a bit of money designing fonts that had multiple slightly different versions of each character, so you could use it and produce the illusion of handwritten words because there were clear variations. That kind of font might be useful here.
There are still a lot of dirt cheap vintage plotters out there. I can’t give away two old hewlett packard multipin plotters I have, because the shipping cost exceeds anyone’s desire for them.
Been there done that… I built a 3D printer a few years ago out of parts from a scanner and a couple of dot matrix printers https://www.youtube.com/watch?v=7b_Z2bevu98 Then I got a commercial 3D printer which works much better… figured I’d eventually try to make my home-built one better in some unique way, but in the meantime it’s indeed fine for addressing Christmas cards. I printed a couple of kinds of pen holders: at first, one that holds the “refill” pulled out of a Bic pen, which is a bit too solid (hard to control the pressure against the paper with my low-res Z axis). So then I made a different design that uses a refill and spring from a typical click-click ballpoint pen, but uses the spring as a suspension so that it can’t push too hard on the paper. That’s the one you can see here https://www.youtube.com/watch?v=qbwTlrX6F8g I didn’t bother to share the pen holder on Thingiverse because it only fits my printer, but I suppose I could in case anybody wants to modify it for another printer (OpenSCAD of course). For software I just went hunting on github and found this https://github.com/Andy1978/hf2gcode which can use any Hershey font to generate gcode; but was thinking it would be nice to come up with a way to generate cursive writing.