Running a server completely off solar power seems like it would be a relatively easy thing to do: throw up a couple of panels, tack on a charge controller and a beefy battery, and away you go. But the reality is somewhat different. Most of us hackers are operating on a relatively limited budget and probably don’t have access to the kind of property you need to put out big panels; both pretty crippling limitations. Doing solar on a small-scale is hard, and unless you really plan ahead your setup will probably be knocked out on its first cloudy day.
 So when [Kris de Decker] wanted to create a solar-powered version of his site “Low-tech Magazine”, he went all in. Every element of the site and the hardware it runs on was investigated for potential power savings, and luckily for us, the entire process was written up in meticulous detail (non-solar version here). The server still does go down from time to time if the weather is particularly poor, but in general it maintains about 90% uptime in Barcelona, Spain.
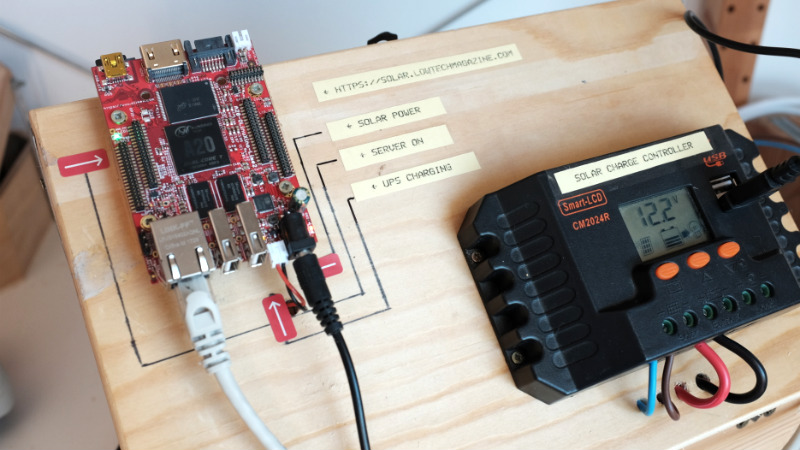
The solar side of the equation is fairly simple. There’s a 50 watt photovoltaic panel charging a 12V 7Ah lead-acid battery though a 20A charge controller. With an average of 4 to 6 hours of sunlight a day, the panel generates 300 Wh of electricity in the best case scenario; which needs to be split between charging the battery and running the server itself.
As for the server, [Kris] chose the Olimex Olinuxino A20 Lime 2 in part because of it being open source hardware, but also because it’s very energy-efficient and includes a AXP209 power management chip. Depending on processor load, the Olimex board draws between 1 and 2.5 watts of power, which combined with charging losses and such means the system can run through two days of cloudy weather before giving up the ghost. A second battery might be added in the future to help improve the run time during low-light conditions, but for now its been working pretty well.
Perhaps the most interesting part of the whole project are the lengths to which the website itself was optimized to keep resource utilization as low as possible. Images are compressed using dithering to greatly reduce their file sizes, and the site eschews modern design in favor of a much less processor intensive static layout. There’s even a battery capacity display integrated into the page through some clever use of CSS. Even if you aren’t looking to set up your own sun worshiping website, there are tips here for building efficient web pages that could absolutely be put to use in other projects.
If you’re interested in solar projects, we’ve got you covered. From an open source charge controller to building DIY photovoltaic panels, there’s plenty of prior art you should find very…illuminating. Please clap.


I am not convinced the write up is very well researched and it probably shouldn’t be used as a reference for other projects trying to do low resource designed website.
and putting lead batteries into into wooden boxes could be a really stupid idea.
What happens when you put lead batteries in a wooden box?
Hydrogen gas and oxygen gas mixed together in a closed space.
In this case a box that is kinda flammable.
It’s just begging for a spark, unless it’s a “Sealed Lead Acid” battery.
Those are SLA, but they have a pressure valve that can release gas (and acid spray) if the battery boils over due to excessive charging voltage.
That’s why my bank of cells has positive ventilation. In fact, it was mandatory.
The cells had to be in a box, sitting in an an acid-resistant tray capable of holding the contents of one cell (we’re talking 12x 2 volt 1320ah cells), and positive ventilation for the box
I worry more about that blue LiPo pack in the wooden box than the SLA.
IT is a myth That lead Acid batteriets areal bombs. As Long as the enclosure is not completely air tight, there is No risk of hydrogen Collecting.
I was referring to text describing how to make a low energy/footprint website, rather than the choice of batteries, solar cells and hardware. Would love to see a more rigorous writeup to substantiate some of the claims and exploring alternatives. For instance the energy impact on the server per MB transferred and how various changes improve the efficiency. The same could be applied to each of the hardware components selected. The article just needs more rigor and scientific method applied to it.
You could save money on the controller (and use that money for more PV and/or bigger battery) by using voltage-regulated PV panels. They’re designed to limit peak voltage to about 14 or 15 volts instead of ~18.
Of course *I* use a controller because I’ve got ~1320ah of battery to deal with.
I would supplement the power generation with wind power. I live in close proximity to wind turbines, so the are is quite windy. I was thinking of doing a wind turbine myself. I just didn’t know what to power. Perhaps a small weather station with web server.
I know it’s not what you meant, but reading this “I live in close proximity to wind turbines, so the are is quite windy” really did make me think of the people who think the wind turbines produce the wind.
The wind turbines keeps California from floating out to sea. ;)
The day is not over.. ;)
I did re-read the sentence and found the fault in the logic, but decided to leave it as it is. Mostly because people that build wind turbines usually choose a windy area to do so. I’m also lazy :)
I’ve also built a small solar-setup, though I’ve gone with an 85W panel, a Wincong SL-03 30A – controller, a bunch of salvaged 18650 li-ion cells and a 3S BMS. The battery-pack’s capacity is somewhere around 140Wh at a guess, though I haven’t bothered to properly measure it. At the moment I use it to run some LED-lighting outdoors at night, though I am planning to expand the battery-pack’s capacity and add some more coollies stuff to my setup, including a small PC.
On a server power saving note, I remember potato powered one:
http://totl.net/Spud/
Kicking around a similar off-grid server concept myself just now. Been fiddling about with some used 18650 Li-Ion laptop battery packs, and scoffing at all the ‘over-charge protect this’, and ‘over-discharge current protect that’ stuff. Such an apparent minutiae of thermal sensors and temperature cut-outs, double layers of Kapton tape and an excess of other ‘superfluous’ insulators. I was both bemused and befuddled. Now what’s all this RTV goo keeping even static, mechanically robust wiring connections in place for? My attitude was one of complete derision.
Then, last night, I made my first simple error. Gee, did that scene get waaay out of hand in a hurry, and compound itself far quicker than I could figure out how to deal with!
Powerwall me not, Elon. Not even my neighbours…and I’m not even trying to be funny.
“and scoffing at all the ‘over-charge protect this’, and ‘over-discharge current protect that’ stuff.” — Well, at least you learned that that was a bad idea without (apparently) setting your house on fire.
I went with a proper BMS from the get-go and I have a fuse for each and every cell, so that if one would fail into an internal short-circuit, the fuse would blow from the sudden inrush of current, protecting the rest of the pack. I didn’t weld my cells together, I just use these plastic 18650-holders in my pack, so replacing a failed cell is easy: just pop it out, replace fuse, charge the new cell to about the same voltage as the other cells and pop it in. (Granted, my way takes a lot more space, but maintenance is much easier.)
While speaking of the devil (BMS), any intelligent but affordable BMS boards with “fuel gauge” like those used in laptop battery packs?
Seems like there’s only dumb ones without things like estimated capacity reporting and etc, or they’re obscenely expensive.
Sorry, can’t help you there. I went with a dumb one without any displays or any other fancy features because it was cheap and simple. Can always add capacity-reporting and stuff later on by slapping on an MCU and a current-sensing resistor. Me, I don’t need to know the momentary current-draw or such, I just like to know the voltage of the pack and I use an MCU to report it and the storage-room’s temperature and humidity over LoRa periodically.
Depends on your figure for obscenely expensive. This one is a bit pricey, but it’s very full-featured:
http://www.mini-box.com/NUC-UPS
I bet it can be made to work on other systems besides the Intel NUC. It reports status over USB, supposedly showing up as a regular battery in the task bar as if you were using a laptop. Has all sorts of settings for attempting a graceful shutdown. They say that linux implementation is planned, I certainly hope so. It supports a very wide range of input voltage, so it would probably work with minimal extra solar management circuitry.
Hi Ø,
There are higher capacity battery packs available, with very comprehensive Smart Battery Management system v1.1 compliant ‘fuel gauge’ chips on-board, but obscenely expensive doesn’t even begin to describe them. I stopped looking at smarter BMS boards for similar reasons.
For a less expensive power system, and without having to go to all the fuss of designing one’s own protect, balance, monitor and control system, I proposed to use a bank of mass consumer grade laptop battery packs, with all the goodies already built-in. It’s then just a matter of building a sufficiently intelligent charge and discharge management system for the bank, driven by the wealth of data and control options that contemporary Li-Ion laptop battery packs nowadays provide, through their SMB (I2C) interfaces.
http://sbs-forum.org/
T.
I (sadly) figured as much.
Currently working on repurposing some T60 and T61 ThinkPad BMS boards, the controller and i2c data output, configuration is almost fully documented with those, except they somehow can’t “tell” you the voltage of each specific cell over i2c as far as I know.
While other BMS laptop boards have no problem doing that.
I have done something similar to build a solar powered cryptocurrency miner, but with a 100W panel, a 12.8V, 82Ah LiFePO4 pack, and multiple cheap smartphones/old tablets plus a small mining ASIC.
How long ’till it breaks even? :)
It did months ago, when the Swagbucks mining profitability was way higher than it is now. I also achieved a bit of fame with the setup and I’m proud to show it on my Facebook.
There are proper connectors for those tabs on the battery.
https://www.digikey.com/products/en/connectors-interconnects/terminals-quick-connects-quick-disconnect-connectors/392
I absolutely love the lightweight “brutalist”/retro web design trend. We’ve increased our broadband connections and amount of RAM to truly science fiction levels, more than most ever thought we’d need just a few years ago. Yet we’re still waiting all the damn day long on slow and horrendously bloated, lazily coded websites. We’re loading pages that exceed then file size of a full Window 95 install just to read a few kilobytes worth of plaintext. Adtech and goofball form-over-function over-designing are strangling what was once a pretty straightforward and efficient medium.
I forgot who said it, but it’s really true that software is a gaseous fluid–it expands to match the shape and volume of its container. Having a solar server introduces some lovely restrictions from which decent design is born.
Is the Olimex processor the best for this application? Beyond the Raspberry Pi, what would people consider?
Anything with power efficient and well designed HW and good software support works.
18650 cells are more efficient than lead acid. will keep the load going longer. A Raspberry Pi with a SSD is a good web server with low power consumption.
Does lead-acid suffer from vampire drain?
As far as I can tell “vampire drain” is a Tesla car thing, and it’s just a symptom of the standby power used by all the stuff other than the motors. Nothing to do with battery technology. Probably why I’ve never heard of it til just now. I thought you might have meant “self discharge” but that already has a name.
Lead-acid is good because it can take a knock, it can take a lot of abuse, without any sort of real damage. And even severe abuse won’t cause it to explode. In rough use, it’s much safer than lithium technologies, and generally tougher.
Also, and this is a guess, but I imagine it’s cheaper per AH too.
Very Cool!
I’ve successfully fine-tuned a fully functional outdoor Mac OS Webserver running apache and OwnCloud for almost a decade now continuously without much needed maintenance. All I pay for is my domains, internet (already paying for ATT fiber which has a static IP) and most other computer parts (SSD, computer, router, wires, 12V parts) I usually have some extras laying around. Initial cost was high for the panels (about 400) but they are warranted 25 years. Battery used runs about 200 (4 year warranty).
Make a wood box clamshell lid (roof) big enough (with 6″ overhang!, paint, roll roof shingle) to house sealed auto battery (AGM 95AH H8Group Size Preferred). It sits on bricks and the solar cable run up through a single hole on the bottom .
It’s about 3ft by 3ft with a vertical partition down the center interior with two holes, drilled for computer fans, several others for cabling. One side is the battery, the other is the computer, 12V temperature switch to control 4 cooling fans during summer, and an MPPT charge controller.
Components:
1: Old Macbook Pro 2008-2015 works great with gigabit ethernet. SSD is necessary!
(remove battery, LCD completely and anything else that draws power speakers bluetooth etc, even the DVD)
We replaced the DVD with another SSD caddy (found on ebay) and configure mirrored raid, 2x1TB drives
1.1: 12V Macbook charger from ebay, macbook air charger will not work on a macbook pro
2: Netgear Wireless Router to bridge to house router (Make custom 12V power cable to connect to cigarette lighter)
3: (3) 100W 12V Solar Panels (+Solar Cables etc.)
4: MPPT Charge Controller (ours was $30 on ebay)
5: The Battery (Less is more!) We prefer one single H8 Group Size lead acid AGM battery (usually have a 4 year warranty! too if something goes wrong) Tried 4 lawnmower batteries from harbor freight initially with poor results after one battery failed.
6: Local auto parts store have many 12V items in stock. We use a male cigarette lighter port mounted to the inside, and 12V outlet splitter (with fuse is important!)
Basically you preinstall mac OS onto the SSD and install in the macbook. Power settings are crucial!
–We set to sleep after 30 min, wake for ethernet access. Shutdown everyday at 3AM. Auto startup/login everyday at 5AM.
–Enable VNC to the account/ router ports, so everything can then be configured remotely without use of an external monitor. Static IP, and change the local name for easy access. On the router enable ports 443, 80, for webserver, VNC and anything else you’d like.
— We run mac os 10.13.6, Mac Server App 5.6.3, OwnCloud 10.7.0.4
Remember that the 12V sequence is key to prevent sparks and shorts. Use insulated 4 gauge coated solid copper wire to connect the 12V outlet to the battery. Also, stray wires floating in the box can accidentally short circuits when you’re connecting it all. Keep it clean to prevent frying your electronics!
Always connect battery cables + then – to charge controller first, then solar + to charge controller, then solar – to charge controller. THEN Connect Load (12V outlet to battery + then -), plug in splitter to 12V outlet. Finally plug in router to 12V splitter Port A, then connect macbook charger to splitter Port B, connect to macbook, and power on!
Have fun and patience is key!