Free And Open E-Reader From The Ground Up

Although ebooks and e-readers have a number of benefits over reading an analog paper book as well as on more common electronic devices like tablets, most of them are locked behind proprietary systems like Kindle which make it difficult to take control over your electronic library. While there are a few off-brand e-readers that allow users to take a bit of control back and manually manage their files and libraries, there are few options for open-source solutions. This project aims to provide not only a free and open e-reader from the hardware to the software, but also a server to host a library as well.

The goal of most of the build is to keep everything as FLOSS as possible including the hardware, which is based on a Raspberry Pi compute module. The display comes from Good Display, which includes a built-in light and a touchscreen. There’s a lithium battery to power the tablet-like device with a number of support chips to charge it, handle the display, and interface with the Pi. On the software side, the system uses MuPDF which has support for most ebook file types while the server side is based on Calibre and the Open Publication Distribution System.

A subsection of the build log discusses a lot of how the code works for those looking to build their own similar system based on this project. The project code is even hosted on GitLab, a more FLOSS-y version of GitHub. Free and open ebook readers have been a goal of a number of builders for some time now, as we’ve seen projects going back at least a few years now and others that hope to make the Kindle hardware a little more open instead.

Docker-Powered Remote Gaming With Games On Whales

Cloud gaming services allow even relatively meager devices like set top boxes and cheap Chromebooks play the latest and greatest titles. It’s not perfect of course — latency is the number one issue as the player’s controller inputs need to be sent out to the server —  but if you’ve got a fast enough connection it’s better than nothing. Interested in experimenting with the tech on your own terms? The open source Games on Whales project is here to make that a reality.

As you might have guessed from the name, Games on Whales uses Linux and Docker as core components in its remote gaming system. With the software installed on a headless server, multiple users can create virtual desktop environments on the same machine, with each spawning as a separate process on the host computer. This means that all of the hardware of the host can be shared without needing to do anything complicated like setting up GPU pass-through. The main Docker container can spin up more containers as needed.

Of course there will obviously be limits to what any given hardware configuration will be able to support in terms of number of concurrent users and the demands of each stream. But for someone who wants to host a server for their friends or something even simpler like not having to put a powerful gaming PC in the living room, this is a real game-changer. For those not up to speed on Docker yet, we recently featured a guide on getting started with this powerful tool since it does take some practice to wrap one’s mind around at first.

A Guide To Running Your First Docker Container

While most of us have likely spun up a virtual machine (VM) for one reason or another, venturing into the world of containerization with software like Docker is a little trickier. While the tools Docker provides are powerful, maintain many of the benefits of virtualization, and don’t use as many system resources as a VM, it can be harder to get the hang of setting up and maintaining containers than it generally is to run a few virtual machines. If you’ve been hesitant to try it out, this guide to getting a Docker container up and running is worth a look.

The guide goes over the basics of how Docker works to share system resources between containers, including some discussion on the difference between images and containers, where containers can store files on the host system, and how they use networking resources. From there the guide touches on installing Docker within a Debian Linux system. But where it really shines is demonstrating how to use Docker Compose to configure a container and get it running. Docker Compose is a file that configures a number of containers and their options, making it easy to deploy those containers to other machines fairly straightforward, and understanding it is key to making your experience learning Docker a smooth one.

While the guide goes through setting up a self-hosted document management program called Paperless, it’s pretty easy to expand this to other services you might want to host on your own as well. For example, the DNS-level ad-blocking software Pi-Hole which is generally run on a Raspberry Pi can be containerized and run on a computer or server you might already have in your home, freeing up your Pi to do other things. And although it’s a little more involved you can always build your own containers too as our own [Ben James] discussed back in 2018.

A Smart Power Distribution Unit For Home Automation

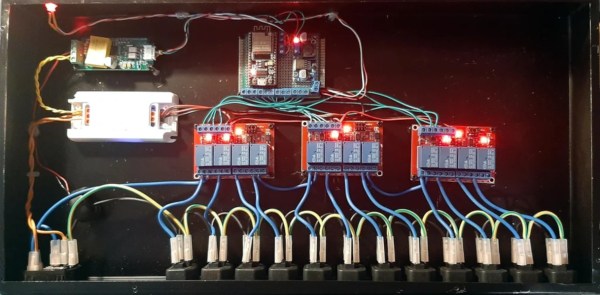
Power distribution units, as the name implies, are indispensable tools to have available in a server rack. They can handle a huge amount of power for demands of intensive computing and do it in a way that the wiring is managed fairly well. Plenty of off-the-shelf solutions have remote control or automation capabilities as well, but finding none that fit [fmarzocca]’s needs or price range, he ended up building his own essentially from scratch that powers his home automation system.

Because it is the power supply for a home automation system, each of the twelve outlets in this unit needed to be individually controllable. For that, three four-channel relay boards were used, each driven by an output on an ESP32. The ESP32 is running the Tasmota firmware to keep from having to reinvent the wheel, while MQTT was chosen as a protocol for controlling these outlets to allow for easy integration with the existing Node-RED-based home automation system. Not only is control built in to each channel, but the system can monitor the power consumption of each outlet individually as well. The entire system is housed in a custom-built sheet metal enclosure and painted to blend in well with any server rack.

Adding a system like this to a home automation system can simplify a lot of the design, and the scalable nature means that a system like this could easily be made much smaller or much larger without much additional effort. If you’d prefer to keep your hands away from mains voltage, though, we’ve seen similar builds based on USB power instead, with this one able to push around 2 kW.

Webserver Runs On Android Phone

Android, the popular mobile phone OS, is essentially just Linux with a nice user interface layer covering it all up. In theory, it should be able to do anything a normal computer running Linux could do. And, since most web servers in the world are running Linux, [PelleMannen] figured his Android phone could run a web server just as well as any other Linux machine and built this webpage that’s currently running on a smartphone, with an additional Reddit post for a little more discussion.

The phone uses Termux (which we’ve written about briefly before) to get to a Bash shell on the Android system. Before that happens, though, some setup needs to take place largely involving installing F-Droid through which Termux can be installed. From there the standard SSH and Apache servers can be installed as if the phone were running a normal Linux The rest of the installation involves tricking the phone into thinking it’s a full-fledged computer including a number of considerations to keep the phone from halting execution when the screen locks and other phone-specific issues.

With everything up and running, [PelleMannen] reports that it runs surprisingly well with the small ARM system outputting almost no heat. Since the project page is being hosted on this phone we can’t guarantee that the link above works, though, and it might get a few too many requests to stay online. We wish it were a little easier to get our pocket-sized computers to behave in similar ways to our regular laptops and PCs (even if they don’t have quite the same amount of power) but if you’re dead-set on repurposing an old phone we’ve also seen them used to great effect in place of a Raspberry Pi.

Using An Old Smartphone In Place Of A Raspberry Pi

The Raspberry Pi was a fairly revolutionary computing device when it came on the scene around a decade ago. Enough processing power to run a full Linux desktop and plenty of GPIO meant almost certain success. In the past year, though, they’ve run into some issues with their chip supplier and it’s been difficult to find new Pis, which has led to some looking for alternatives to these handy devices. [David] was hoping to build a music streaming server and built it on an old smartphone instead of the ubiquitous single-board computer.

Most smartphones are single-board computers though, and at least the Android devices are fully capable of running Linux just like the Pi. The only problem tends to be getting around the carrier or manufacturer restrictions like a locked bootloader or lack of root access. For [David]’s first try getting this to work, he tried to install Navidrome on a Samsung phone but had difficulties with the lack of memory and had to build the software somewhere else and then load it on the phone. It did work, but the stock operating system kept killing the process for consuming too much memory.

Without root access, [David] decided to try LineageOS, a version of Android which, among other benefits, is typically much more configurable than the stock version of Android that is shipped with smartphones. This allowed him to disable or uninstall anything not needed for his music server to free up enough memory. After some issues with transcoding the actual music files he planned on streaming, his music server was successfully up and running on a phone that would have otherwise been relegated to the junk drawer. The specific steps he took to get this working can be found on his GitHub page as well.

[David] also mentioned looking at PostmarketOS for this job which is certainly a viable option for some, but the Linux distribution for phones is only supported on a few devices. Another viable alternative for a project like this if no Raspberry Pis are available might be any of a number of Pine64 devices that might also be sitting around gathering dust, like the versatile Linux-based Pinephone.

Before You Sudo Rm -rf /, Take Some Precautions

Maintaining or administering a computer system remotely is a common enough task these days, but it’s also something that can go sideways on you quickly if you aren’t careful. How many of us are guilty of executing a command, having it fail, and only then realizing that we weren’t connected to the correct computer at all? [Callan] occasionally has this issue as well, but in at least one instance, he deleted all of the contents of the wrong server by mistake. To avoid that mistake again, he uses color codes in the command line in a fairly unique way.

The solution at first seems straightforward enough. Since the terminal he’s using allows for different colors to be displayed for the user and hostname on the bash prompt, different text and background colors are used for each server. The only problem with this is that his friends also have access to these servers, and one of them is red/green colorblind, which led to another near-catastrophic mix-up. To ensure no edge cases are missed, [Callan] built a script which runs on every new server he spins up which selects two random colors, checks that they contrast well with each other, don’t create problems for the colorblind, and then applies them to the bash prompt.

For a problem most of us have had at some point or another, it’s a fairly elegant solution that helps ensure we’re sending the right commands to the right computer. This adds a layer of automation to the process and, while some color combinations do look similar, there are enough to help out most of us in some way, especially since he has released the source code on his GitHub page. For other helpful server administration tips, we’d recommend the Linux-Fu article about deploying your own dynamic DNS.