We’ve been seeing an influx of repurposed 3D printers recently. Thrifty hackers have been leveraging cheap 3D printers as a way to bootstrap their builds, on everything from laser engravers to pick and place machines. There’s nothing wrong with that, and honestly when you can get a cheap 3D printer for less than the cost of the components separately thanks to the economies of scale, you’d be foolish not to.
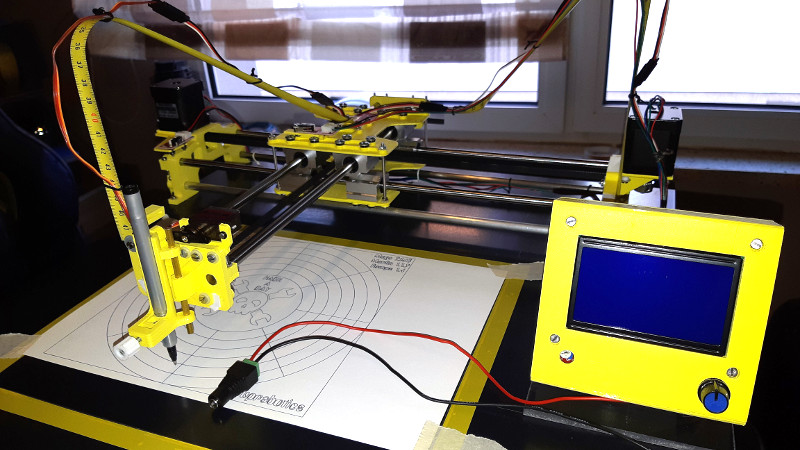
 But there’s still something to be said for the classic RepRap mentality of building things using printed parts and smooth rods. Case in point, the largely 3D printed plotter that [darth vader] sent in for our viewing pleasure. This isn’t somebody sicking a pen on the extruder of their open box Monoprice special, this is a purpose built plotter and it shows. In the video after the break you can see not only how well it draws, but also how large of a work area it has compared to a modified 3D printer.
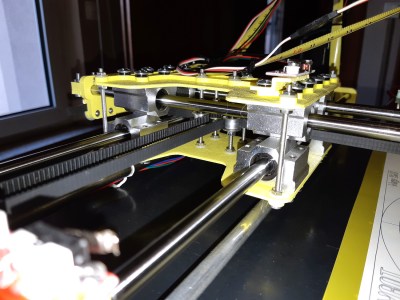
If you know your way around a 3D printer, most of it should look pretty familiar to you. Using the same GT2 belts, steppers, end stop switches, and linear bearings which are ubiquitous in 3D printers, it shouldn’t be difficult to source the parts to build your own. It even uses a Mega 2560 with RAMPS 1.4 running Marlin 1.1.9 for control.
The biggest difference is the physical layout. Since there’s no heavy hotend or extruder assembly to move around, the plotter has a cantilever design which gives it far greater reach. As it only needs to sightly lift the pen off the paper, there’s no need for a complex Z axis with leadscrews either; a simple servo mounted to the end of the arm is used to raise and lift the pen. We especially like the use of a tape measure as strain relief for his wiring, a fantastic tip that we (and many of you) fell in love with last year.
While it’s hard to beat just tossing a pen onto the business end of your desktop 3D printer in terms of convenience, we think it’s pretty clear from this build that the results don’t quite compare. If you want a real plotter, build a real plotter.


So, what are people using these for? Don’t get me wrong, I like a good project done just for the sake of the project as much as anyone. There seems to be a plotter theme going though lately so I am just wondering if even in the day of affordable laser printers there is still a practical reason for them that I have not realized.
I’ve used them before to mass-produce “hand-written” documents, because I could- make a custom font based on your handwriting’s stroke order, spend some time getting kerning, tracking, etc. right, and you’re golden. I’ve also used this method to create physical copies of CAD drawings that had to be in pen, and not printed out.
It’s also useful for a lot of other things as well- if you can put a Bic Crystal on it, you can put a Pilot G2, Uniball, felt tip marker, etc. on it as well. What I want to do is combine something like this with a head-changing attachment, so that I can automagically create engineering drafts that are perfect, and have colored annotations.
I’d like to see them used on diplomas- with a high-enough quality plotter, and a proper pen, you could make it look way more authentic than the current “print out in a different font and raise the ink” method used almost everywhere with a large amount of graduates. It does, however, take longer than a comparable print job (I think, haven’t tried printing in metallic ink / etc.)
Agreed. I had to pay $20 to get a physical diploma from tech college, took them months to send it to me, then it was just a laser printout.
Go to Twitter and check out #plottertwitter. You’ll see a lot of folks being creative with plotters just like this. (This is just the nth plotter based on EMSL’s Axidraw — search for “axidraw” on Thingiverse and you’ll find many more).
This looks like the Axidraw from EMSL
Absolutely as mesmerizing as when I used to watch the pen plotters in our drafting lab back in the early 90’s. Love it!
Nice! And the explanatory comment is genius!
I occasionally use my reprap for plotting. I haven’t found a toolchain for this that I am particularly happy with. Currently I use an Inkscape plugin but the plugin has not been maintained for a number of years. I had to make some small changes to the code just to get it working but it still is quirky. Sometimes it works great, others it want to move the whole drawing way out of bounds. Also there is this conversion to path process that has to be done in Inkscape first. I don’t entirely understand it because sometimes it seems to work, other times it takes several tries before I can get a path. On a really bad day I have to actually convert to bitmap then back to vector before I can get a useful path. Yuck!
The other toolchain I have been successful with is to use an online svg to stl converter that virtually extrudes the 2d image into a 3d shape. I set the extrusion height equal to a single layer of a 3d print. Then I run it through my usual slicer only with the extruder and heated bed temperatures set to manual and a box checked that tells it to lift the z axis whenever it is not extruding. This works but seems pretty hacky.
Anyway, I was wondering.. if one is building a single-purpose plotter, why Marlin? Or more to the point why even G-Code? I think there are sketches out there for interpreting HPGL. Would that make it as simple as setting it up in cups as an HPGL printer and just hitting print?
HP-GL is a dead simple language. Its PLT files are just plain text, using only 7 bit ASCII characters. HP-GL/2 added support for things like line width, solid and other fills, color mixing etc for their DesignJet plotters. It can be done in a human readable text format but most HP/GL/2 is done in binary files, and there’s compression possible to reduce the time to send to the plotter.
The text PLT files can simply be sent to the COM port an HP plotter is connected to. Open a CMD window then use COPY to send it to the port. I did that to plot out a few patterns for cutting some hardboard with a bandsaw.
In other words, there aren’t drivers for HP-GL pen plotters. They’re pretty much specialized dumb terminals that dump whatever is sent to them onto the ‘display’, formatting it as commanded by the data being sent.
Someone should pick up the Chiplotle project and update it. https://web.archive.org/web/20170227192623/http://cmc.music.columbia.edu/chiplotle/
One thing about HP-GL printers is that they must have flow control of some sort, my plotter uses RTS/CTS to make sure that no characters/instructions are lost. There fore you must have a serial port with flow control. The standard Arduino style board does not have this.
G-code have build in flow control in the language with a call and response style.
There a lot of axidraws on thinginverse…this is a very old idea.
Laser printers are great, but most folks printers are limited to a small selection of paper, card stock. Some are willing to just work with that, or abuse the printer a little, print on anything they can force through there, without jamming it it too much. A plotter can be used large format, just re-position the paper or other material. You could use a permanent marker, and draw PCB traces on copper, for etching. Sure, a laser printer can do well enough for most needs, but a plotter can provide a few other options, and in some cases better results. Of course, on can just send out their printing needs to the nearest shop, and not mess with anything, but it’s sometimes nice to have the tools yourself, and get what you need done quick, or even make a few bucks on the side, doing print jobs for others.
Anything that spills and says ‘automation’ is surely very welcome to us hackers and makers. But thinking about the practicalities of owning a large machine-controller ballpen is a at least a stretch of imagination; there must only be space for it on very niche markets, so I doubt that it is financially worth it. But anyway
Thanks for all your reply’s , for the price of this machine it cost me 167€ in material and like 24h printing , but most of all , it was fun to build , test and improve.The tool holder is done for those who want drop the pen and print another tool holder , like a laser holder. a little mill will probably not work well at this size with 8mm treated rod (must be like 10 or 12mm).Anyway , every-time you build something you learn :)
Cheers.
Add a drag knife and you can cut self adhesive vinyl. Make it a knife with electronic controlled rotation and you can do even more materials, depending on the power and rigidity of the machine.
Nice work, even if you’re still not my father.
As others have noted, this is exactly like the AxiDraw plotter which EMSL developed from my original design. It’s neat to see how many 3D printed variations have sprung up! The rigidity looks pretty reasonable too – the pen slide is the trickiest part to get right.
The design (with the drawing arm sticking out in front) lends itself to drawing on actual “things”, rather than just paper. For example, someone drew a Tux on their laptop – https://www.youtube.com/watch?v=wXKt6VPHjGA – and a logo on an electric guitar – https://www.instagram.com/p/Bk28xWOlsRV/.
Some notes:
– Plotters are great you want to create high-precision, 1:1 scale drawings in sizes >A4/letter paper. (Fantastic for wood/metalwork, as you can attach the drawing directly to your wood/metal/etc.)
– HPGL, the language used by most(?) plotters, can easily be converted into gcode, and a number of projects like CNCLib support importing it directly. This means that (in theory) you could tell your PC that you have a regular plotter and convert the (relatively simple) code on the fly with an Arduino. (…or just have the firmware on the machine include an HPGL interpreter.)
– There are also projects to create Hershey font gcode output for fast, clear text.
Funny that 3D printers started with tinkerers attaching hot-glue guns to discarded pen plotters in the early 90s and now they’re using 3D printers as pen plotters.