Laser And Webcam Team Up For Micron-Resolution Flatness Measurements

When you want to measure the length, breadth, or depth of an object, there are plenty of instruments for the job. You can start with a tape measure, move up to calipers if you need more precision, or maybe even a micrometer if it’s a really critical dimension. But what if you want to know how flat something is? Is there something other than a straightedge and an eyeball for assessing the flatness of a surface?

As it turns out, there is: a $15 webcam and a cheap laser level will do the job, along with some homebrew software and a little bit of patience. At least that’s what [Bryan Howard] came up with to help him assess the flatness of the gantry he fabricated for a large CNC machine he’s working on.

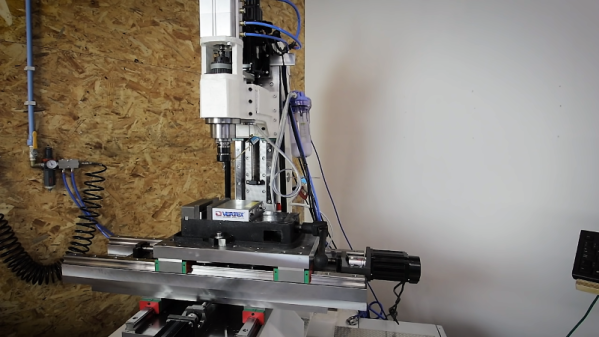
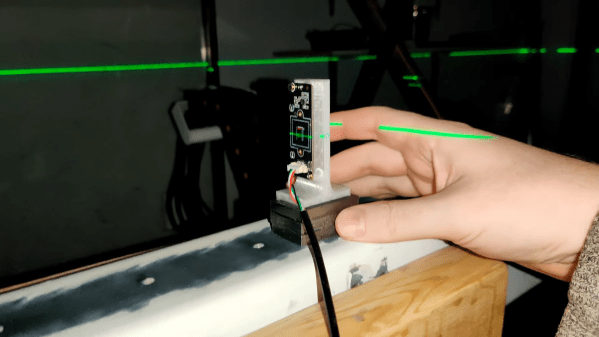
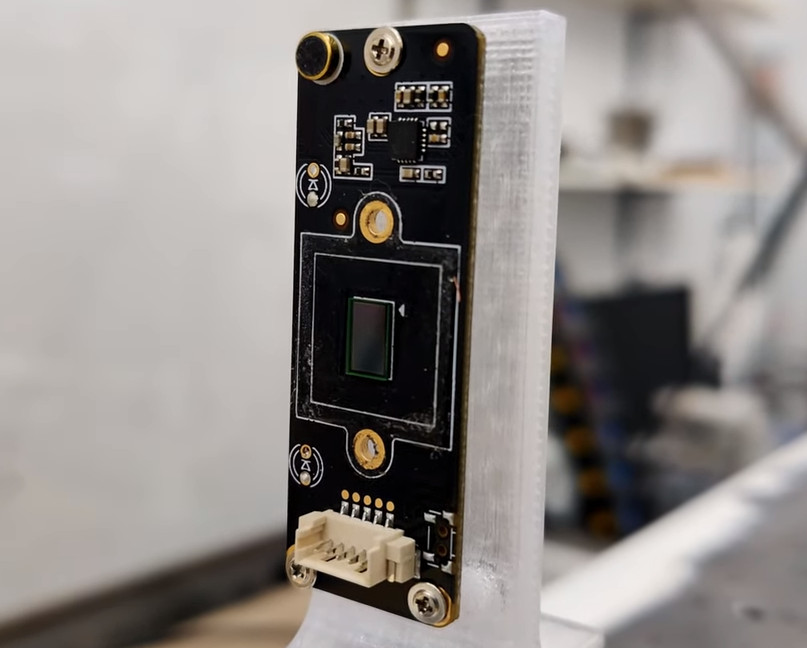
The gantry arm is built from steel tubing, a commodity product with plenty of dimensional variability. To measure the microscopic hills and valleys over the length of the beam, [Bryan] mounted a lens-less webcam to a block of metal. A cheap laser level is set up to skim over the top of the beam and shine across the camera’s image sensor.

On a laptop, images of the beam are converted into an intensity profile whose peak is located by a Gaussian curve fit. The location of the peak on the sensor is recorded at various points along the surface, leading to a map of the microscopic hills and valleys along the beam.

As seen in the video after the break, [Bryan]’s results from such a quick-and-dirty setup are impressive. Despite some wobblies in the laser beam thanks to its auto-leveling mechanism, he was able to scan the entire length of the beam, which looks like it’s more than a meter long, and measure the flatness with a resolution of a couple of microns. Spoiler alert: the beam needs some work. But now [Bryan] knows just where to scrape and shim the surface and by how much, which is a whole lot better than guessing.   Continue reading “Laser And Webcam Team Up For Micron-Resolution Flatness Measurements”

Automate Parts Kitting With This Innovative SMD Tape Slicer

Nobody likes a tedious manual job prone to repetitive stress injury, and such tasks rightly inspire an automated solution. This automatic SMD tape cutter is a good example of automating such a chore, while leaving plenty of room for further development.

We’re used to seeing such tactical automation projects from [Mr Innovative], each of which centers on an oddly specific task. In this case, the task involves cutting a strip containing a specific number of SMD resistors from a reel, perhaps for assembling kits of parts. The mechanism is simple: a stepper motor with a rubber friction wheel to drive the tape, and a nasty-looking guillotine to cut the tape. The cutter is particularly interesting, using as it does a short length of linear bearing to carry a holder for a razor blade that’s mounted perpendicular to the SMD tape. The holder is mounted to a small motor via a crank, and when the proper number of parts have been fed out, the motor rotates one revolution, driving the angled blade quickly down and then back up. This results in a shearing cut rather than the clipping action seen in this automated wire cutter, also by [Mr Innovative].

Curiously, there seems to be no feedback mechanism to actually measure how many resistors have been dispensed. We assume [Mr Innovative] is just counting steps, but it seems easy enough to integrate a photosensor to count the number of drive sprocket holes in the tape. It also seems like a few simple changes would allow this machine to accommodate SMD tapes of different sizes, making it generally useful for SMD kitting. It’s still pretty cool as a tactical project, though, and does a great job inspiring future improvements.

Continue reading “Automate Parts Kitting With This Innovative SMD Tape Slicer”

Vertical Mill Completes Scrapyard Lathe Build

One thing’s for sure: after seeing [Roland Van Roy] build a vertical mill from industrial scrap, we’ve got to find a better quality industrial scrapyard to hang around.

The story of this build started, as many good shop stories do, at the lathe, which in this case was also a scrapyard build that we somehow managed to miss when it first posted. This lathe is decidedly different from the common “Gingery method” we’ve seen a few times, which relies on aluminum castings. Instead, [Roland] built his machine from plate stock, linear slides, and various cast-off bits of industrial machines.

To make his lathe yet more useful, [Roland] undertook this build, which consists of a gantry mounted over the bed of the lathe. The carriage translates left and right along the bed while the spindle, whose axis lines up perfectly with the center axis of the lathe, moves up and down. [Roland] added a platform and a clever vise to the lathe carriage; the lathe tool post and the tailstock are removed to make room for these mods, but can be added back quickly when needed. Digital calipers stand in for digital read-outs (DROs), with custom software running on a Picaxe and a homebrew controller taking care of spindle speed control.

[Roland] reports that the machine, weighing in at about 100 kg, exhibits a fair amount of vibration, which limits him to lighter cuts and softer materials. But it’s still an impressive build, and what really grabbed us was the wealth of tips and tricks we picked up. [Roland] used a ton of interesting methods to make sure everything stayed neat and square, such as the special jig he built for drilling holes in the T-slot extrusions to the use of cyanoacrylate glue for temporary fixturing.

Continue reading “Vertical Mill Completes Scrapyard Lathe Build”

Steel Tubes And Ground Plates Form The Skeleton Of This DIY Vertical CNC Mill

If you’re going to do it yourself, you might as well outdo yourself. That seems to be the thinking behind this scratch-built CNC mill, and it’s only just getting started.

According to [Kris Temmerman], the build will cost about $10,000 by the time he’s done. So it’s not cheap, and a personal CNC from Tormach can be had for less, but that’s missing the point entirely. [Kris] built most of the structural elements for the vertical mill from cheap, readily available steel tubing, of the kind used for support columns in commercial buildings. Mounted to those are thick, precision-ground steel plates, which eat up a fair fraction of the budget. Those in turn hold 35 mm linear bearings and ball screws for the three axes, each powered by a beefy servo. The spindle is a BT30 with a power drawbar, belt-driven by an external motor that [Kris] doesn’t share the specs on, but judging from the way it flings chips during the test cut in the video below, we’d say it’s pretty powerful.

There’s still plenty to do, not least of which is stiffening the column; perhaps filling it with epoxy granite would do the trick? But it sure looks like [Kris] is building a winner here, and if he keeps the level of craftsmanship up going forward, he’ll have a top-quality machine on his hands.

Continue reading “Steel Tubes And Ground Plates Form The Skeleton Of This DIY Vertical CNC Mill”

Polar Platform Spins Out Intricate String Art Portraits

We have semi-fond memories of string art from our grade school art class days. We recall liking the part where we all banged nails into a board, but that bit with wrapping the thread around the nails got a bit tedious. This CNC string art machine elevates the art form far above the grammar school level without all the tedium.

Inspired by a string art maker we recently feature, [Bart Dring] decided to tackle the problem without using an industrial robot to dispense the thread. Using design elements from his recent coaster-creating polar plotter, he built a large, rotating platform flanked by a thread handling mechanism. The platform rotates the circular “canvas” for the portrait, ringed with closely spaced nails, following G-code generated offline. A combination of in and out motion of the arm and slight rotation of the platform wraps the thread around each nail, while rotating the platform pays the thread out to the next nail. Angled nails cause the thread to find its own level naturally, so no Z-axis is needed. The video below shows a brief glimpse of an additional tool that seems to coax the threads down, too. Mercifully, [Bart] included a second fixture to drill the hundreds of angled holes needed; the nails appear to be inserted manually, but we can think of a few fixes for that.

We really like this machine, both in terms of [Bart]’s usual high build-quality standards and for the unique art it creates. He mentions several upgrades before he releases the build files, but we think it’s pretty amazing as is.

Continue reading “Polar Platform Spins Out Intricate String Art Portraits”

Entry-Level SLA Printer Gets Upgrades, Prints Better

Fused-deposition modeling (FDM) printers have the lion’s share of the 3D-printing market, with cheap, easy-to-use printers slurping up thousands of kilos of filament every year. So where’s the challenge with 3D-printing anymore? Is there any room left to tinker? [Physics Anonymous] thinks so, and has started working on what might be the next big challenge in additive manufacturing for the hobbyist: hacking cheap stereolithography (SLA) printers. To wit, this teardown of and improvements to an Anycubic Photon printer.

The Photon, available for as little as $450, has a lot going for it in the simplicity department. There’s no need to worry about filament and extruder issues, since the print is built up a layer at a time by photopolymerization of a liquid resin. And with but a single moving part – the build platform that rises up gradually from the resin tank on a stepper-driven lead screw – SLA printers don’t suffer from the accumulated errors of three separate axes. But, Anycubic made some design compromises in the motion control area to meet their price point for the Photon, leaving a perfect target for upgrades. [Physics Anonymous] added quality linear bearings to each side of the OEM vertical column and machined a carrier for the build platform. The result is better vertical positioning accuracy and decreased slop. It’s a simple fix that greatly improves print quality, with almost invisible layers.

Sadly, the Photon suffered a major, unrelated injury to its LCD screen, but it looks like [PA] will be able to recover from that. We hope so, because we find SLA printing very intriguing and would like to dive right in. But maybe we should start small first.

Continue reading “Entry-Level SLA Printer Gets Upgrades, Prints Better”

The 3D Printed Plotter You Didn’t Know You Needed

We’ve been seeing an influx of repurposed 3D printers recently. Thrifty hackers have been leveraging cheap 3D printers as a way to bootstrap their builds, on everything from laser engravers to pick and place machines. There’s nothing wrong with that, and honestly when you can get a cheap 3D printer for less than the cost of the components separately thanks to the economies of scale, you’d be foolish not to.

But there’s still something to be said for the classic RepRap mentality of building things using printed parts and smooth rods. Case in point, the largely 3D printed plotter that [darth vader] sent in for our viewing pleasure. This isn’t somebody sicking a pen on the extruder of their open box Monoprice special, this is a purpose built plotter and it shows. In the video after the break you can see not only how well it draws, but also how large of a work area it has compared to a modified 3D printer.

If you know your way around a 3D printer, most of it should look pretty familiar to you. Using the same GT2 belts, steppers, end stop switches, and linear bearings which are ubiquitous in 3D printers, it shouldn’t be difficult to source the parts to build your own. It even uses a Mega 2560 with RAMPS 1.4 running Marlin 1.1.9 for control.

The biggest difference is the physical layout. Since there’s no heavy hotend or extruder assembly to move around, the plotter has a cantilever design which gives it far greater reach. As it only needs to sightly lift the pen off the paper, there’s no need for a complex Z axis with leadscrews either; a simple servo mounted to the end of the arm is used to raise and lift the pen. We especially like the use of a tape measure as strain relief for his wiring, a fantastic tip that we (and many of you) fell in love with last year.

While it’s hard to beat just tossing a pen onto the business end of your desktop 3D printer in terms of convenience, we think it’s pretty clear from this build that the results don’t quite compare. If you want a real plotter, build a real plotter.

Continue reading “The 3D Printed Plotter You Didn’t Know You Needed”