The portable air compressors sold at big box hardware stores like Lowe’s and Home Depot are perfectly suited for the jobs they’re advertised for: namely throwing some nails into the wall or filling tires. But if you try to respray your car with that $50 Black Friday pancake air compressor, you’re going to have a bad day. The relatively small amount of air they hold is almost guaranteed to be contaminated with oil and moisture, making it unsuitable for painting or even just blowing the dust out of electronics.
 But all is not lost. [Stephen Saville] has done an excellent job documenting his work to turn these low cost homeowner-grade air compressors into something suitable for spraying auto body panels. But even if you aren’t looking to put a sick pearlescent finish on the family minivan, these tips are worth checking out. From increasing the usable volume of air in the system to separating out contaminants, these modifications can unlock a whole new world of pneumatic projects.
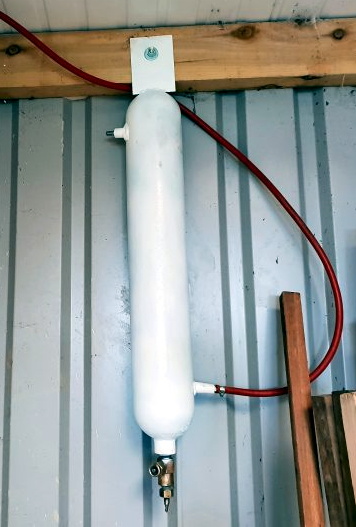
The big one (literally and figuratively) is the swirl tube [Stephen] builds out of an old CO2 cylinder. The idea is that this will centrifugally clean the air, not unlike a cyclonic dust separator. As the air enters the top of the cylinder and spins around, contact with the cold metal will cause any moisture to condense out and collect down at the bottom. Oil and other particles in the air should also get spun out, leaving a central column of cleaner air. The collected water and contaminants at the bottom can be occasionally purged out by way of the cylinder’s original valve.
With a source of clean and dry air sorted, [Stephen] next wanted a way to get it around his shop. Using scrap metal pipes he puts together a system that not only gives him air where he needs it, but also increases the volume of compressed air he has available. By using large smooth metal pipes rather than something like flexible rubber hose, the plumbing puts very little resistance on air flow. The pipes therefore can be considered something of an extension of the compressor’s primary tank.
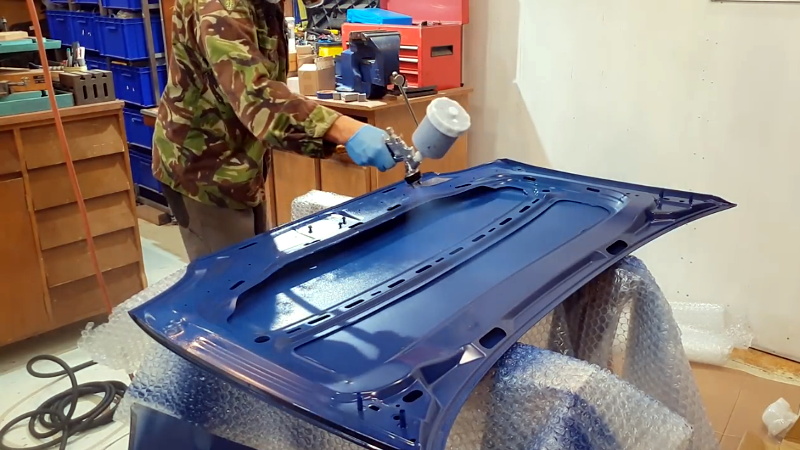
In the video after the break, [Stephen] shows off his new air system by laying down a very nice looking coat of paint on a car hood, but he also goes through the whole build process if you want to see the nuts and bolts of his system. He gives some great tips on welding and working with dissimilar metals which are worth the price of admission alone.
Outfitting the workshop with an integrated compressed air system sounds like the perfect second project to tackle once you’ve got the built-in dust collection system up and running.


You could also just go to Harbor Freight and buy an air compressor with a bigger tank for about the same price. Sure the quality isn’t very good, but if you’re only using it occasionally you’re not going to wear it out. And the bigger tank will likely have its own drain, and do the same job as the Co2 cylinder in the OP.
Two seconds of his accent told me that his nearest Harbor Freight store is close to me, about 3000 miles away from him. Confirmed by the electrical outlets.
Your point is valid though – a 10 gallon tank is cheap, and with his skills he could easily gang a couple up. I don’t quite get the level of effort needed for his “swirl tube” though – you can find affordable coalescing filters easily on ebay. A 10 micron particulate filter into a 4-6 micron coalescing filter followed by an adsorption filter, and he’d have nice dry clean air. his pipework is also overkill. Yes, reusing and recycling is great, but time is money. Stainless pipe in 2″ isn’t exactly cheap – he could have probably flogged it, bought an MaxAir pipe kit (or similar), saved a lot of time and hassle welding, and been left with cash at the end.
None of what he has done has really solved his problem though – cheap compressors are rated with a low duty cycle. Trying to run paint off of them might work for a quick job or two, but not for long. 10-25% duty cycle ratings are not uncommon.
” time is money”
The conversion rate between time and money varies by circumstances though.Typically you can’t make a dollar more by saving an hour of time – you just end up twiddling your thumbs.
Long story short- Use a dryer if you are spray painting. It has nothing to do with the compressor. If you want to spend a lot of money on an oil free scroll compressor, great, but you should be using a dryer anyway for best results.
Also, don’t spray paint outside or where theres wind, draft, dust or cold.
I’ve sprayed a couple of cars outside late on a still night….just keep the lights off until you spray and get it done fast; I was spraying primer and a flat single stage paint…they came out pretty decent for hotrods
insects
That’s why he said to keep the lights off until you spray so you don’t attract them.
Peter is right the keep the lights off until you spray and it’s not so bad…these were hotrods not “trailer queens” so a couple of gnats in the paint didn’t matter.
Unless you have an old cylinder kicking around you are probably better off getting a few HF accessories. I have built a nice little remote sir system. It has a regulator, an air dryer, an air filter and plumbing so I can use that air for a paint gun or run the air through an inline oiler for my nail guns and other air stuff that depends on oil in the air. I had a nice filter and dryer from something else and I think the oiler was all of $10 at HF plus I always use a 20% off coupon. Oddly enough I have second oiler. They come with a pair of 3/8″ to 1/4″ adapters. I needed a second set and buying a second oiler was the least expensive local option.
“but he also goes through the hold build process if you want to see the nuts and bolts of his system.”
hold process?
Years ago I fixed up a portable that was homemade and didn’t even have a shutoff when full just a gage and a relief valve. Besides putting the switch on I put 6 feet of copper tubing sprayed flat black on the head port to go to the filter which was inches away already on board. Coiled it by hand it looks like a still, hot at the start it’s cool before the filter. The filter catches a lot more crap now. Compressor mousse. Always open the drain petcock slowly and not much, when it farts oh!
Where I live (Germany) you can get decent old air compressors (25cfm and more) with 150 gallon tanks for scrap money or even free without any hassle. The classifieds are full of them.
Just make sure you thoroughly inspect the tank for rust on the inside and outside BEFORE pressurising it.
If that thing rips open at full pressure with you near – you’ll die.
Concur. When i was in the Navy I saw two deaths from HP air incidents. A lot higher pressure than a shop compressor, but still hard to forget.
To be honest I thought the compressor was going to crap out before it even charged the new improved system, one of the highlights for me was increased tube diameter to decrease air resistance, on a sub 20cfm compressor, and he really needs to learn how to spray paint properly instead of throwing it at things.
Just remember these are pressure vessels we are working with…
A cheap(er?) way to easily double your storage with a cheap compressor is to buy a [preferably used] portable air tank meant filling flat tires somewhere remote. They already have a gauge. A tee on the compressor line, a short piece of hose, your choice of connector options, and a likely reducer on the new tank will get it done. You can even use female quick comments on both ends and a male-to-male hose to keep the original function working. Optionally, add a cheap harbor freight, or other, regulator to the 2nd tank in-line with the source hose and you can semi-safely connect a tank of mismatched max pressure to prevent overfill. You could go nuts like that, but all the parts will add up over time a that cheap but larger option someone mentioned. And duty cycle becomes a problem too as every cycle will still be longer.
If considering this, finding someone that killed their own larger tank cheap-o compressor would he best option. Just scrap the hardware they burnt up and connect yours to the single larger tank, but remember duty cycle will still be a factor.
Before upgrading, I safely used the first option for years without any issues by keeping all factors in mind, but I had only modest needs. I didn’t use large sustained volume air tools or paint cars.
One warning about my 1st suggestion. Those cheap tire filling tanks WILL NOT have a petcock valve so any moisture that goes in will remain. I addressed that in my setup by using a male quick connector on the tank so when that I could invert the tank for a bit, disconnect the fill hose and being the lowest point now, use the air inside to blow out any moisture. I am sure it wasn’t perfect and it concerned me about longevity, but on a budget it was much better than not addressing the moisture. Naturally, you could add a dryer to the fill line but now you are really close to the cost of a larger unit.
I agree with Brian that you should be using a dryer anyway for best results. Thanks for the post.