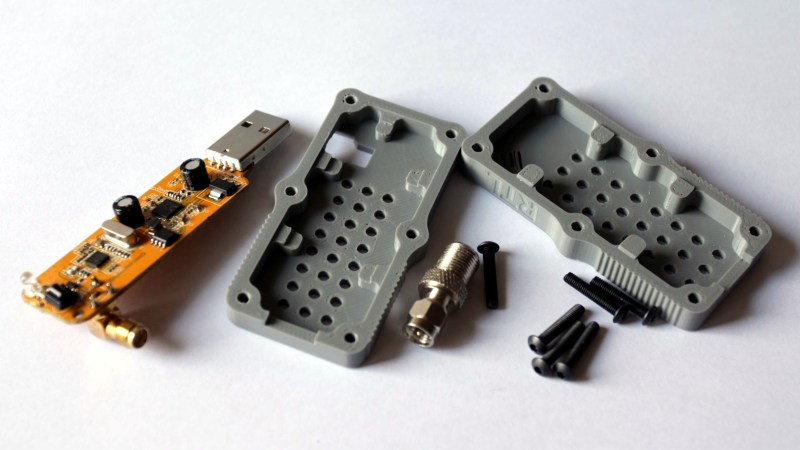
[ByTechLab] needed an enclosure for his R820T2 based RTL-SDR, which sports an SMA connector. Resolving to design and 3D print one in less than a day, he learned a few things about practical design for 3D printing and shared them online along with his CAD files.
The RTL-SDR is a family of economical software defined radio receivers, and [ByTechLab]’s’ enclosure (CAD files available on GrabCAD and STL on Thingiverse) is specific to his model. However, the lessons he learned are applicable to enclosure design in general, and a few of them specifically apply to 3D printing.
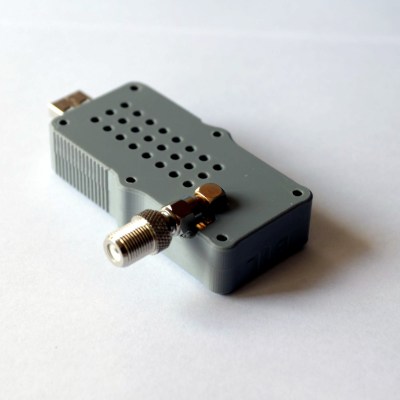
He started by making a basic model of the PCB and being sure to include all large components. With that, he could model the right voids inside the enclosure to ensure a minimum of wasted space. The PCB lacks any sort of mounting holes, so the model was also useful to choose where to place some tabs to hold the PCB in place. That took care of the enclosure design, but it also pays to be mindful of the manufacturing method so as to play to its strengths. For FDM 3D printing, that means most curved shapes and rounded edges are trivial. It also means that the biggest favor you can do yourself is to design parts so that they can be printed in a stable orientation without any supports.
This may be nothing that an experienced 3D printer and modeler doesn’t already know, but everyone is a novice at some point and learning from others’ experiences can be a real timesaver. For the more experienced, we covered a somewhat more in-depth guide to practical 3D printed enclosure design.
[ByTechLab]’s desire for a custom enclosure was partly because RTL-SDR devices come in many shapes and sizes, as you can see in this review of 19 different units (of which only 14 actually worked.)


The thing that stands out the most is the screws. Recessed screw holes to hide the heads would be better. Also, the screws may be unnecessary… Most things like this that I design can snap together with a latching mechanism. Screws are usually a waste unless there’s some important reason to have them
That would be true for a massed produced design, but for that, you wouldn’t 3D print anyway. For a “one off” or small run, and particularly if accessing the board after assembly is important, nothing wrong with screws.
In addition to your comment, 3D printers have a finite resolution where part tolerances can’t be maintained. Snap together housings usually have tabs and low profile receptocals for said tabs. Printing these would be difficult, and confirming their strength to hold up to even the first time engagement would be troublesome.
The thing that stands out the most is… the use of plastic!
This was the perfect opportunity to put some quality shielding around the tuner. Even a metallic spray paint on the inside would be an improvement.
This!
Now I always think components that generate or receive RF, intentional or otherwise should be enclosed in metal but when it comes to RTLSDR I think this is 100 x more true!
First, these tuners are cheap. Built for a price there isn’t much filtering in there. Second, they are very wide banded. Do you like the fact that they receive pretty much everything VHF and up? Yah, me too but that also means that any onboard amplification is also amplifying everything VHF and up. So… Most of the time your little tuner is bombarding itself with signals on frequencies that you aren’t even trying to receive. In order to protect itself it drops it’s gain thus weakening all signals including the one you want!
Are you using it with an upconverter? Even worse! Now it is purposefully receiving in the FM broadcast band where those upconverters usually convert the HF range to. There you are doubtlessly surrounded by large powerful transmitters even though the signal you actually want is something entirely different.
So, anyway.. do yourself a favor and mount your RTLSDR in a METAL box always! You will be glad you did.
The print quality looks more like SLA rather than FDM. With SLA one could design a snap-style enclosure with a bit of experimentation and calibration. Nice looking parts!
That works fine with fdm also. I do it a lot.
How small are the tabs you are creating? I have not been able to make one work at all. They end up too far out of tolerance and won’t engage. If I adjust my feed rate to reduce the plastic, it just breaks.
Maybe something is wrong with your machine in that case. Even a low-end printer should have no problem hitting 0.2 mm dimensional accuracy, which should be more than enough to make sure pieces snap together. Most models I’ve seen designed to snap fit assume a gap of around .5 mm between the pieces.