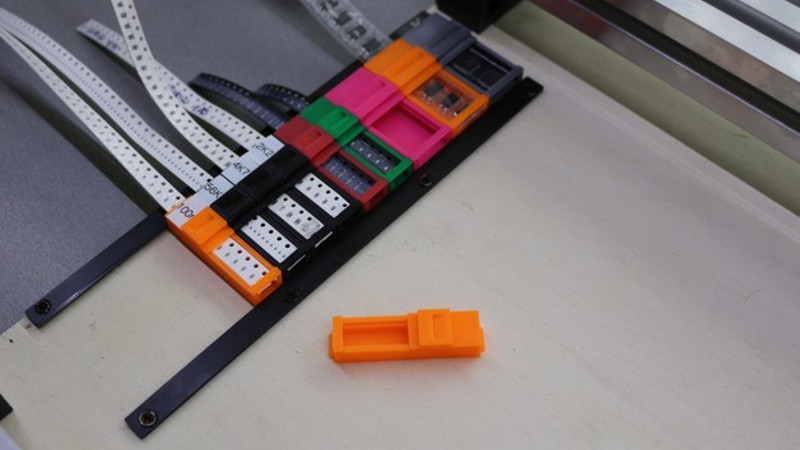
Making one of something is pretty easy, and making ten ain’t too bad. But what if you find yourself trying to make a couple of hundred of something on your home workbench? Suddenly, small timesavers start to pay dividends. For just such a situation, you may find these modular SMD tape feeders remarkably useful.
The tape feeders come in a variety of widths, to suit different size tapes. You’ve probably seen if you’ve ever ordered SMD components in quantity from Mouser, Digikey, et al. SMD components typically ship on large tape reels, which are machine fed into automated pick and place machines. However, if you’re doing it yourself in smaller quantities, having these manual tape feeders on your desk can be a huge help. Rather than having scraps of tapes scattered across the working surface, you can instead have them neatly managed at the edge of your bench, providing components as required.
The feeders are modular, so you can stack up as many as you need for a given job. Rails are provided to affix them to the relevant work surface. We’ve seen similar work before – like this 3D-printed bowl feeder for SMD parts.


I have a couple small PnP machines and do a lot of small runs. Great idea, but I can’t imagine it scaling well.
1) It’s difficult to pull components out of the tape recesses – even with high quality tweezers.
2) It seems more difficult to manage the amount of tape leader to pull back. With free cut-tapes or reels, I count with my eye, place my thumb at the correct spot, pull back the tape and dump. If I need 21 .1uF 0402 caps per board, getting exactly 84 off the tape per panel seems more difficult with this method.
3) Multiply by a couple hundred reels and a few thousand cut-tapes….and
That being said, I haven’t found a good solution for managing hundred of cut tapes yet. Stuff I use most often, I un-reel a few hundred parts at a time into a shot glass and then dump into a SMT component parts try from Jameco. With parts floating freely, they are easier to grab with tweezers. With parts I keep on reels that float back and forth to PnP slots, I have to keep at least 30cm of leader to feed to tensioners – which complicates parts management. I’ve even started keeping two reels of the most most used parts. One that stays mounted and one to feed the part trays.
If someone can workout a complete system for small batch assembly, I’m in!
Nevermind, I guess if you are using a hand-vacuum tool, it would be easier to pick parts of out recesses. But I just find tweezers faster. It’s probably just me.
It takes a lot of fiddling to set up and find the right sequence of motions, but I found a vacuum tool directly out of tape much easier when placing a few thousand 0603 LEDs by hand. The huge advantage here was a known orientation. For resistors and capacitors, I’m 95% in agreement with you. That 5% is flipping upside-down resistors over.
According to my experience, about 50% of the rsistors have to be flipped over, if you can not use them directly out of the tape. And I much more prefer a vacuum tool over tweezers when I populate a PCB for reflow soldering. It was self built from a small DC vacuum pump, a surgical needle, the tubing of an od i.v. drip set and a good dose of hotglue.
For hand soldering of course normal tweezers are quite good and I do this normally only for some components when I do changes during development work, never for a whole PCB.
Mike’s Electric Stuff did a few vid’s about SMD prototyping.
Since SMD tape holes / components every 4mm, you can simply measure the distance to get an exact amount of parts. Then put some pieces of double sided tape on your table or a piece of cardboard and put the pieces of tape on that before you remove the tape leader.
If you dump resistors & capacitors on a piece of (bit wobbly) paper, then you can first take out the rightly oriented ones, and then flip a number by tapping on the paper. This way you can turn multiple components with a single tap.
I’m using SMD boxes. When I get a cut tape, I dump them in a hole and label it with the part ID and value. Prototyping parts go to the large ‘mobile repair’ silicone mat with ‘screw slots’ and labelled with their part id’s. I’d rather deal with a bunch of R1, C2’s than fiddle with a tape and lookup values.
I’ve thought about getting a bunch of those little boxes from Aliexpress, but then I think back to my failed experiment in using tiny component drawers (that level of organization was too much for me). Do you use them for storage? Or only for building?
Here is one I did. Lego pins are 8mm apart, and the model snaps on a Lego sheet at half spacing so the same feeder can do all widths.
https://hackaday.io/project/160857-p1-lego-compatible-drag-feeder
Props for those thingiverse models. I have a python script which tells me if I should fire up the PnP or do by hand. Very often doing it by hand is faster.
Interesting! I assume that’s a function of quantity/variety/expected number of boards? Out of curiosity, what do you use for PnP?
The big drivers for both hand assembly and PnP assembly is the number of unique part types. With hand assembly the per-board rate stays flat. With PnP assembly the per-board rate goes down as you amortize the setup time over the size of the run. PnP setup time is also directly proportional to the number of unique part types. My PnP is a Manncorp MC-400
If these are for a pnp, where does all the empty reel/ tape go? Even hand picking, the empty tape would start to get in the way.