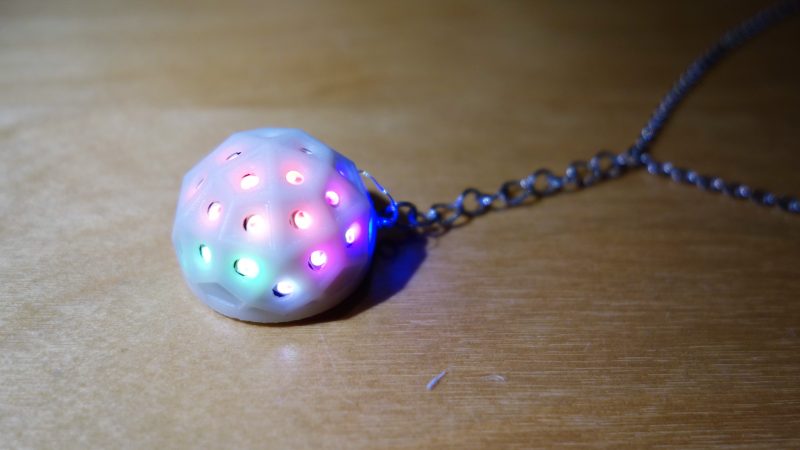
Trying to make a hemispherical surface out of a PCB is no easy feat. Trying to do that and make the result a working circuit is even harder. Doing it with one solid piece of FR4 seems impossible, right?
Not so much. [brainsmoke] came up with a clever way to make foldable, working PCBs that can be formed into hemispheres. The inspiration for this came from a larger project that resulted in a 32-cm diameter LED-studded sphere, which a friend thought would make a swell necklace if it was scaled down. That larger sphere was made somewhat like a PCB soccer ball, with individual panels soldered together. [brainsmoke] didn’t relish juggling dozens of tiny PCBs to make a necklace-sized version, so the unfolded pattern for half a deltoidal hexecontahedron was laid out as one piece on single-sided FR4. The etched boards were then cut out on a CNC mill, with the joints between the panels cut as V-grooves from the rear of the board. By leaving just enough material to act as a live hinge, [brainsmoke] was able to fold the pattern up into a hemisphere while leaving the traces intact. The process was fussy and resulted in a lot of broken FR4 and traces, but with practice and the use of thicker board material and heavier copper, the hemisphere came together. The video below shows the final product
This objet d’art is [brainsmoke]’s entry in the Circuit Sculpture Contest, which is just wrapping up wrapped up last week. We can’t wait to share some of the cool things people came up with in this contest, which really seemed to get the creative juices flowing.


Wouldn’t gluing FPC to a folded substrate work better? No risk of cutting through the 0.1mm tolerance.
Seriously, people, stop trying to inject practicality into projects presented here.—you’re missing the point! The more effort it takes the better! If it costs ten times as much as a solution purchased from China, well then, you’ve done your part to protect the trade balance. And, don’t forget the immortal hacker battle cry: “Today would be a good day to fail!”
Where do you get your flex PCBs so cheaply?
Misplaced reply?
If you didn’t mind having the resulting thingy somewhat larger, you could just solder a bunch of these into pretty much any shape you want. Parallel the common & power leads (they can provide mechanical structure), and chain the data leads in whatever order makes sense for your sculpture. A bit of insulating dope might be needed to avoid shorts if you pack the LEDs very close together.
https://www.aliexpress.com/item/PL9823-F8-8mm-round-hat-RGB-LED-with-PD9823-chipset-inside-full-color-frosted/1707244439.html
Edit: Not the URL I meant to use—there’s a smaller version which might make more sense for this sort of project.
https://www.aliexpress.com/item/PL9823-F5-5mm-round-hat-RGB-LED-with-PD9823-chipset-inside-full-color-frosted/1707244750.html
The most basic of soultions is usually the best. My thoughts: use a flat pcb with LEDs flush on the board. Mold light tubes/guides from acrylic or similar to fit the 3d shape desired
Someone on here posted that the more difficult and less practical the process the better. I wholeheartedly disagree … unless that process is applicable to something more useful to our society than a glowing necklace. If it is it would likely need to be tailored to the new application so much so that starting from scratch makes sense anyway.
Oh cool! And here I thought I was the first one to think of it! https://tinkrmind.me/2018/09/19/bending-pcbs/