We have semi-fond memories of string art from our grade school art class days. We recall liking the part where we all banged nails into a board, but that bit with wrapping the thread around the nails got a bit tedious. This CNC string art machine elevates the art form far above the grammar school level without all the tedium.
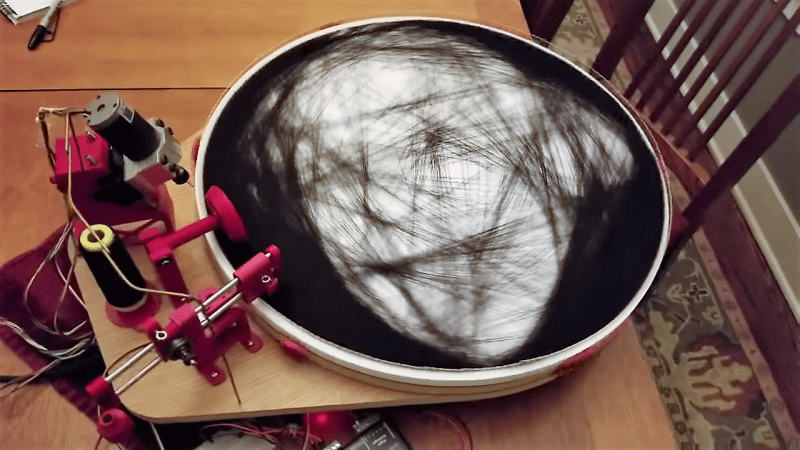
Inspired by a string art maker we recently feature, [Bart Dring] decided to tackle the problem without using an industrial robot to dispense the thread. Using design elements from his recent coaster-creating polar plotter, he built a large, rotating platform flanked by a thread handling mechanism. The platform rotates the circular “canvas” for the portrait, ringed with closely spaced nails, following G-code generated offline. A combination of in and out motion of the arm and slight rotation of the platform wraps the thread around each nail, while rotating the platform pays the thread out to the next nail. Angled nails cause the thread to find its own level naturally, so no Z-axis is needed. The video below shows a brief glimpse of an additional tool that seems to coax the threads down, too. Mercifully, [Bart] included a second fixture to drill the hundreds of angled holes needed; the nails appear to be inserted manually, but we can think of a few fixes for that.
We really like this machine, both in terms of [Bart]’s usual high build-quality standards and for the unique art it creates. He mentions several upgrades before he releases the build files, but we think it’s pretty amazing as is.
[via @Chris Gammell]


I am amused at the irony he invented makerslide but this project doesn’t use any for the linear axes.
I was wondering how he would deal with the thread buildup over time… I love the slanted nail method. Simple and effective.
Yeah, I think that extra roller visible in the featured image above gently pushes the thread down if the friction between it and the nail is too great. He doesn’t mention it in the video, but it makes sense. Simple but effective – imagine how complex a Z-axis to deal with that would be.
That extra roller turned out to not be needed, That was an earlier version. The base was also enlarged to fit the bigger stepper motor driver.
Lovely machine; nicely made.
very nice. Thank you for sharing!
A couple of ideas to achieve your desited additions…
* time lapse: you should be able to modify the python code to continue wrapping the string around every pin, and every XXX of them, continue until you move across the pin that you are using to “take a photo”. Actually, you could even try setting the zero-pin crossing switch to also trigger a camera. Assuming that you have enough lighting and you are using a camera/webcam that can take moving pictures, then you energize the pin to take a photo whenever it crosses. If you cannot take a non-blury picture with it moving at full speed, then you can slow it down to stop at that point.
* hinged assembly: you could also look at making a small raised vertical back, which could be used as a stand.
Hope this helps….
It’s not trivial to “pass start” every now and then: When the graphic you’re trying to make has a dark area in the top left, the machine will stay in that quadrant for quite lengthy stretches. Just going “the long way around” is not an option: The thread will go slack after you pass the midpoint.
Just take photos from directly overhead every n threads and store the angle the disc is at with the image. You could then rotate every image back before assembling the timelapse.
Great idea about the vertical back, I may make a modified version of the legs back there that accomplish that.
Thanks!
Great to see a well finished project. Beautiful execution. On the rubber wheels, how about rather putting a rubber mat down for the existing metal wheels to run on?
Great idea! Another inexpensive solution for rubber wheels is to buy a small section of latex tubing (available at most home centers, I think), then cut slices off it. I have used this technique for prop-savers on RC airplanes since the O-rings they typically come with are usually too stiff and tend to get brittle over time.
Or, a little less like rubber and a little more like plastic, a short ring of heatshrink sleeving over the bearings.
This has the usual high standard of innovation and build quality. As a recent purchaser and user of the ESP32 Development board and associated firmware i can vouch for it’s stability and reliability.
where can I buy this machine