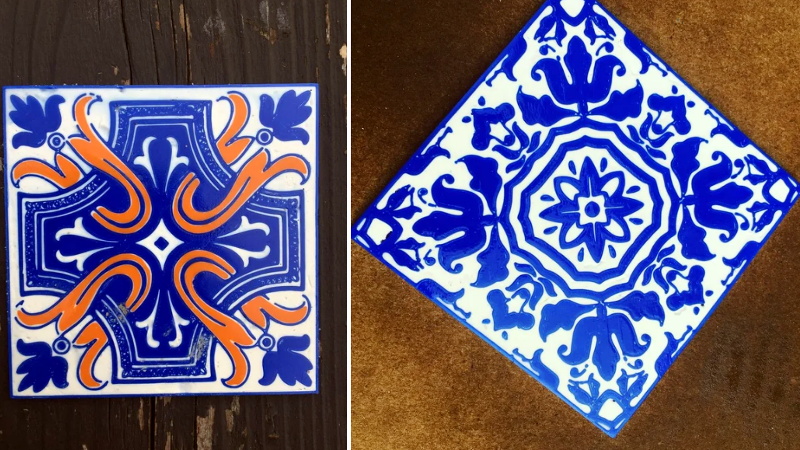
Where does your mind go when you think of 3D printed parts? Running off hard to find replacement components? Maybe spinning up a bespoke electronics enclosure? Occasionally the little boat that you can compare to the little boats of others online? All reasonable enough answers. But thanks to the work of [Matthew Wentworth], you might have a new mental image to associate with the smell of melting PLA: decorative Portuguese Azulejo tiles.
 As difficult as it might be to believe, the tiles you’re seeing here weren’t made on some exotic ceramic printer, but a standard Prusa i3 MK3. Well, at least they started on the 3D printer. As you might have guessed, there’s a bit more involved than that.
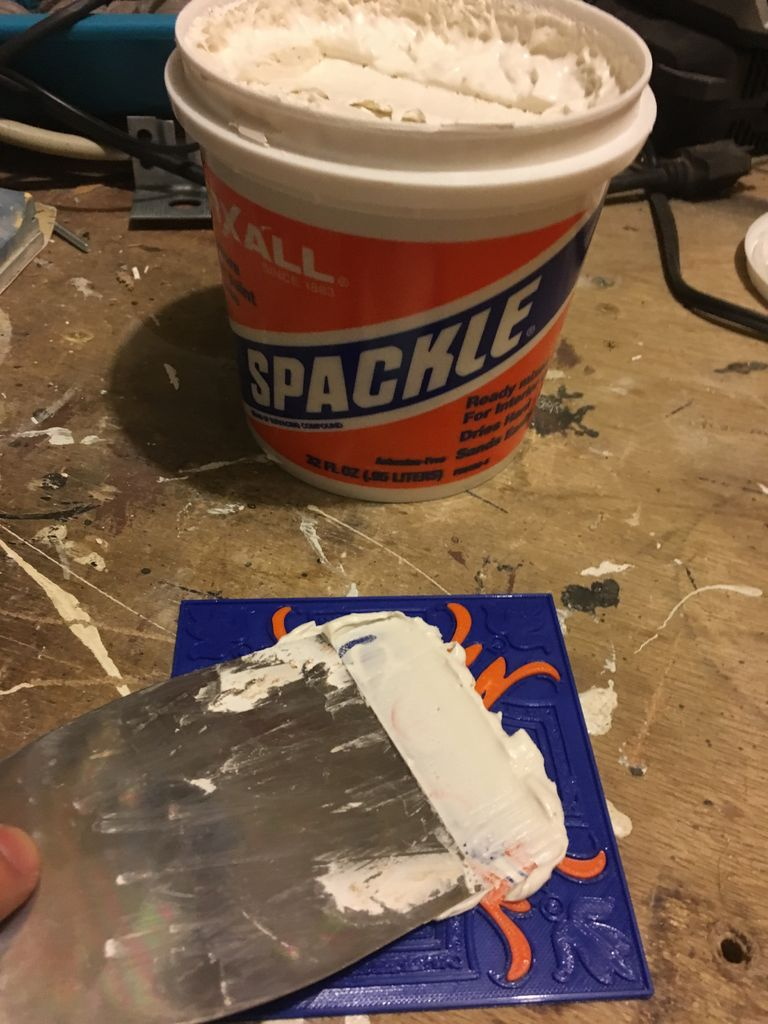
That said, the idea is actually quite simple. The printed “tile” is just the base plate, plus the raised elements that will eventually be seen on the surface. Everything else is just a void, which naturally saves a lot on printing time and material. Once the print is done, premixed spackling paste is pushed into all of the open areas and the top is made as smooth as possible with a putty knife. The filled tile is then left to dry for 24 hours or so.
Once it’s dried, you take the tile outside and sand the top down with a palm sander (or by hand, if you have the patience). This not only smooths out the spackle, but eventually will expose and then smooth the top parts of the print. Once everything is nice and silky, it gets sprayed with a semi-gloss clear coat to both protect it and give it that authentic looking shine.
[Matthew] actually created his designs based on images of real Azulejo tiles he found online, but really any sort of image that has raised elements like this could be made to work. If anyone out there decorates their home with 3D printed Jolly Wrencher tiles, you know where to send the pictures. Interestingly, these aren’t the first tiles we’ve seen made out of plastic, but we’ve got to admit these ones would look quite a bit more appealing on your kitchen walls.


Happy you like my work! Thanks for the awesome write up!
What is dry wall spackle, is it the joint compound known as mud.
It’s similar but not the same. Mid shrinks more as it dries
Did you know that “Azulejo” is the spanish word for “Tile”? Oddly enough Tile in portuguese is not “Azulejo”, is “Telha”. Next time you look for pictures for your tiles try to google “Azulejo español” or “Azulejo sevillano”; an you’ll find beautyful designs.
Azulejo in Portuguese is this specific type of tile… Telha is the generic word for tile anything from a roofing tile to floor tiles. So contrary to what you say Azulejo in Portuguese *is* a word for tile.
Is more a name, based on the spanish word for tile
Great idea, personally i would use the printed “raised” tile to create a flexible mold, fill it with a colored casting material (not an expert on making tiles) and then continue with the filling and and sanding/clearcoat. Depents on how many tiles you need ofcourse.
I agree with your assessment. These were proof of concepts to be backsplashes for some kitchen accent shelves I am building. So I am doing very low rate of production. If I were to do more than a couple per design I would do a mold.
“Once it’s dried, you take the tile outside and sand the top down with a palm sander” – you’d better not, there’s enough micro plastic in the environment as it is!
Assuming he used PLA (which he probably did), the plastic is technically biodegradable. And while typical PLA solid objects don’t degrade very quickly at all, PLA dust from sanding has a very high surface area and so should biodegrade in a reasonable time.
You are correct micro plastic is a problem, however this is not meant as a large scale operation, it’s to only do a few tiles at most. The second way to get around this is to use PLA or PETG plastic which in the right scenarios (specifically composting it) is biodegradable. I will admit the orange in one print was ABS so that causes an issue, but if I collect and properly dispose of the materials that are sanded off in post production the environmental effects should be minimal.
We also should put this to comparison, if I were to run a kiln to do this, the energy used in the firing of the tiles would be pretty heavy. Fortunately, with the process I used the sanding is 99% focused on removing the excess spackle and is less focused on the plastic. I do wonder if I could have used some form of white clay vs spackle.
Update: powdered PLA (which is what you get after sanding a 3D printed object) does biodegrade, although fairly slowly (~12% biodegradation of powdered PLA in 28 days in soil). So I’d say his conscience is clear.
Study:
“Degradation of Bioplastics in Soil and Their Degradation Effects on Environmental Microorganisms”
https://file.scirp.org/pdf/JACEN_2016022916204646.pdf
Wouldn’t the sanding process result mainly friction heating/melting rather than the creation of particles anyway?
I doubt the sanding process (even when I cheated on one of the tiles with an orbital) really got to the temperatures needed for the PLA to melt or deform much. The nozzle was set to 215 celsius when I was printing, and when I would touch the tile as I would check on it during sanding it was just warm so not even close to 100 celsius by my guess.
You might not be aware that not all articles published online meet the established standards of scientific rigor. Thanks to the infestation of academic publishing with corporate ownership intent on protecting their revenue streams, there has been a rise of predatory publishers using the “author pays” model of Open Access (online) publishing–in other words, the vanity press. Worse, there’s enough money in it, that scholarly information sharing that “names and shames” makes the people highlighting abusive publishers a target for predatory lawsuits. You might want to read this entry https://en.wikipedia.org/wiki/Scientific_Research_Publishing and draw your own conclusions about whether this article should be used as a reference.
The main thing I wonder about is the durability. Spackle isn’t great at that.
Dropped it multiple times on the floor (concrete) no visible issues. This is for accent reasons not for constant hits of a pot or pan on the counter or to walk on. The clear spray pain and plastic seem to help it stay together but a resin coat would be easier.
Try a sample kit of Smooth-On XTC-3D. A quick Google shows at least one US seller has the smallest kit for $11.21
At first first look at this, and the mention of a Kiln. I thought you where making a stamp or some sort applicator for glaze.
Great work Matthew! We need more out of the box ideas like this!
Thank you!
From the start take a gander at this, and the notice of a Kiln. I thought you were making a stamp or some kind of implement for the coating.