Electronic Catan Game Board Is Modular

Plenty of gamers around these parts require an expensive PC to play games, often spending thousands of dollars for a gaming machine. Believe it or not, though, there are entire classes of games that don’t require any electronics at all, but that doesn’t mean that they don’t benefit from the addition of some neat gadgets. This Settlers of Catan game uses custom LCD tiles with a built-in custom mesh network.

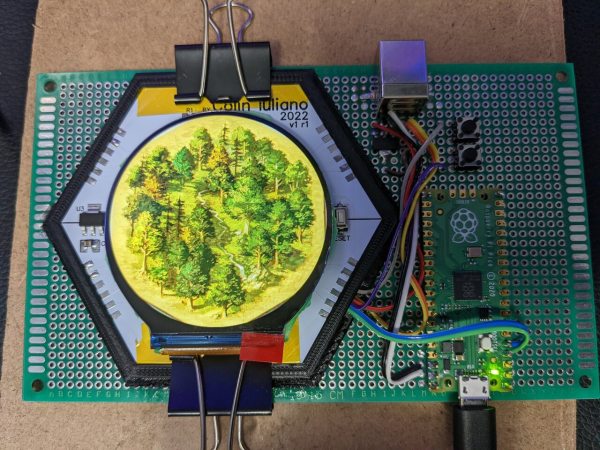
The tiles for the game board themselves are hexagonal and snap together using magnetic pogo pins in order to form a board of any size or shape. The pogo pins also allow communication for a pseudo-mesh network to operate with each tile’s built-in PCB to allow the game board to know exactly which tiles are placed where and to display the correct image on each one. Each tile contains it own RP2040 microcontroller, keeping the overall cost of each tile to a minimum.

For those regularly hosting game night, a project like this could really change the traditionally analog game’s dynamic for the better. It was mostly a project that [Colin Iuliano] built just for fun, and if he ever builds a second one he does plan on some improvements, but we’d say that it looks like a success already. For other Catan-based electronic design inspiration, take a look at this complete and non-modular electronic game board.

Tileable LED matrix

Tiny LED Matrix Panels Tile Together Perfectly

There’s a lot to admire about LED matrix projects, which more often than not end up looking really cool. But most of them rely on RGB matrix panels sourced from the surplus market, and while there’s nothing wrong with that, building your own tiny, tileable LED matrix panels makes these builds just a little bit cooler.

There’s a lot to admire about these matrix panels, not least of which is the seamless way they tile together. But to get to that point, [sjm4306] had a lot of prep work to do. He started with a much simpler 5×7 array, using the popular WS2812 RGB LEDs on a custom PCB. With a little practice under his belt, it was time to move to the much smaller SK6805 LEDs, which were laid out in an 8×8 matrix. The board layout is about as compact as it can be; [sjm4306] reports that it pushed the PCB fab to their limits, but he ended up with LEDs spaced perfectly on the board and just enough margin to keep consistent spacing in two dimensions when the boards are adjacent to each other.

Assembly of the boards was challenging, to say the least. The video below shows that the design left barely enough room for handling the LEDs with tweezers, and some fancy finagling was needed to get the boards on and off the hotplate for reflow. [sjm4306] says that he’ll be exploring JLC PCB’s assembly service in the future, since each board took an hour for him to assemble. But they look fantastic when daisy-chained together, with no detectable gaps at the joints.

With matrices like these, the possibilities are endless. We’ve even got a whole list of LED matrix projects over on Hackaday.io for you to check out.

Continue reading “Tiny LED Matrix Panels Tile Together Perfectly”

Triangle Tiles Form Blinky Networks Using Clever Interconnects

We love to see LEDs combined in all shapes and sizes, so we were especially ticked when we caught a glimpse of [Debra Ansell]’s (also known as [GeekMomProjects]) interlocking triangular TriangleLightPanel system glowing on our screen. This unusually shaped array seemed to be self supporting and brightly glowing, so we had to know more.

The TriangleLightPanel is a single, triangular, light panel (refreshing when everything is in the name, isn’t it?).  Each panel consists of a single white PCBA holding three side-firing SK6812 LEDs aimed inward, covered by transparent acrylic. When the LEDs are doing their thing, the three-position arrangement and reflective PCB surface does diffuses the light sufficiently to illuminate each pane — if not perfectly evenly — very effectively. Given the simple construction it’s difficult to imagine how they could be significantly improved.

The real trick is the mechanical arrangement. Instead of being connected with classic Dupont jumper wires and 0.1″ headers or some sort of edge connector, [Debra] used spring contacts. But if you’re confused by the lack of edge-plated fingers think again; the connectors are simple plated strips on the back. There is a second PCBA which effectively acts as wires and a surface to mount the spring contacts on, which is bolted onto the back of the connected leaves to bridge between each node. The tiles need to be mechanically connected in any case, so it’s a brilliantly simple way to integrate the electrical connection with the necessary mechanical one.

All the requisite source files are available on the project’s GitHub page and the original Tweets announcing the project are here for reference. We can’t wait to see what this would look like with another 30 or 40 nodes! Enterprising hackers are already building their own setup; see [arturo182]’s 24 tile array glowing after the break.

Continue reading “Triangle Tiles Form Blinky Networks Using Clever Interconnects”

DIY Grout Cleaning Machine Does A Good Job

Cleaning tiled floors can be a drag. Getting the tiles themselves clean is bad enough, but often dealing with the grouted joints in between requires more elbow grease and attention to detail. It’s a tedious chore, and thus one ripe for improvement. [Elite Worm]’s cleaning machine is an excellent solution to the problem.

The machine is built entirely from scratch, using primarily 3D printed components. A fluid tank is fitted to the chassis, along with a custom 3D-printed pump run by a DC motor, to deliver cleaning product where its needed. A large DC motor is then used to spin a nylon brush which gets deep in the tile grooves to clean out the grime. The chassis is then fitted with rollers to allow it to glide along the floor. Finally, a handle is fitted which allows the user to push the tool along, with switches to turn on the spinning brush and dispense cleaning fluid.

It’s a great tool, and one which eliminates hours of scrubbing on hands and knees. We’re sure the time investment in the build will pay off before long. We’ve seen other tricky cleaning hacks before, too. Video after the break.

Continue reading “DIY Grout Cleaning Machine Does A Good Job”

Over-Engineered Cat Door Makes Purrfect Sense

On paper, pet doors are pretty great. You don’t have to keep letting the cat in and out, and there should be fewer scratches on the door overall. Unfortunately, your average pet door is indiscriminate, and will let any old creature waltz right in. Well, [Jeremiah] was tired of uninvited critters, so he built a motorized door with a built-in bouncer. Now, only animals with pre-approved BLE tags can get in.

The bouncer is a Raspi 3 running Node-RED, which scans continuously for BLE advertisements from the cats’ collars. [Jeremiah] settled on Tile tags because they’re reliable and cat-proof. The first version used an Arduino and RFID tags for the cats, but they had to get too close to the door to trigger it.

We love [Jeremiah]’s choice of door actuator, a 12V retractable car antenna. [Jeremiah] uses the antenna itself to lift and lower the removable lockout panel that comes with the door. He removed the circuit that retracts the antenna when power is lost, so that power outages don’t become free-for-alls for shelter-seeking animals.

There’s also a nice feature for slow creatures—the door won’t close until 15 seconds after the last BLE ad, so they cats won’t ever have to Indiana Jones it through the opening. Magnetic switches currently limit the door travel at the top and bottom, though [Jeremiah] will eventually replace them with standard switches. Paw at the break until you get a walk-through video.

Cats will be cats, and the ones that go outside will probably rack up a body count. Here’s a cat door that looks for victims clenched between cat jaws and starts a 15-minute lockout period.

Continue reading “Over-Engineered Cat Door Makes Purrfect Sense”

Forget The Kiln, These Tiles Were Made On A Prusa

Where does your mind go when you think of 3D printed parts? Running off hard to find replacement components? Maybe spinning up a bespoke electronics enclosure? Occasionally the little boat that you can compare to the little boats of others online? All reasonable enough answers. But thanks to the work of [Matthew Wentworth], you might have a new mental image to associate with the smell of melting PLA: decorative Portuguese Azulejo tiles.

As difficult as it might be to believe, the tiles you’re seeing here weren’t made on some exotic ceramic printer, but a standard Prusa i3 MK3. Well, at least they started on the 3D printer. As you might have guessed, there’s a bit more involved than that.

That said, the idea is actually quite simple. The printed “tile” is just the base plate, plus the raised elements that will eventually be seen on the surface. Everything else is just a void, which naturally saves a lot on printing time and material. Once the print is done, premixed spackling paste is pushed into all of the open areas and the top is made as smooth as possible with a putty knife. The filled tile is then left to dry for 24 hours or so.

Once it’s dried, you take the tile outside and sand the top down with a palm sander (or by hand, if you have the patience). This not only smooths out the spackle, but eventually will expose and then smooth the top parts of the print. Once everything is nice and silky, it gets sprayed with a semi-gloss clear coat to both protect it and give it that authentic looking shine.

[Matthew] actually created his designs based on images of real Azulejo tiles he found online, but really any sort of image that has raised elements like this could be made to work. If anyone out there decorates their home with 3D printed Jolly Wrencher tiles, you know where to send the pictures. Interestingly, these aren’t the first tiles we’ve seen made out of plastic, but we’ve got to admit these ones would look quite a bit more appealing on your kitchen walls.

Using a Tile as a car tracker

Turning A Tile Into A Car Tracker

A Tile is a small Bluetooth device which you can put on your keychain, for example, so that you can find your keys using an app on your phone. Each Tile’s battery life expectancy is one year and after that year you’re expected to trade it in at a discount for a new one. Right away your hacker senses are tingling and you know what’s coming.

Hacked tile with buck converter

[Luis Rodriguez] had switched to Samsung SmartThings and had accumulated box of these Tiles with dead batteries. So he decided a fun project would be to put a Tile in his wife’s car to track it. Given that it’s using Bluetooth, the range isn’t great for car tracking, but the Tile’s app can network with other user’s apps to widen the search area.

Since the Tile’s battery was dead, he cracked it open and soldered wires to its power terminals. He then found a handy 12 volt source in the car and added a DC to DC buck converter to step the voltage down to the Tile’s 3 volts. Finding a home for the hacked tracker was no problem for [Luis]. He was already using an ODB-II dongle for a dash cam so he tapped into the 12 V rail on that.

You’ll be surprised what you can find by hacking these small tracking devices. Here’s an example of hacking of a fitness tracker with all sorts of goodies inside.

Our thanks to [Maave] for tipping us off about this hack.